
DIY Personalized Lunch Bags With Cameo & Sketch Pens

You won’t believe how easy these lunch bags were to make! Let me show you how!
First I took a regular brown lunch bag and measured it. Mine were about 5 inches by 11 inches. I adjusted my material size in my Cameo software to make sure the design would fit on the bag.

Next I browsed the Silhouette Online Store for sketch designs that I could use for my lunch bags. There are a lot of fun designs to choose from! To select all sketch designs, simply adjust the filters on the website:

Click update filters and it should bring up all the sketch designs in the online store that are available for purchase.
TIP: Look for SIMPLE designs. The more sketch lines you see, the more the sketch pen will go over your bag and the more likely it is that it will tear. Remember, lunch bags are thin! For this project, I used the snow princess sketch from the Silhouette Online Store. It looks like a certain princess from a very popular Disney movie that my daughter happens to love! I know it might seem like a complicated sketch, but there aren’t a lot of lines that overlap here:

By comparison, these apples, while I LOVE the design, are much too complex to go on a bag. I tried this design and the sketch pens sketched so much, it cut right through the bag. See how the lines are really close to each other? That doesn’t preform well on a paper lunch bag:

I took my brown lunch bag and put it face up on the mat so the bottom flap was stuck to the mat. I taped the bottom of the bag to the mat, just to try to make it less bulky.

Next I put in a Silhouette Sketch Pen in where the blade would go normally. The Silhouette Sketch Pens pop right in and you don’t need a pen holder. If you have the Chomas Pen Holder– you can use any writing utensil that fits (think of the possibilities there!).
Next I sent my design to my Cameo. TIP: Set the thickness of your material to as high as it will go. This will prevent your pen from pushing down too hard and tearing your bag. Setting the thickness of the material higher will tell the machine to not push down as hard on the pen.

After I adjusted the settings, I let the whole design sketch out.
TIP: Leave some space at the top of the bag when designing your image so you have room to fold the bag over.


I made a couple more bags, to add variety:
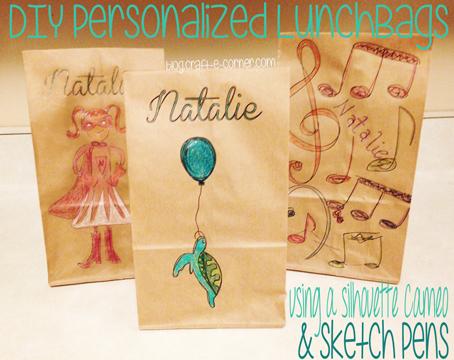
She really enjoys seeing what her lunch bag looks like everyday. And yes, she’ll use it and then probably throw it away, but sometimes the best art is the kind that is only temporary!
Will YOU be giving this project a try? Think of all the possibilities of what you can sketch on a simple bag. Take this idea and make goodie bags for birthday parties, cookie exchanges, gift bags and more!

FEATURED SALES


