
Free Shipping
On Orders $49+
On Orders $49+

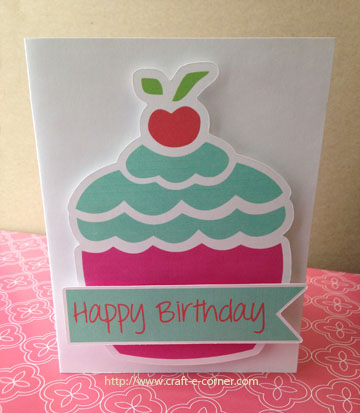
Learning how to do Print and Cut with your Silhouette machine will open up such a wide range of things you can do with your machine! I created this card with a few simple Print and Cut images:
There are two ways to use the Print and Cut function with your Silhouette machine.
This post will cover how to work with files that you purchase, but you can check out Silhouette 102: How to Create Print and Cut Designs, From Scratch! if you’d like to make your own!
When you have purchased a Print and Cut file, you will need to download the file and save it somewhere convenient on your computer.
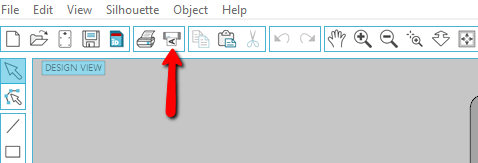
Once you have downloaded your image, open your Silhouette Studio then go to File–> Open and find your file you have saved. This will bring your image into Silhouette Studio. Next, click on the Registration Mark Window:

I have always used the default settings, but you can change it up if you’re feeling adventurous!
Once you click on the Registration Window, select the Style that you would like to use from the drop down box. The options are: Off, Type 1 (Cameo, Portrait, Curio) or Type 2 (Original, SD):
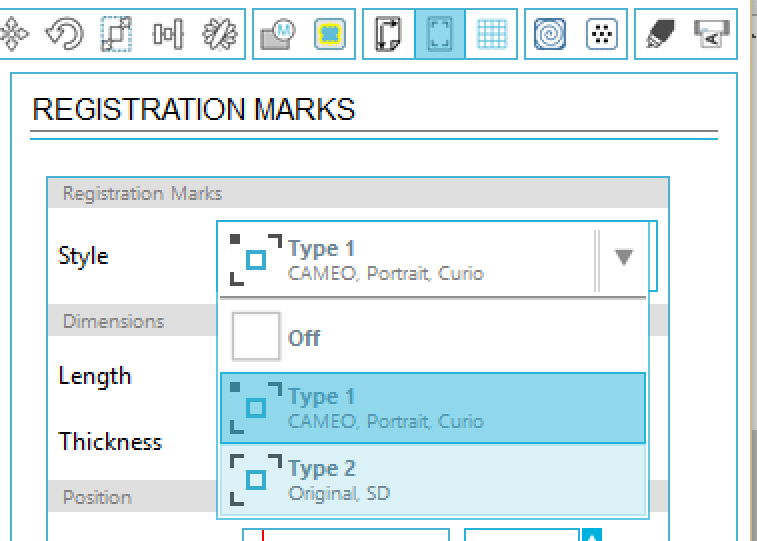 I am using my Silhouette Cameo, so I picked Type 1.
This will add the Registration Marks to your work space. There are a few different pieces to the Print and Cut window, so I thought it might be helpful to diagram it out for you:
 The large gray box in the background is your Silhouette Cutting Mat. The white box on top of the Silhouette Cutting Mat is your material (in this case, I am going to use a piece of 8.5″ x 11″ cardstock). You can adjust both of these settings by clicking on the Design Page Settings window where “Page Size” is your material:

Next, ensure that you are positioning your image correctly. You will need to pay attention to two things on your work area:
1) The red outside box: This is the cut border for your material. Nothing outside the red box will cut, even if it contains cut lines.
2) The cross hatch area: This area is an area that the Print and Cut function looks at and you’ll want to keep anything that is printable outside of the cross hatch area (cut lines inside the cut area is okay, however).
For example:

The blue flower tag on the left will not work because the printing area is inside the cross hatch area. The orange flower tag on the right is okay though, because the printable area is outside the cross hatch area, though there are cut lines within the cross hatches. If in doubt, just keep everything you’re working on outside of the cross hatches.
Once you have your design situated, click the Send to Printer button:

Note: You will need to have a printer either connected to your computer or you will need a networked printer to use, the Silhouette Cameo does not do the actual printing.
Your printer will print off a sheet with your printable file and some registration marks. Notice that the gray hatch marks are not printed.

Place the printed paper in the upper left hand corner of your cutting mat. Be careful to aligning it straight (follow the grid marks on your cutting mat). Load your cutting mat into your machine.
Next, click the Send to Silhouette Button:
The machine will read the printed Registration Marks. If your machine is having problems finding the Registration Marks, you will have to trouble shoot it (more on that in a different post).
Once your machine reads all three Registration Marks, it will begin to cut out your designs:

To finish off my card, I cut a piece of white card stock for my card base. I added foam adhesive dots to the back of the cupcake so it wouldn’t be flat on the card base. Next I put more foam adhesive dots on the back of the Happy Birthday banner to make it pop it off the cupcake and give the card dimension:

This was such a simple and easy card! Doing Print and Cut is like making making your own die cut embellishments!


Leave a comment