
How to Align and Size Iron-On Designs on T-Shirts

Mastering Iron-on Heat Transfer Vinyl (HTV): Sizing, Placement, and Beyond
Cricut iron-on heat transfer vinyl, also known as HTV, is a versatile material for creating personalized designs on various garments. Whether you're decorating t-shirts, baby onesies, or any other fabric, using iron-on vinyl opens up a world of creative possibilities. In this comprehensive guide, we'll not only discuss general guidelines for sizing and placement of iron-on designs but also provide additional insights to ensure your HTV projects turn out perfectly.
Starting with the Basics:
Choosing the Right Tools and Materials: Gather your tools, such as a weeder tool, ruler, Cricut cutting machine, Cricut EasyPress or household iron, and your favorite Cricut iron-on material (everyday, glitter, holographic and more).
Design Software: Create or import your design into free Cricut Design Space software. This is where you'll set the dimensions of your design. Add a shape to your Design Space canvas in the size needed to scale your design with ease and accuracy.
Cutting and Weeding Process: Follow Design Space prompts to make the project. Ensure your machine is in good condition, and the blade is clean and sharp. Then weed your design. Cricut weeder tools make it easy to remove the excess iron-on vinyl, leaving behind your intended design.
Pre-Heating the Garment: Prepare your garment by pre-heating it before applying the iron-on. This crucial step helps eliminate wrinkles and any lingering moisture, resulting in better vinyl adhesion. A few seconds with your EasyPress heat press machine or iron will do the trick.
Temperature and Pressure: Different iron-on materials have specific temperature and pressure requirements for successful adhesion. To ensure your design stays put, be sure to follow the recommended iron-on settings indicated in Cricut's Heat Guide. This guide eliminates all guesswork and ensures a long-lasting design.
Layering HTV: For those multi-layered iron-on designs, mastering the order and application technique is crucial. Start with the bottom layer and work your way up, ensuring each layer adheres perfectly to avoid any alignment mishaps. See the layering technique in action in our post, How to Layer Cricut Iron-On Vinyl.
Sizing and Placement for Different Garments:
Adult Shirts:
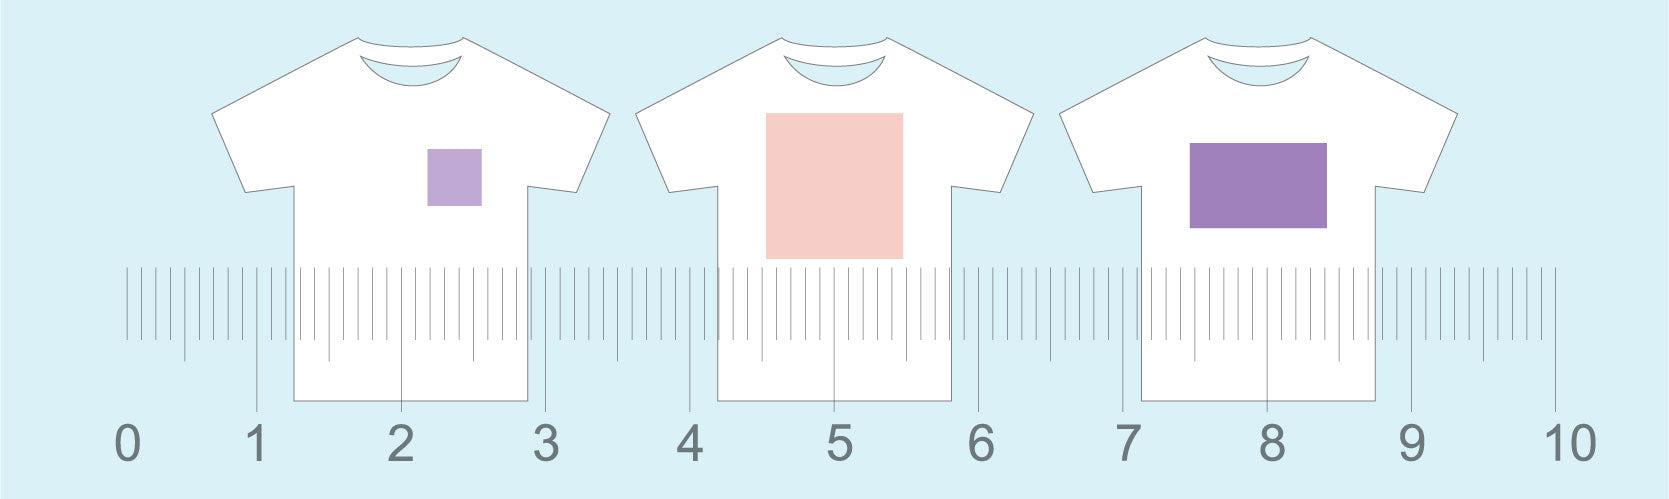
The size of your iron-on design on an adult shirt typically ranges from 11 to 14 inches in width. However, consider adjusting the size based on the shirt's dimensions. For example, if you are working with a women's fitted shirt, you may want to use a smaller design that is between 9 and 11 inches wide.
To determine placement, fold the shirt in half and make a crease down the middle with your iron or heat press. Then, fold your design in half (fold the non-sticky sides together and make a small crease in the middle of the backing sheet). Align the creases for a centered look.
For a reference point, start by lining up the design with the bottom seam of the shirt sleeves. Adjust based on the design's height and your preferences. If you have a tall skinny design, you can measure about 3 inches down from the collar for top placement on most adult shirts.
If your shirt has a pocket that you want to put a design on, consider that most pockets are 3.5-5.5 inch square. If you are adding a design to a shirt with a pocket, that is not incorporated into your design, you can usually just pretend the pocket is not there and line up your design as outlined above.

Kids Shirts:
HTV designs for kids' shirts should be between 5.5 and 9 inches wide, but adapt as needed based on the shirt's size. The placement process mirrors that of adult shirts. Fold the shirt and the HTV design in half, align the creases, and adjust the height as required. Start by lining up the design with the bottom seam of the shirt sleeves. If you have a tall skinny design, you can measure about 2 inches down from the collar for top placement on most kid's shirts.
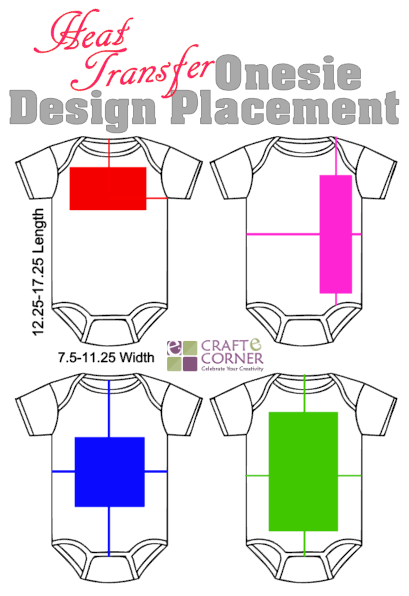
Baby Onesies:
Baby onesies come in various sizes, typically ranging from 7.5 to 11.25 inches wide and 12.25 to 17.25 inches tall. Adapt your design to fit within these dimensions. In general, you should aim for a design that is between 3 and 5 inches in width for a small onesie (0-3 months) and between 5 and 7 inches in width for a larger onesie.
To help with placement, it can be helpful to crease the onesie in half both horizontally and vertically. This will give you "cross hairs" that you can use to align your design. It's also worth noting that the placement of the design may vary depending on the shape of the design. The diagram below provides some helpful ideas on alignment options for different shaped designs.
Additional Considerations:
Sizing and placement are crucial, but there are more factors to consider:
Heat Transfer Vinyl Types: Different iron-on types have distinct stretching capabilities and heat resistance. Be aware of these characteristics, especially when working with stretchy vinyl or unique finishes. For example, if you're using a stretchy vinyl for a shirt, you may want to consider placing the design closer to the center of the shirt to account for the stretching that may occur when the shirt is worn.
Obstacles on Garments: Seams, buttons, or pockets can impact design placement. Adjust accordingly to avoid overlap or awkward placement.
Overall Aesthetics: Consider the visual impact you want to achieve. A larger design can be bold and eye-catching, while a smaller one offers subtlety. A design that looks great on an adult-sized shirt may be overwhelming or difficult to see on a baby onesie. Similarly, a design that looks great on a smaller shirt may not have the same impact on a larger shirt.
Testing and Experimentation: When in doubt, test your design on scrap material or a spare garment to ensure it meets your expectations. Remember that practice and experimentation will lead you to the perfect sizing and placement for your designs every time.
Caring for Your Iron-on Vinyl Creations:
Lastly, it's essential to know how to care for your HTV-decorated garments to ensure longevity and vibrant designs. With proper care, Cricut's Everyday Iron-On with StrongBond Guarantee outlasts 50+ washes:
- Allow 24 hours after application before washing.
- Wash and tumble dry inside out.
- Do not bleach.
- If you need to iron, only iron on the backside of the garment.
With these comprehensive insights and a bit of practice, you'll be well on your way to mastering the art of working with iron-on heat transfer vinyl. Your custom creations will stand out and delight everyone who sees them. Enjoy your crafting journey, and don't hesitate to share your own tips in the comments below!
FEATURED SALES


13 comments
Hello Kim,
I would measure the area with a tape measure on the shirt itself to come up with the correct measurements for the size of the shirt and the design.
I am new to Cricut and want to make a Valentines t-shirt. My t-shirt is an adult Gildan soft style 2XL what would be the measurements that I would make it on my design space canvas.
Thank you,
Kimberly Cook
Ashley, I would measure the space you have for the back of the shirt and make your decisions that way. But, you could roughly use the same size as the front. I would then find the center of the shirt by folding it in half. Vertical placement will depend on where you are wanting it. but keep in mind that if you want it to be seen for someone with long hair you will want to move it down a bit.
Samantha, I would measure the pocket size and create a shape inside Design Space with those measurements. Then you can create your design in that shape. You will know for sure then that it will fit.
What would be the letter size to put words on a pocket? Along with an image?