
How to Fix Iron-On Heat Transfer Vinyl (HTV) Mistakes

Mistakes are an inevitable part of life and crafting. When working with iron-on HTV, errors can be especially frustrating. Nobody likes to waste supplies, particularly heat transfer vinyl. In this guide, we'll explore how to address common HTV mishaps and provide you with a detailed step-by-step approach to fix these mistakes.
Materials You'll Need
- Embossing Heat Tool: An essential tool for heating and removing iron-on.
- Tweezers: Precise tweezers will help you lift off the vinyl sections.
- Hook or Weeder Tool: A handy instrument for safely peeling off iron-on from fabric. Get a weeder tool here.
- Heat Transfer Vinyl Remover: This can be helpful in removing any adhesive residue.
Safety First
When using tools like heat guns or irons, exercise caution to prevent burns, and ensure you're working in a well-ventilated space.
Step-by-Step Instructions:
Now, let's dive into the detailed process of fixing common iron-on mistakes, including visuals to guide you along the way.
Mistake/Fix #1 - Shifting Layers
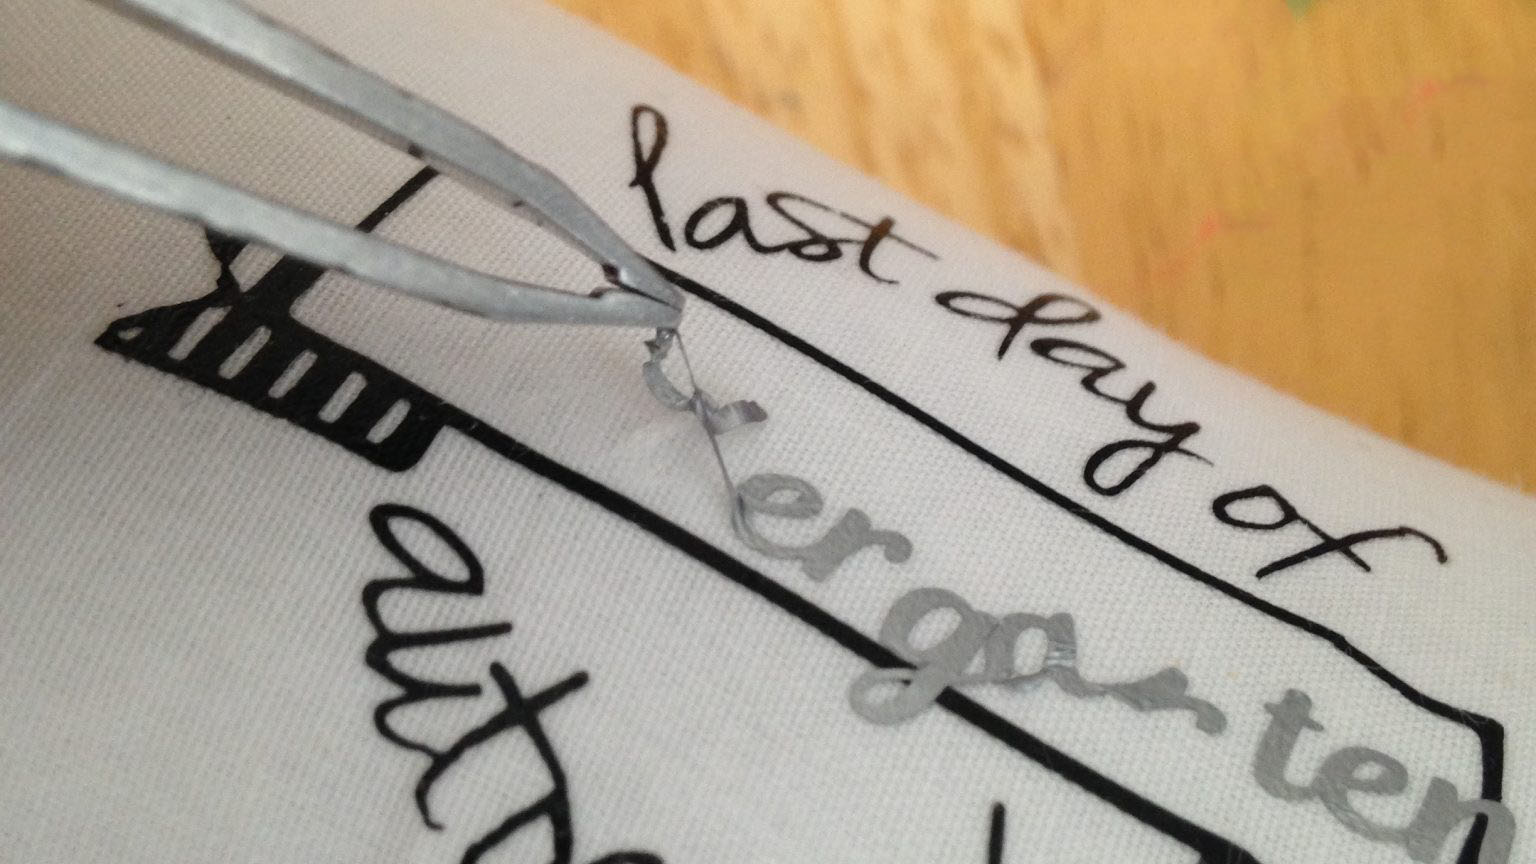
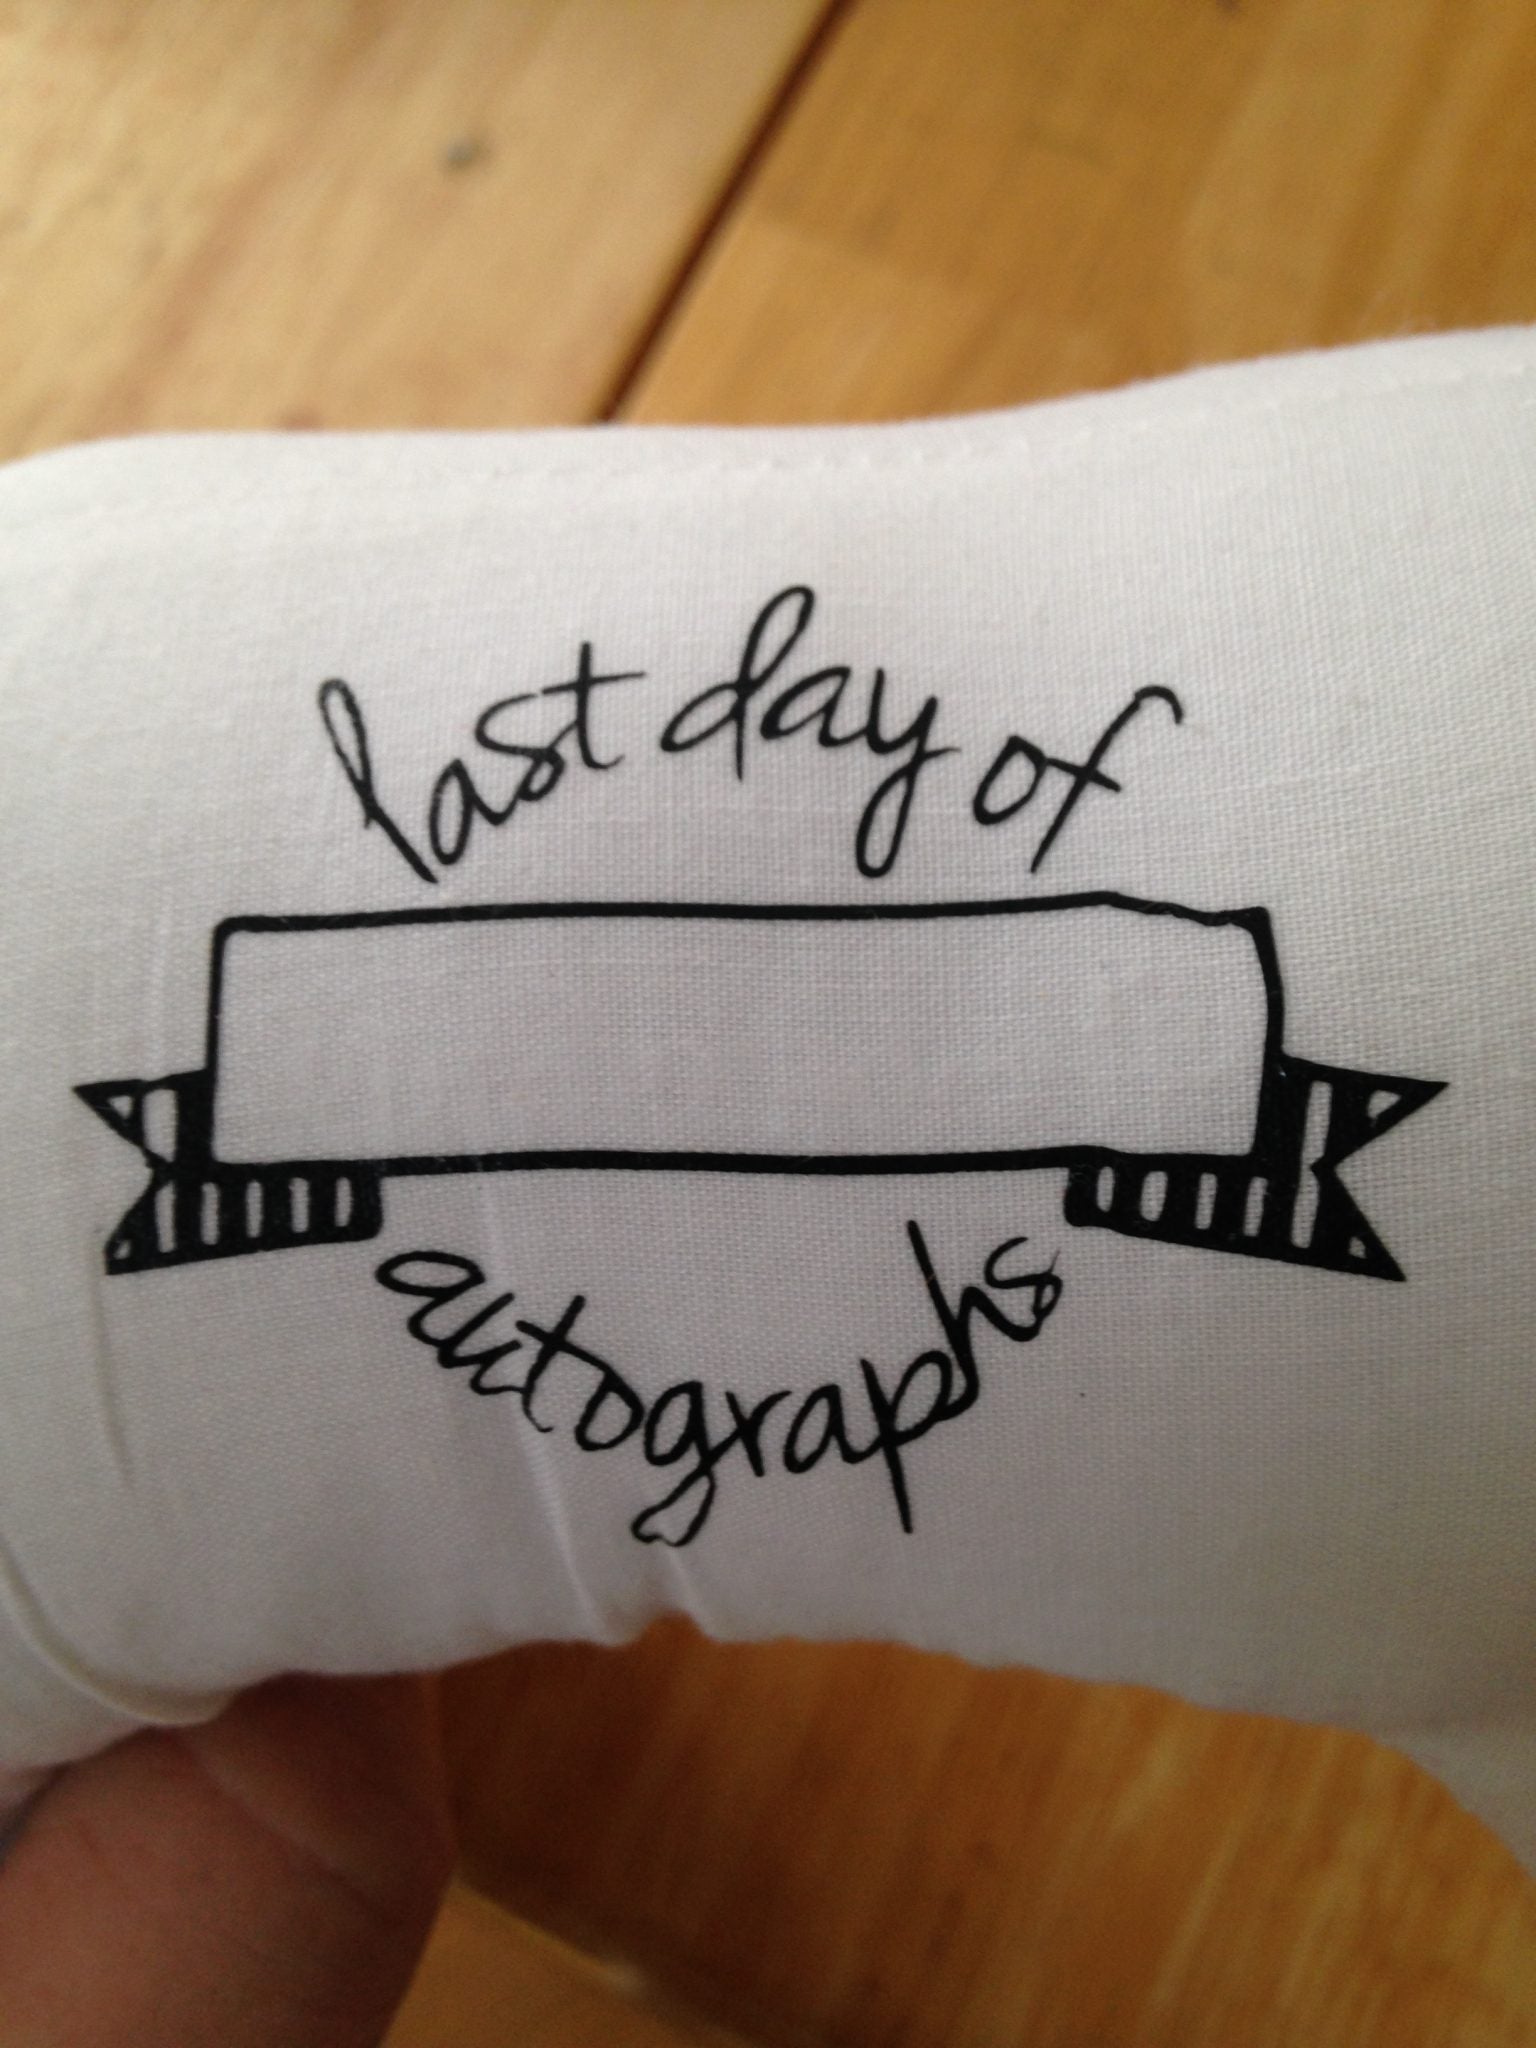
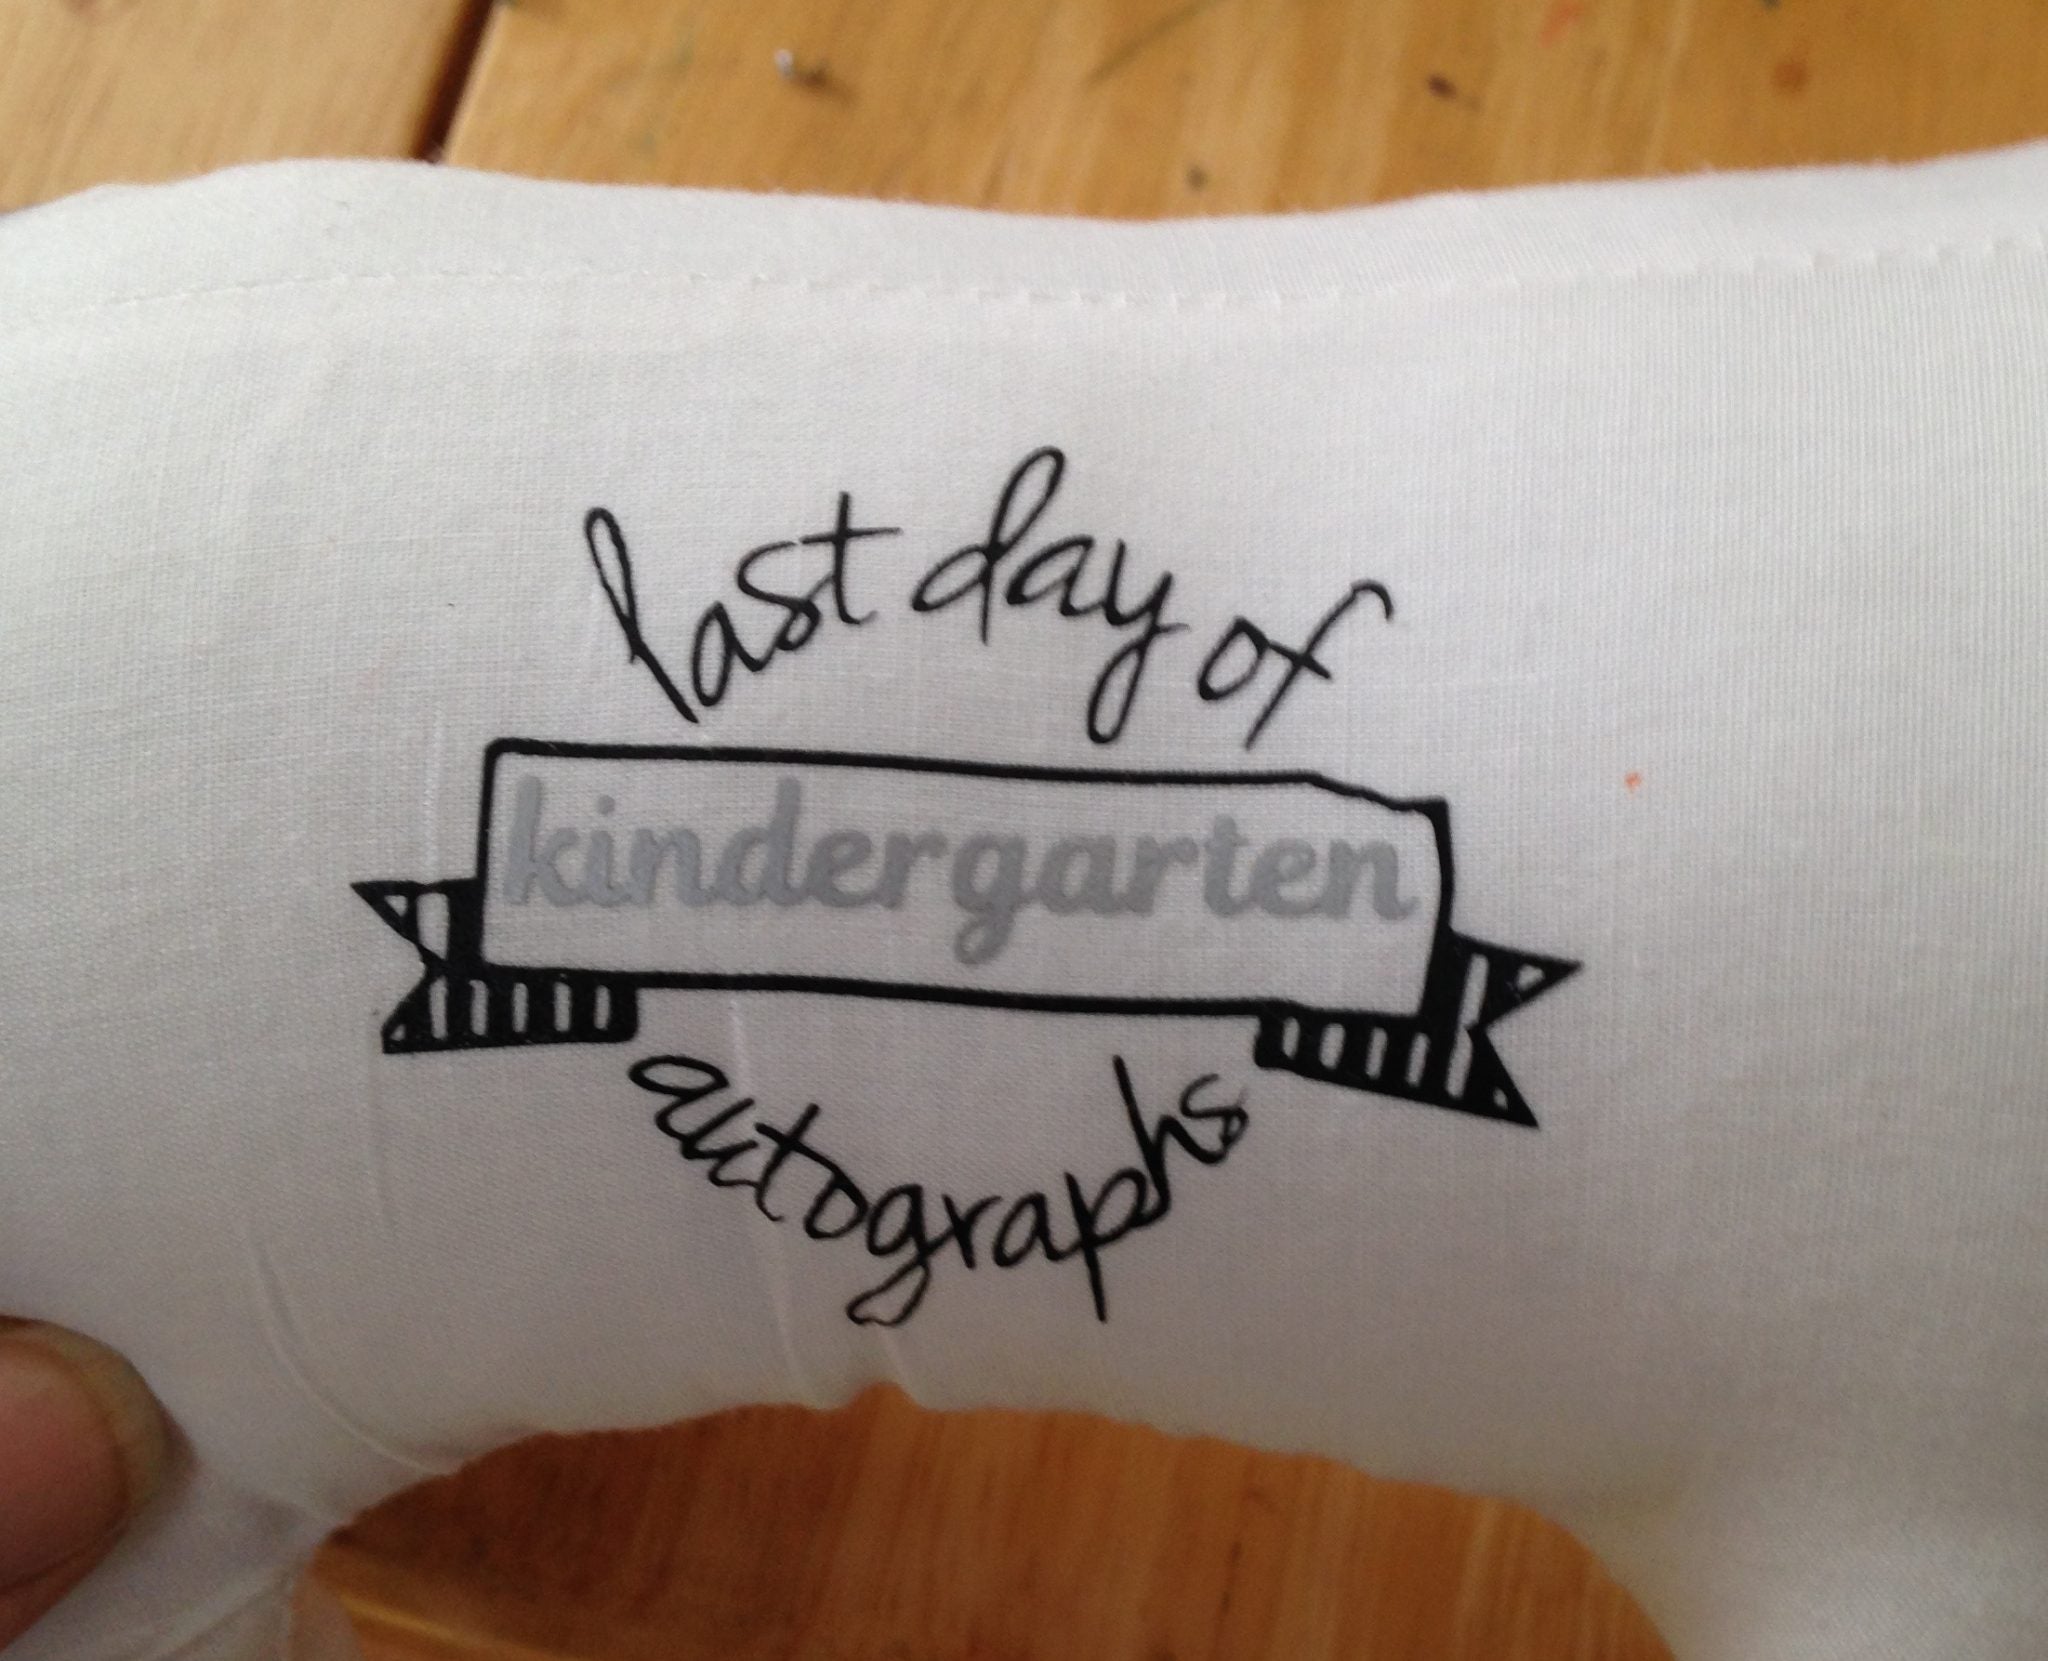
Imagine you're crafting last day of school autograph stuffed animals. Bring along a few Sharpies and collect friends' signatures, it’s like a stuffed yearbook! As I was making these two, I had a slight mishap on the one dog. Groan! The "kindergarten” layer shifted when I pressed the design and got all kinds of messed up. No worries, we can fix it!


Step 1: The first step to fix it is to heat the design up again. On a plush stuffed animal like this, it isn’t as easy as heating up your iron and ironing it again (see below for a shirt fix). Instead, I pulled out my trusty embossing heat tool.
Heat tools (aka embossing guns) are used to melt embossing powder for paper crafting. My embossing gun has been used for that, but I’ve also used it to speed dry paint, adhere vinyl onto surfaces and - you guessed it - remove mistakes in iron-on vinyl! Embossing guns are like super powered blow dryers, they get very hot, so exercise caution.

Step 2: Heat sections of your design and gently peel it off using tweezers. Hold the embossing gun a few inches away from the design and keep the heat moving to avoid damaging the fabric.

Step 3: Once the design is removed, you can realign it and press it again, achieving a much-improved result.
Mistake/Fix #2 - Covering Up
I made this beautiful photo album for a friend's wedding gift. The album came with the gold polka dots already printed on the album. They are some type of foil I think. Agh! When I removed the heat transfer carrier sheet, it pulled up some of the gold! Since this was not something I added to the album, I could not just pull it off and try it again. Instead, I opted to cover it up. This is another trick you can do to fix your heat transfer mistakes.


Step 1: Measure the damaged area (e.g., 1" circles) and cut a piece of silver glitter HTV to match.
Step 2: Apply the silver glitter HTV over the damaged area, covering it completely with a tea towel. Then, press the album again.
Step 3: I added a few more glitter silver circles on the front and back of the album to make it look intentional. Who says those silver circles weren’t part of the plan (wink)?
Note: Covering up works equally well on layered iron-on mistakes. If you forget to weed layered iron-on, you can cover the mistake with a piece of vinyl the same color as the background and press it right over the top. When you work with smooth iron-on and and press a piece on top, you can barely see the fix!


Mistake/Fix #3 - Weeding Mistakes
The last fix is for a mistake on a shirt. I thought the design was pretty simple so I didn’t look carefully at the design when I was weeding, missing a huge piece of iron-on that should have been removed. Whoops! Here's how to address this issue:
Step 1: The goal is to heat up the design again. Carefully wrap the shirt around an iron, heating the design from behind to loosen the adhesive on the iron-on.
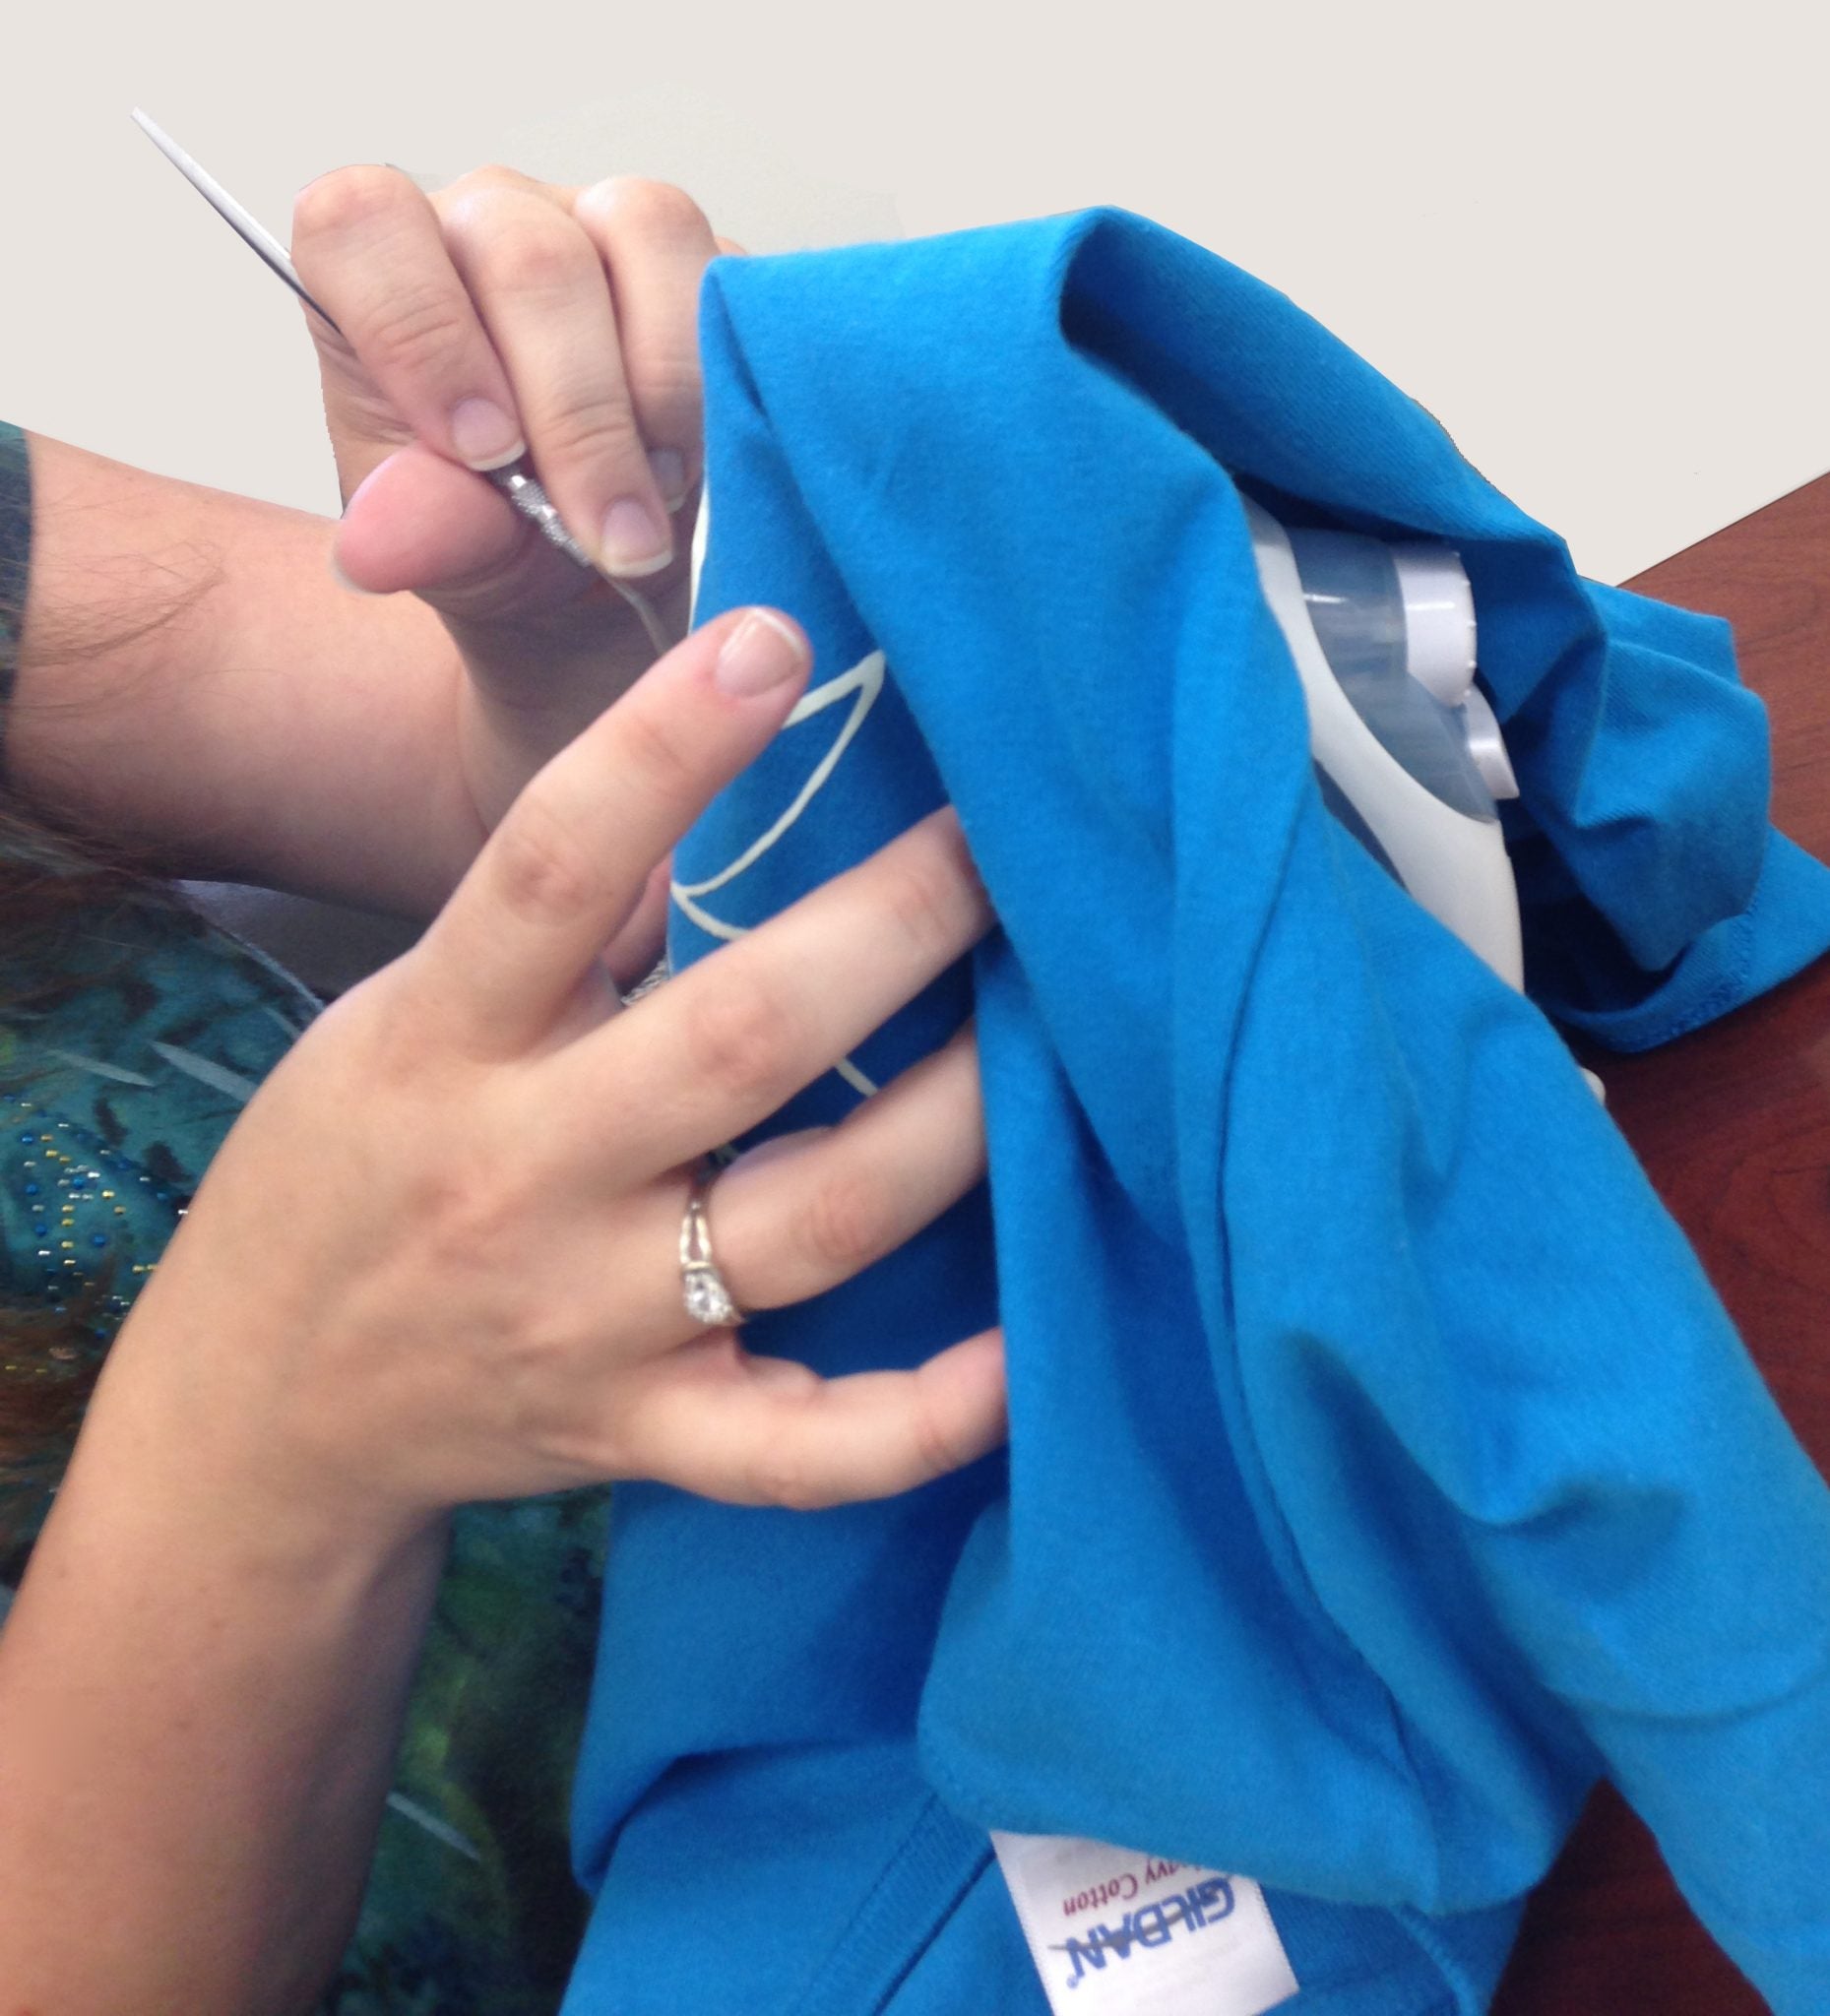
Step 2: Hold the shirt around the iron (careful, it’s hot), and work quickly. I used a metal hook tool and picked at the design until it started to come up.

Step 3: Once I was able to get a corner of it up enough, I grabbed it quickly and pulled it off.

You can’t even tell which petal I missed!


Troubleshooting Tips
Not everything always goes according to plan. Here are some troubleshooting tips:
- If the iron-on doesn't come off easily, apply more heat and use tweezers or a hook tool with patience.
- For adhesive residue, consider using Heat Transfer Vinyl Remover to clean the surface effectively.
- Keep in mind that the effectiveness of these techniques can vary based on the brand and type of iron-on you're using. It's a good practice to test these methods on a small area or scrap piece before fixing a larger mistake.
While we hope you won't encounter iron-on vinyl mistakes, know that everyone makes them from time to time. Armed with the right knowledge and materials, you can successfully rectify these errors and continue creating beautiful, personalized projects. Happy crafting!
FEATURED SALES


13 comments
This is a life saver! Missed a piece weeding and just put the shirt on top of my upside down heat press and the piece came off perfectly! So relieved! Thank you!!!
Oh my goodness! Thank you for the help! Tried the iron hack for a piece I forgot to weed before heat pressing & it worked!! Saved having to replace the whole shirt for a do-over. Thank you, thank you, THANK YOU!!
Hi, I tried to apply my vinyl to an apron with the cricut heat press but it didn’t stick. It was still on the vinyl and left an impression on the apron. I tried again to press on the same vinyl and it didn’t work the second time. Do I need to use a new piece of vinyl and will it stick as there is an outline of residue left on the fabric.
Thank you
Sandra
Help a piece of regular vinyl was stuck on the back edge of my heat press and it melted. Then when I made a shirt after it melted into the shirt. What can I do?
With respect !!!