
Free Shipping
On Orders $49+
On Orders $49+

The cutting mat is an essential part of your die cutting machine! There is a surprising amount to know about the cutting mat. Whether you are new to the Silhouette Cameo or a long time user, you just might learn something new!

The Silhouette Cameo mat comes in several sizes - the 12×12 inch Cameo mat (standard grip), 12×12 inch Light Tack Mat, 12×24″ and 8×12″. The mat is clear and comes with a 1 inch grid printed on it. When your mat is facing the correct direction, the sticky side is up and the Silhouette logo is in the bottom right hand corner. To expose the adhesive on the mat, remove the blue cover sheet then place your materials on your mat.
Silhouette Studio has a digital representation of your cutting mat in the program. There are several different options you can select regarding the digital mat that are worth mentioning. Let’s take a look at how the mat appears in studio.

The dark gray grid in the background is Silhouette Studio’s representation of the cutting mat. It comes with a 1 inch grid, just like the real mat. It even sports the Silhouette logo in the bottom right hand corner!
The white box on top of the gray mat is your material. You can change the material size in the Design Page Setting’s window. In the above example, my material size is 10x12 inches.
The red border around the outside of the material is the cut border. The Silhouette Cameo can cut up to 12 inches wide and 16.5 feet long (if you are cutting without a mat). The largest mat size is 12″x24″. The cut border is generally the size of the material you are working with. Note: if you have longer than 12×12 inch material, you must adjust the material size and the cutting mat size in the Design Page Setting window or the cut border will remain at the 12 inch mark:
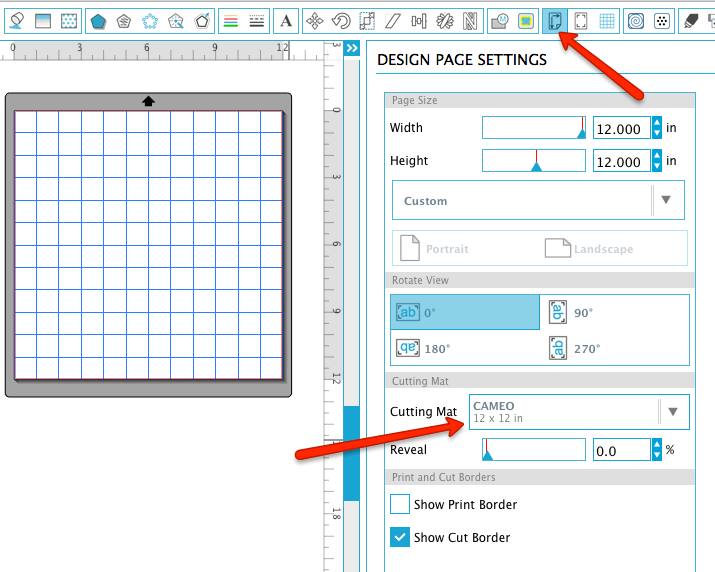
The light gray border on the material is the printing border. If you want to print anything from your Silhouette Studio software, turn the “Print border” line on and ensure that everything you want to print is within the gray box. The print border is 8.5×11 inches (the same size as a standard sheet of printer paper).
I prefer to work without grid lines showing, but if you want to turn them on in Silhouette Studio, you can press G on your keyboard whenever you are not in a text box. Silhouette Studio will turn the grid on (or off). You can also go to the Grid Settings Window to turn them off or on. If you want your digital mat to look like the actual mat, turn the grid on with a 1 inch spacing and 1 divisions:

You can control how many divisions and the size of the spacing in the Grid Settings Window.

In this window you can tell Silhouette Studio if you want to see the grid and if you want your items to snap to it (which is helpful if you are trying to align something with the gird lines). You can also change the color of your grid and turn the ruler and crosshairs on or off.
The higher the spacing, the bigger the main boxes will be. In this example, my spacing was at 2. This made each box 2 inches square:

You can also add in the divisions, which will break up your spaces into smaller sections. For example, I added 4 divisions per space, so each 2 inch square was now broken into .25 inch squares. You can still predominately see the 2 inch spaces with the divisions being slightly thinner/lighter:

You can mess with these settings to find something that works for you. Personally, I only turn the grid on if I want to make sure design elements line up, but you can do what works best for you.
You can cut certain materials without a cutting mat. The material must have a backing or carrier sheet such as adhesive backed vinyl or heat transfer vinyl (HTV). While you can cut these materials without a cutting mat, I still recommend it as the mat helps stabilize the material and ensures a proper cut. You cannot cut paper (for example) without the cutting mat in place. To cut without a cutting mat, on the Cameo 3, you will want to make sure that you do not have a cutting mat in your design. To turn the cutting mat off, go to the Design Page Settings window and change the Cutting Mat to “none” from the dropdown menu:

This will remove the dark gray cutting mat from the background. Note: it is important to pay attention the the black arrow on your screen. This will show you which direction the machine thinks is the top of your material. In this example, my material size is 12 inches wide by 9 inches long. The machine expects me to feed the material in so the 9 inches is at the top, not the 12 inches. This is important to note as loading your material in the opposite direction will affect your cut job. The top of your screen is not always the top of your material!
When you load a job that does not have a cutting mat into the Cameo 3 machine, simply press the “load” button on your touch screen. When you remove the cutting mat from your file in Silhouette Studio, the machine knows that you are cutting without a mat and will advance your material into the machine at the correct distance. If your material is pulling in too far, it’s likely that you did not turn off your cutting mat. Alternatively, if your machine isn’t pulling your material in far enough, it’s possible you turned off your mat and intended for a mat to be used. (Note: this is not the same as it is for the Cameo 1 or 2 machines.)
When cutting without a cutting mat, you do not want to cut all the way through your material. Your machine has a built in cutting strip that runs along the path that your blade follows, but the strip is not a replacement for a cutting mat. The cutting strip will help protect your machine and your blade from damage should you cut through the material, but it will eventually wear out even with proper use:
To replace your cutting strip, simply peel up the cutting strip and stick a new one down. If your machine is missing certain areas when it cuts (even if you always cut with a cutting mat), check your cutting strip to see if it is in need of replacement.
To load a cutting mat into the Silhouette Cameo, remove the protective covering sheet from the mat:
 Next, apply your material to the mat. Use the grid lines on the mat to line the material up with the edges of the sticky portion of your mat.
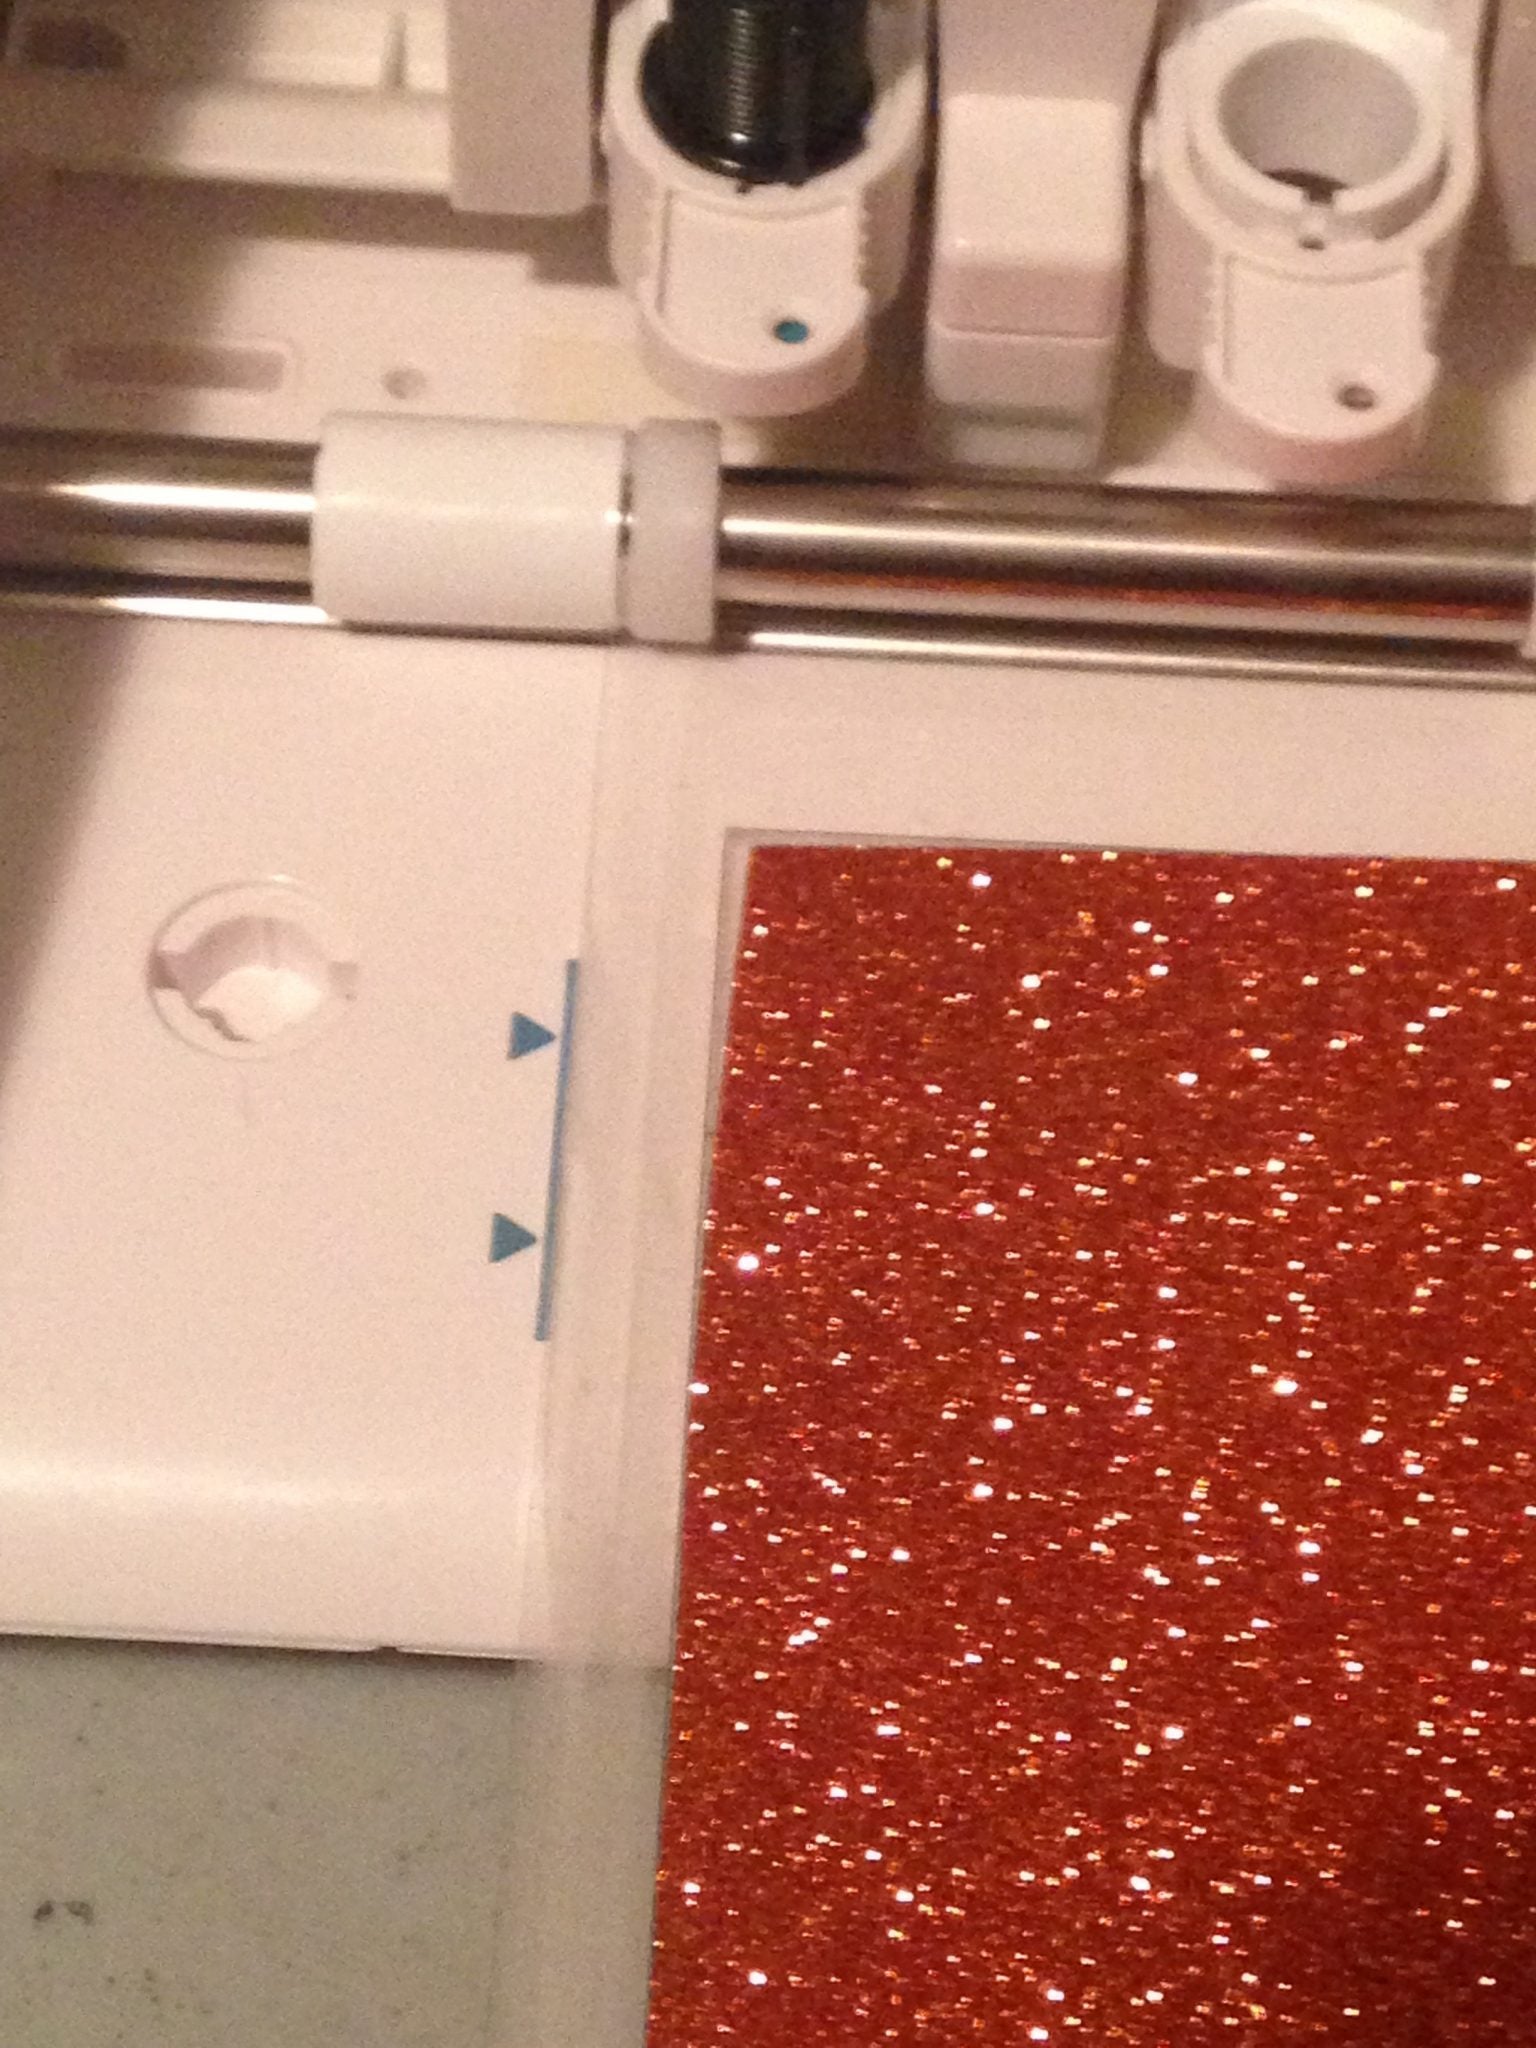
Next, butt the mat up to the rollers on your machine. Use the blue line printed on the left hand side of the cutting deck as an alignment mark:
Press the load button and your machine will advance the cutting mat into the proper location:
If the mat did not load straight, unload the try reloading.
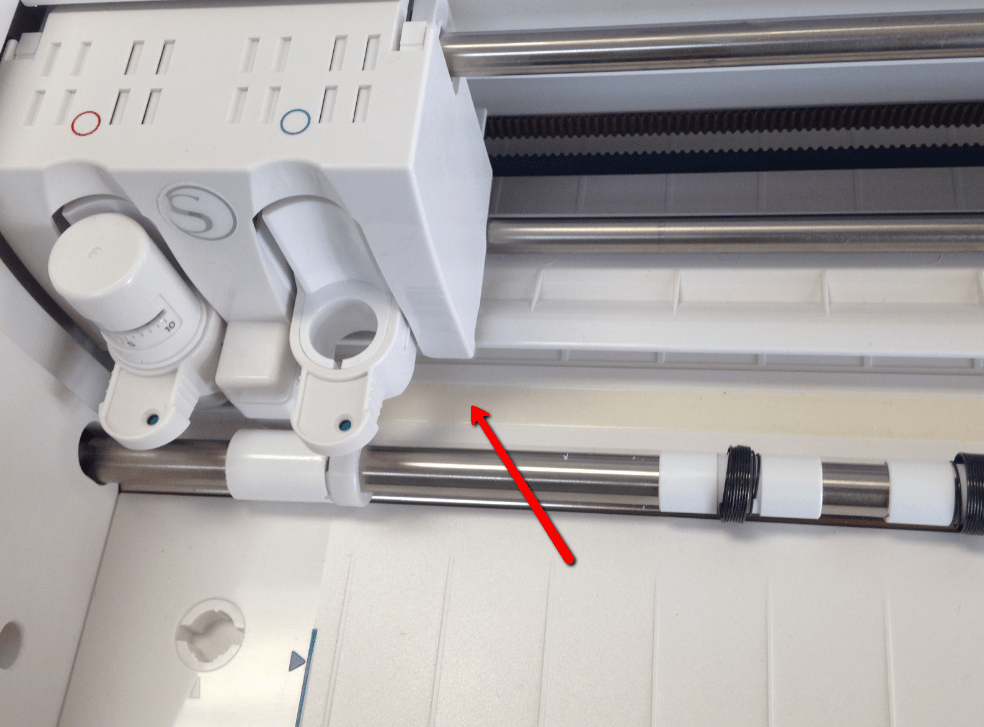
Note that the roller bar can be moved up and down on the right hand side by flipping the lever above the bar. When the lever is flipped forward or down the bar is not locked into place:

To lock the bar in place, flip the lever to the upwards position:

The bar will not move much, but it will move a little bit. If your mat is sliding around when cutting, make sure your lever is locked in place.
When cutting, your roller bars should just overlap the edges of your mat or material:

If your mat or material is smaller than 12″ wide, you will need to move the roller bar over to properly hold the mat or material. The right roller can be adjusted by twisting it until it unlocks (look closely at the roller and it will have a lock and unlock position):

Slide it over to the next stop and then lock it into place. There are stops where the roller bar can be aligned to and look like grooves in the bar:

There are four stops on the bar. They are in the 12″ mark for the Silhouette Cameo mat, slightly less than 12″ mark for cutting 12″ material without the mat, 8″ mark for cutting with an 8″ mat and slightly less than 8″ mark for cutting 8″ materials without the mat:

Equally space the middle rollers over your material as well, or slide them out of the way for bulkier or delicate materials.
If you accidentally cut all the way through your mat, you can tape the back side of it using packing tape. This will not really fix the mat, but will work like a bandaide and allow you to keep using the same mat for a while longer.
Alternating which direction you load the mat will prolong the life of the mat. The cutting mat can be loaded in two ways. You can load the top of the mat by the black arrow, or turn your mat around and load it from the bottom. The mat is not square though, so you cannot load it from just any direction, only top or bottom.
Change where you cut on your mat. If you always cut in the top left corner, this section of your mat will lose it’s sticky faster. Changing where you are cutting on your mat will help space out the damage to the mat, making it last longer.
Clean your mat. If you have a lot of built up fuzz or have been using high fiber materials such as fabric or handmade paper, gently clean your mat with warm water. Let it air dry when finished.
Make sure to store your mat flat, with the cover sheet over the adhesive. If your mat is bent, use books to help flatten it.
Use tape to hold materials in place. If your mat is beyond it’s days, you can try using tape to hold your materials in place. This helps with very thick materials as well.
Restick your cutting mat with a temporary adhesive or glue. There are a lot of tutorials out there that recommend different adhesives to replace the adhesive on the mat when it wears down. You’ll have to decide which you prefer.
My mat is too sticky- how can I make it less sticky?
To make a brand new mat just a little less sticky, use a clean t-shirt! Smooth the fabric over the mat and then remove. It will leave the mat just a little less sticky so your materials do not stick too much. For fragile materials, consider using the Light Tack Mat instead.
My mat isn’t sticky enough- how can I make it sticky again?
Try washing your mat with some warm water. Let it air dry. This usually brings some of the sticky back to the mat. If it’s not sticky at all, you can try to use some adhesive spray to revive the mat, or use tape to hold your materials in place.
My mat is sliding around when cutting, what’s going on?
Make sure your roller bars are appropriately spaced. The rollers should *just* overlap the edges of your cutting mat. See above for more information about adjusting the roller bars.
Can I use other brands of mats in my machine?
The official ruling is no on this one. Using a different brand of mat in your machine can ruin the calibration of your machine and it also voids your manufacturer warranty. Stick to Silhouette brand mats and you should be covered!
How long does a mat last?
A cutting mats life span will depend a lot on what you cut. Someone who cuts a lot of paper, for example, will need a new cutting mat before someone who cuts vinyl as you’re not cutting through the vinyl backing sheet. Having a back up mat on hand is always a good idea though, just in case.
Should there be score lines in my mat after cutting?
Yes, some scoring is expected when cutting with a cutting mat. You are cutting through the material and this will leave marks on your mat. If you are cutting a lot of the same shape, make sure to move the shape around on your mat or rotate your mat to prolong it’s life.
My mat isn’t sticky AT ALL- why?
Did you remove the cover sheet? The mat comes with a blue or teal colored cover sheet that covers the adhesive. Make sure to remove the cover sheet, attach your materials to the mat and then cut. Replace the cover sheet when you are done cutting to keep your mat clean between uses.


Comments
Leave a comment