Penny Emoji Pin Tutorial
This weekend I am heading to the All Things Silhouette Conference! The conference is about… well… all things Silhouette! With classes from cutting fabric to clay with the machine, rhinestones design, software classes and more, I cannot wait to be among “my people!” One of the events to participate in at the conference is a project swap. The only requirement with the swap is to use your Silhouette to create it- I decided to make some cute emoji penny pins:

One of the fun things about the swap is that theoretically everyone will make something different. The Silhouette is such a versatile machine, I’m excited to see what everyone makes to swap!
These pins turned out so cute and were a really fun project. There were a few steps, so I wanted to write a post with lots of pictures so you can make some too.
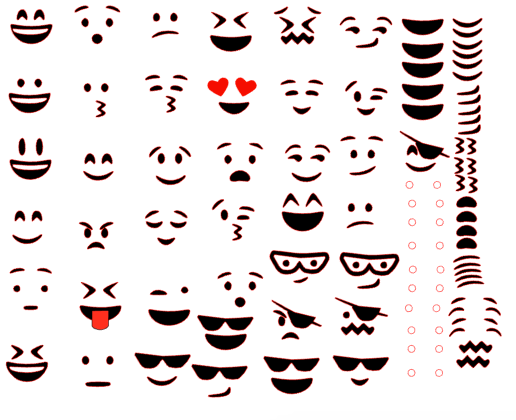
To make these pins, I first found emoji faces online (quick Google search to the rescue!)
I traced the emoji faces using Silhouette Studio 4’s new tracing feature, trace by color. Some of the faces were easily traced with the traditional trace functions (like the one in this example here), but I am really enjoying the new trace by color option, it worked great for the red and white portions of the emoji faces!

When you trace an image in Silhouette Studio, you’ll see everything colored in yellow that is going to trace. For this emoji face, I really only needed to trace the eyes, mouth and teeth. I adjusted the threshold and turned the high pass filter on to get the pieces that I wanted to turn yellow. When I did this trace, it gave me an extra line that I didn’t need, so to delete it, I right clicked and selected “released compound path”:
Once you have released the compound path, you can now move the pieces independently and delete the extra line and separate the pieces by color.

To help keep track of what is what, you can use the fill color option (totally optional though):

In the case of these pins, I didn’t really need the yellow circle, but I sized it to be .75 inches (the standard penny size) using the scale window. This gave me a size reference for the faces to make sure they would fit on the pennies. The scale window has moved a little from V3 software, but you can find it under the transform window:

I created lots of different faces, sized them to fit, and lined them up for easy application before cutting, plus lots of random pieces off to the side for impromptu face combinations. Note that I cut the white (teeth/eyes), red (tongues/heats) and black (everything else) all on separate layers, but assembled them for reference here:
Once my images were all set, I cut them out using my Silhouette and 651 vinyl. Once my Cameo was done cutting, I removed all the extra vinyl and then cut the vinyl sheet into little individual face squares. If there was more than one color in the design, I layered the vinyl right on the little square. I stuck everything to my cutting mat, just to keep track of everyone:

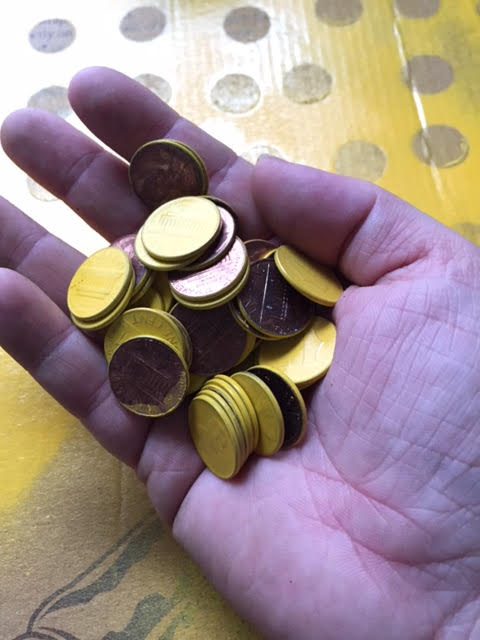
Next, I spray painted some pennies yellow. I used Rust-Oleum in the color Sun Yellow. I always find it best to spray paint on unfinished cardboard (in this case, a pizza box). The cardboard soaks up the extra paint and (usually) doesn’t sick to the project you're painting. Use short bursts in sweeping motions when spray painting. I did two light coats of paint, ensuring good coverage. Once the pennies dried, they were ready to be pins!:
I picked up the individual emoji faces with some contact paper and burnished the vinyl (rubbed over the vinyl to make it stick to the transfer paper) with a scraper:

Next I aligned the face with the penny. Using clear contact paper made it easy peasy to line up the design on the penny:

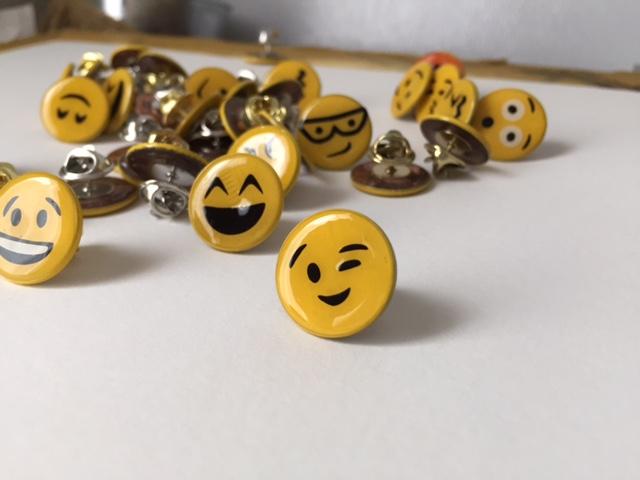
I pressed the decal onto the penny, and repeated the process (60 times (!) over):

Now lets turn these little guys from yellow pennies with faces on them into pins! To make that happen, I used E-6000, and Glossy Accents:

Glossy Accents is a clear glaze that is thick and will give you an enamel look. Start by going around the outside of the penny and then fill in towards the middle.
Tip: Do NOT shake the Glossy Accents bottle, air bubbles are your enemy and somewhat difficult to get rid of:

Once you have covered the whole penny, it will look a little cloudy:
 No worries though, the Glossy Accents will dry clear and will leave a nice glazed finish. If you have some bubbles, use a sewing needle to pop them before the glaze dries. I left these guys dry overnight. In the morning it was time to turn them into pins! I used two piece butterfly pins with a flat back:
 I glued the pins onto the back of the pennies with E-6000 glue. Don’t go crazy with the glue, a little dab will do it:

Wiggle the flat pin back into the glue and try to make sure you center it on the back of the penny:

Let this dry overnight again:
To finish them up, I added a little blob of Glossy Accents to the back of the pins. Some of the pins wanted to sit with the face upside down, so the blob creates a counter balance weight to ensure that they sat “face up” when pinned. Just make sure you look at the face on the front of the pin and put the blob at the bottom of the face:


Now that the pins were all done, of course they needed a cute little tag to go on. I created this tag in Silhouette Studio.
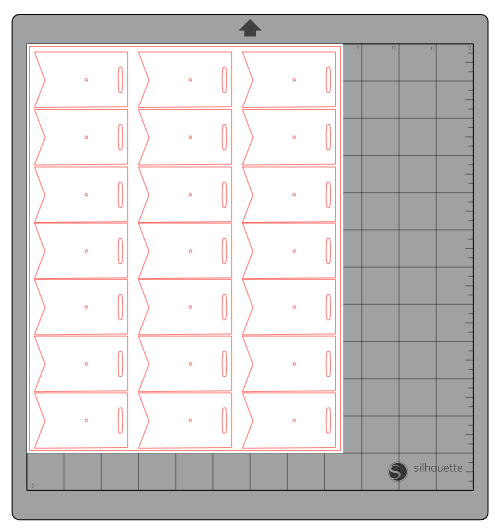
I added in a center point hole so I could pin the pins onto the tags without having to guess where to put them (and this made it super easy to assemble them too).

At this point I could have been done, but it looked so plain! I decided to add a block of color at the bottom of the tags, just because. I used a regular pink eraser as a stamp to add a line to the bottom of the tags, then slipped the tags in a small jewelry baggies (presentation is everything afterall!):

Some of the pins are more obvious that they are pennies than others, but that’s okay. I really was not trying to hide that they are pennies, if anything I think it makes it more unique!
For the swaps, with everything one that you bring, you can bring something new home! I can’t wait to see what everyone else made.
I am swap ready!

I will make sure to post an update, post conference, and share all the other swap goodies to bring you some inspiration on what you can all do with your machine!
P.S. In case you were wondering, or concerned, altering pennies in this way is not illegal! If you are trying to alter a coin or fraudulently pass a fake coin as legal tender, that’s illegal, but using a coin for crafting, with no intentions of using it as currency afterwards, is completely fine.
I can see this being a GREAT fundraiser project. With a handful of pennies, a can of spray paint and vinyl scraps, you can make so many different designs. A bottle of Glossy Accents goes quite a long way. I made over 100 pins and I still have about 1/3 of the bottle left.

FEATURED SALES