
Free Shipping
On Orders $49+
On Orders $49+

Knockout designs are when there are two designs that overlap each other. One design is “knocked out” of the other.

In a knockout design, words are subtracted from an image to create two separate layers that do not overlap. This technique is handy when you are layering, as it helps reduce bulk.
Here is an example of a knockout design:

To create a knockout design, you’ll want to have thick letters that take up a lot of visual space. In our sample, you can see how there is not a lot of space between the characters or the lines of the text:

The closer and thicker your letters, the easier it will be for people to tell what your design is within the words. The reindeer design file seen here can be purchased as part of our 12 Heat Transfer Designs, but I wanted to show you how to create your own too.
Let’s get right to it and create a The Little Mermaid project. Here’s a sneak peak at the end results:

First you’ll want to create your text layer. To create a design with text, click the text button and type out the words. In this case, we’ll do the characters from the movie:

At this point, we’re not concerned with picking the right font or sizing, just type out the words.
Once you have all your words typed out, you’ll want to find a blocky font to use. Click anywhere but on the words so you unselect them. Next click on the words again to select the whole text box (do not double click). Next let’s preview what fonts will look like to find a blocky one. You can use any font on your computer in Silhouette Studio. To see what fonts you have available, click on the fonts from the menu on the right and use the down arrow to change your font in your design. You’ll see the font change as you scroll:

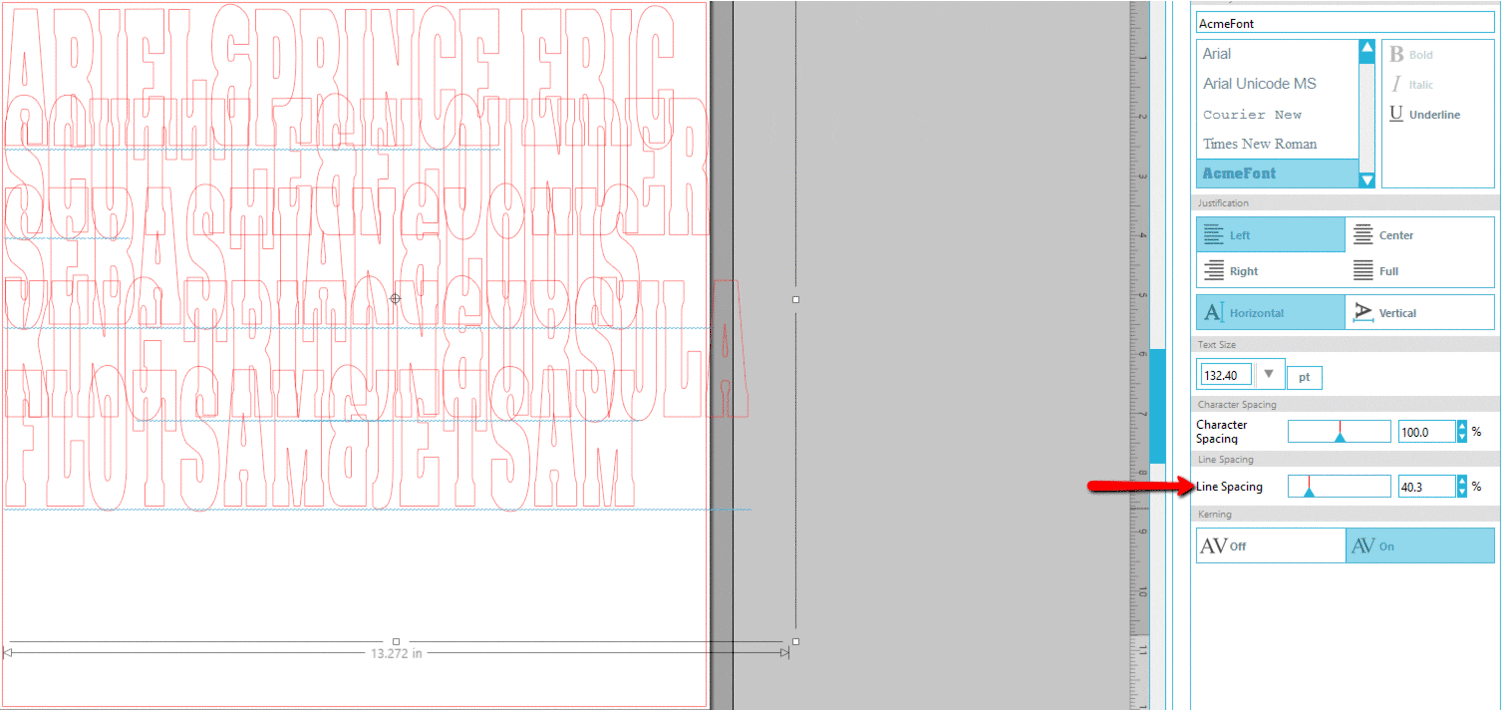
I liked the AcmeFont for this project. Once you have selected a font to use, stretch your design to fit the size you want. (I know, graphic designers everywhere are cringing because I just told you to stretch a font, my apologies graphic designers!)
You want the text lines to be very close together. To adjust the spacing between the lines, slide the “line spacing” slide over until your words just about touch but not overlap:
Once we have sized the words large enough for our project, we’ll want to fill in the blank spaces on the sides to make a square of text. To do this, we’ll need to resize each line to fit. Right click on your text box and select ungroup:

This will break all the words into individual characters. Click and drag a box around each set of words:

Then right click and select “group” again:

This will give you individual lines of text. Once you have individual lines, drag the text line out to make it more square.
Now that you have a nice solid square of text, select all lines of your text, right click and select “make compound path.” This will make all your text one piece.
Now we can work on the knockout portion. Make sure that the picture you are using is recognizable as a solid shape without printed details. In this case, we will use a silhouette of Ariel. I found the image on Google, brought it into Silhouette Studio, traced the image and then filled it in. If you need a brush up on tracing, see How To Trace.
Bring in the cut ready image and size to fit your design. Ensure that your design fits behind the text:

It is helpful (to me) to color the text at this point so you can see the difference between the image and the text. To color your text, click on the text and then click the fill color window and select a color (any color will do):

Next, select both the image and the text at the same time and copy the image by pressing Ctrl+C then Ctrl+P. Do this two times and drag the copies off to either side:

You can consider the first copy like an insurance policy, it’s just there in case you need to go back to the original.
With the middle copy, select both the words and the image and click Object>Modify>Subtract:

This will cut Ariel out of the text:

Before you clicking on anything, press Ctrl+G to group your pieces together.
Next, on the right hand copy, select both pieces and go to Object>Modify>Crop:

This will cut the words out in the shape of Ariel and it will also change the color of the pieces left behind:

Before clicking away from Ariel, press Ctrl+G to group pieces together. I changed Ariel to pink and if you move her back over to the text, you’ll see that the pieces fit right together and do not overlap:

To use this file, you would cut each layer separately and then layer the two images together. This would be great for vinyl on canvas. The point? It helps reduce bulk and gives you a little wiggle room (no one will notice if it’s a bit off if you don’t have anything under it to line it up with). Instead of having a blue layer with a pink layer on top of it, you just have a blue layer and a pink layer.
If you wanted to use a knockout file like this with heat transfer, I would recommend creating a small offset on the knockout layer (in this case, Ariel). Heat transfer vinyl shrinks slightly when heated, so creating an offset will make it not only easier to align, but help your shape stick out and not have an awkward space between your design layers.
To create an offset, click Ariel and then click the Offset Window:

Silhouette Studio will automatically put a .125 offset around the outside your design. Click “cancel” and it will remove it.
Click on the image again and click Internal Offset. Choose a distance that works best for you, I selected .05 inches. Click apply:

You will see a small outline of each piece inside of the original piece. Before clicking on anything else, group your pieces together by pressing CTRL+G. This will make a slightly smaller version of your original design. The original design is pink and the offset is purple in this image below:

Now if you move the offset layer back to the original layer, you’ll see that there is a small space between the words and Ariel, which helps accentuate Ariel’s shape a little more:

If you want to use this design for heat transfer vinyl, just ensure you flip the design so it is backwards before cutting the design with heat transfer vinyl.
If you do NOT want a space between the layers, you can create an offset the other way and make your Ariel layer slightly larger (0.015 inches). This will make it so your image overlaps a bit when you transfer it, but it will ensure that you have no gap.
I hope you enjoyed this tutorial! If you have any questions, let me know!


Comments
Leave a comment