
Free Shipping
On Orders $49+
On Orders $49+

One of the most powerful and versatile tools you will use with your Silhouette Cameo die cutting machine is the blade. There are several different varieties of blades available, let’s check them all out and see how they can be used.


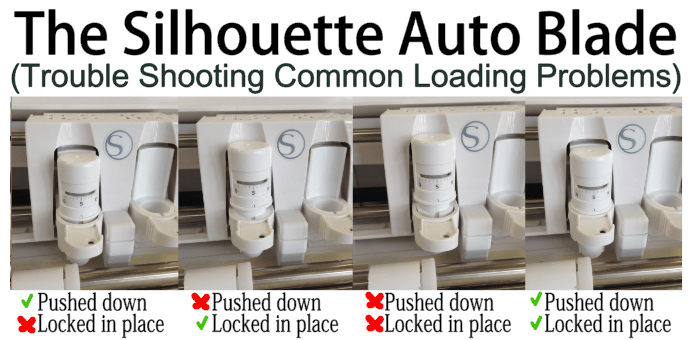
The new Self Adjusting Blade is the “new blade on the block!” This blade comes stock with the Silhouette Cameo 3 machine and can only be used in the Cameo 3 machine’s dual carriage. The “auto blade” can cut a variety of materials including vinyl for home decor, heat transfer vinyl for DIY t-shirts, cardstock to make scrapbooking embellishments and much more. To utilize the self adjusting blade, load the blade into the left hand side of the dual carriage:

There are ridges in the back of the blade and grooves in the left hand side blade holder. Match the positive to the negative and then slide the blade all the way down and ensure there is no gap between the blade and the blade holder. Lock your blade in place by pushing the sliding blade holder in until you see a blue dot. You should also hear a small click to indicate that it is now locked in place.
The Cameo 3 comes with a default of the ratchet blade. You need to select the Self Adjusting Blade in order for the machine to use this blade correctly. To select the auto blade, click on the blade menu at the top of your screen in Silhouette Studio. Pick the material you want to cut from the list of materials in your software. Next, click the edit button to change your blade settings and to select the Automatic Blade. If you want to change your blade depth, speed or thickness of materials, or to turn on double cut feature, you would make those adjustments here:

TIP: If you know the brand of material that you work with usually differs from the Silhouette Presets, you can either adjust the presets and save them, or create and save a new material and add in the specific cut conditions. This will save you from having to remember the perfect settings for your favorite brand of paper or vinyl and save you time!
NOTE: You MUST have plugged in the Cameo 3 and turned it on for the software to give you the Auto Blade option. If you have not plugged in the machine with the USB cord, it will not give you the auto blade option. Connecting via Bluetooth may also not give you the auto blade option (use the USB cord and you’ll be fine). ((Update: Silhouette Studio V4 now defaults to the Auto Blade))
Once you have selected the Self Adjusting Blade and have the settings ready, you can send your file to be cut. The Cameo 3 will adjust the blade by using a set of holes in the left hand side of the deck of your machine:

The machine will pass the carriage over the holes and tap the blade up and down to reset the blade to 10 and then will continue to tap to reach the desired blade length. Once it has set the correct length, it will start to cut your design.

To clean out the auto blade, use the blade chuck. Just line up the nubs on the smoother hole with the blade top and press down and twist. It’s not the easiest thing to do, but it is doable. Be careful as the blade is sharp and will stick out of the top of the blade. You just need the blade chuck to loosen the cap, then you can unscrew it:
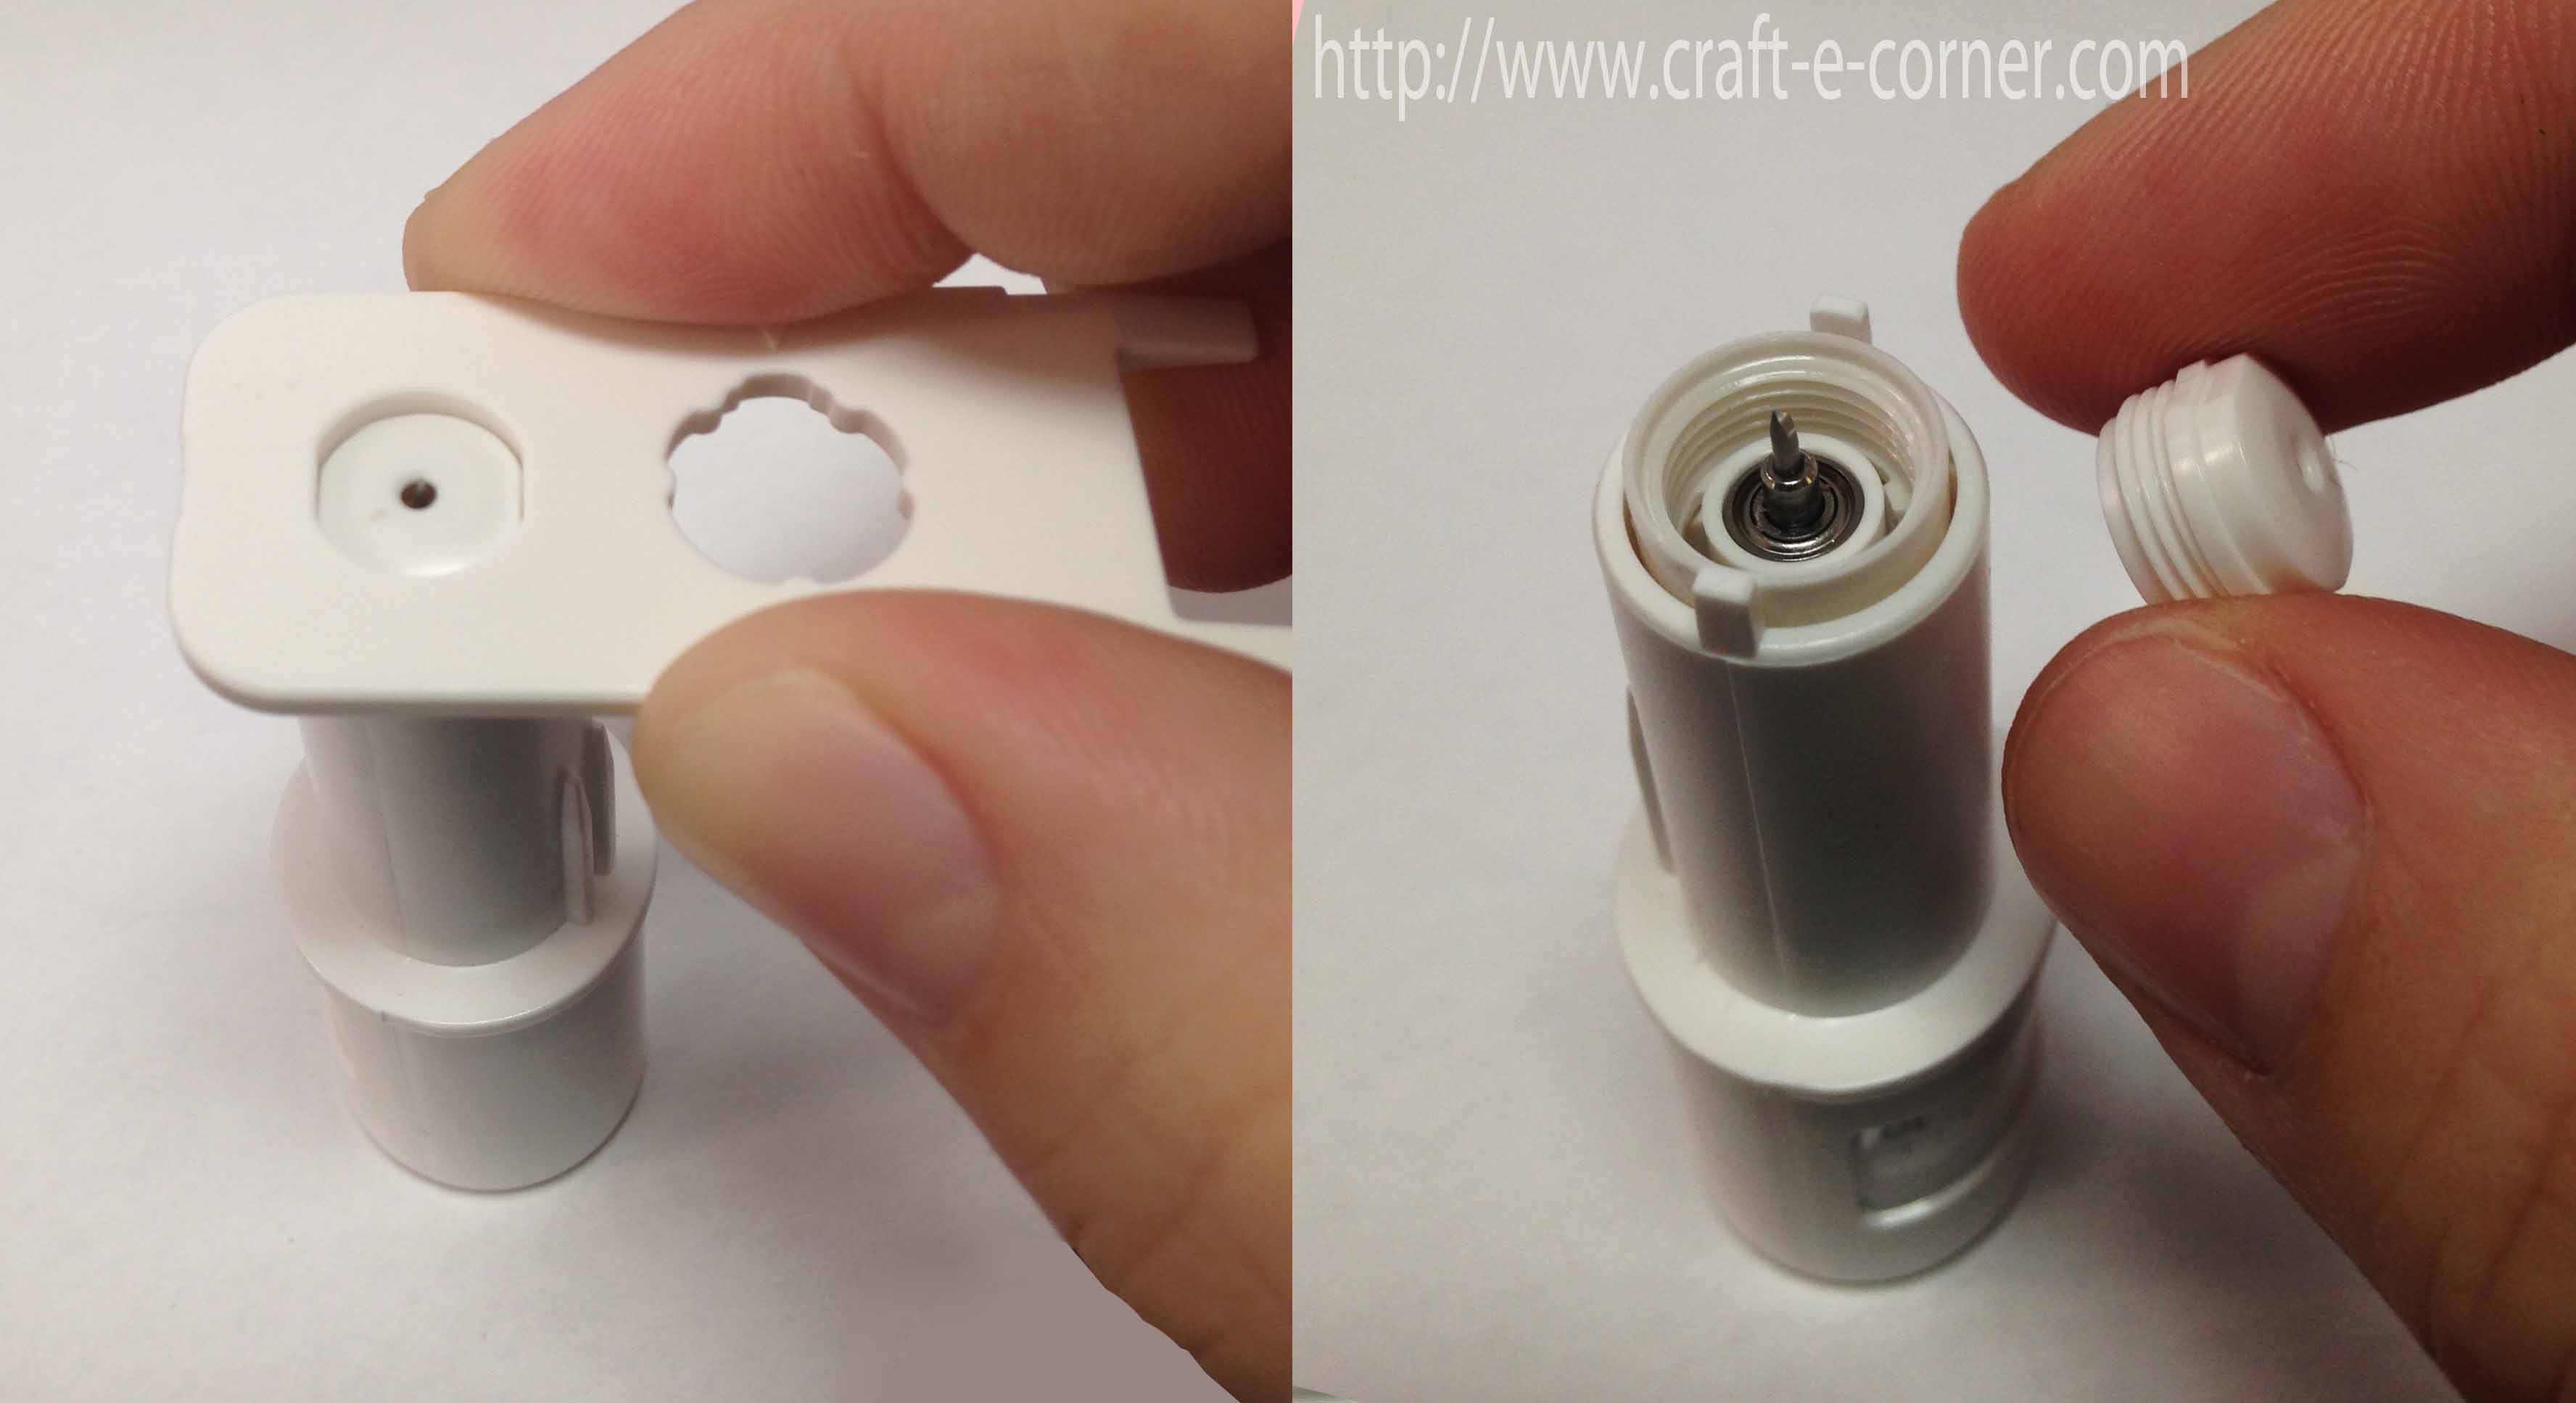 Once you have the blade open, you can clean out any debris and then put the cap back on, making sure to screw it on all the way.
Some other useful information and frequently asked questions about the blade can be found in our frequently asked questions post.
Learn how to open the Auto Adjusting Blade by using the “Blade Chuck” at Silhouette Cameo 3 Blade Chuck Tool and How to Remove the Bluetooth Dongle.
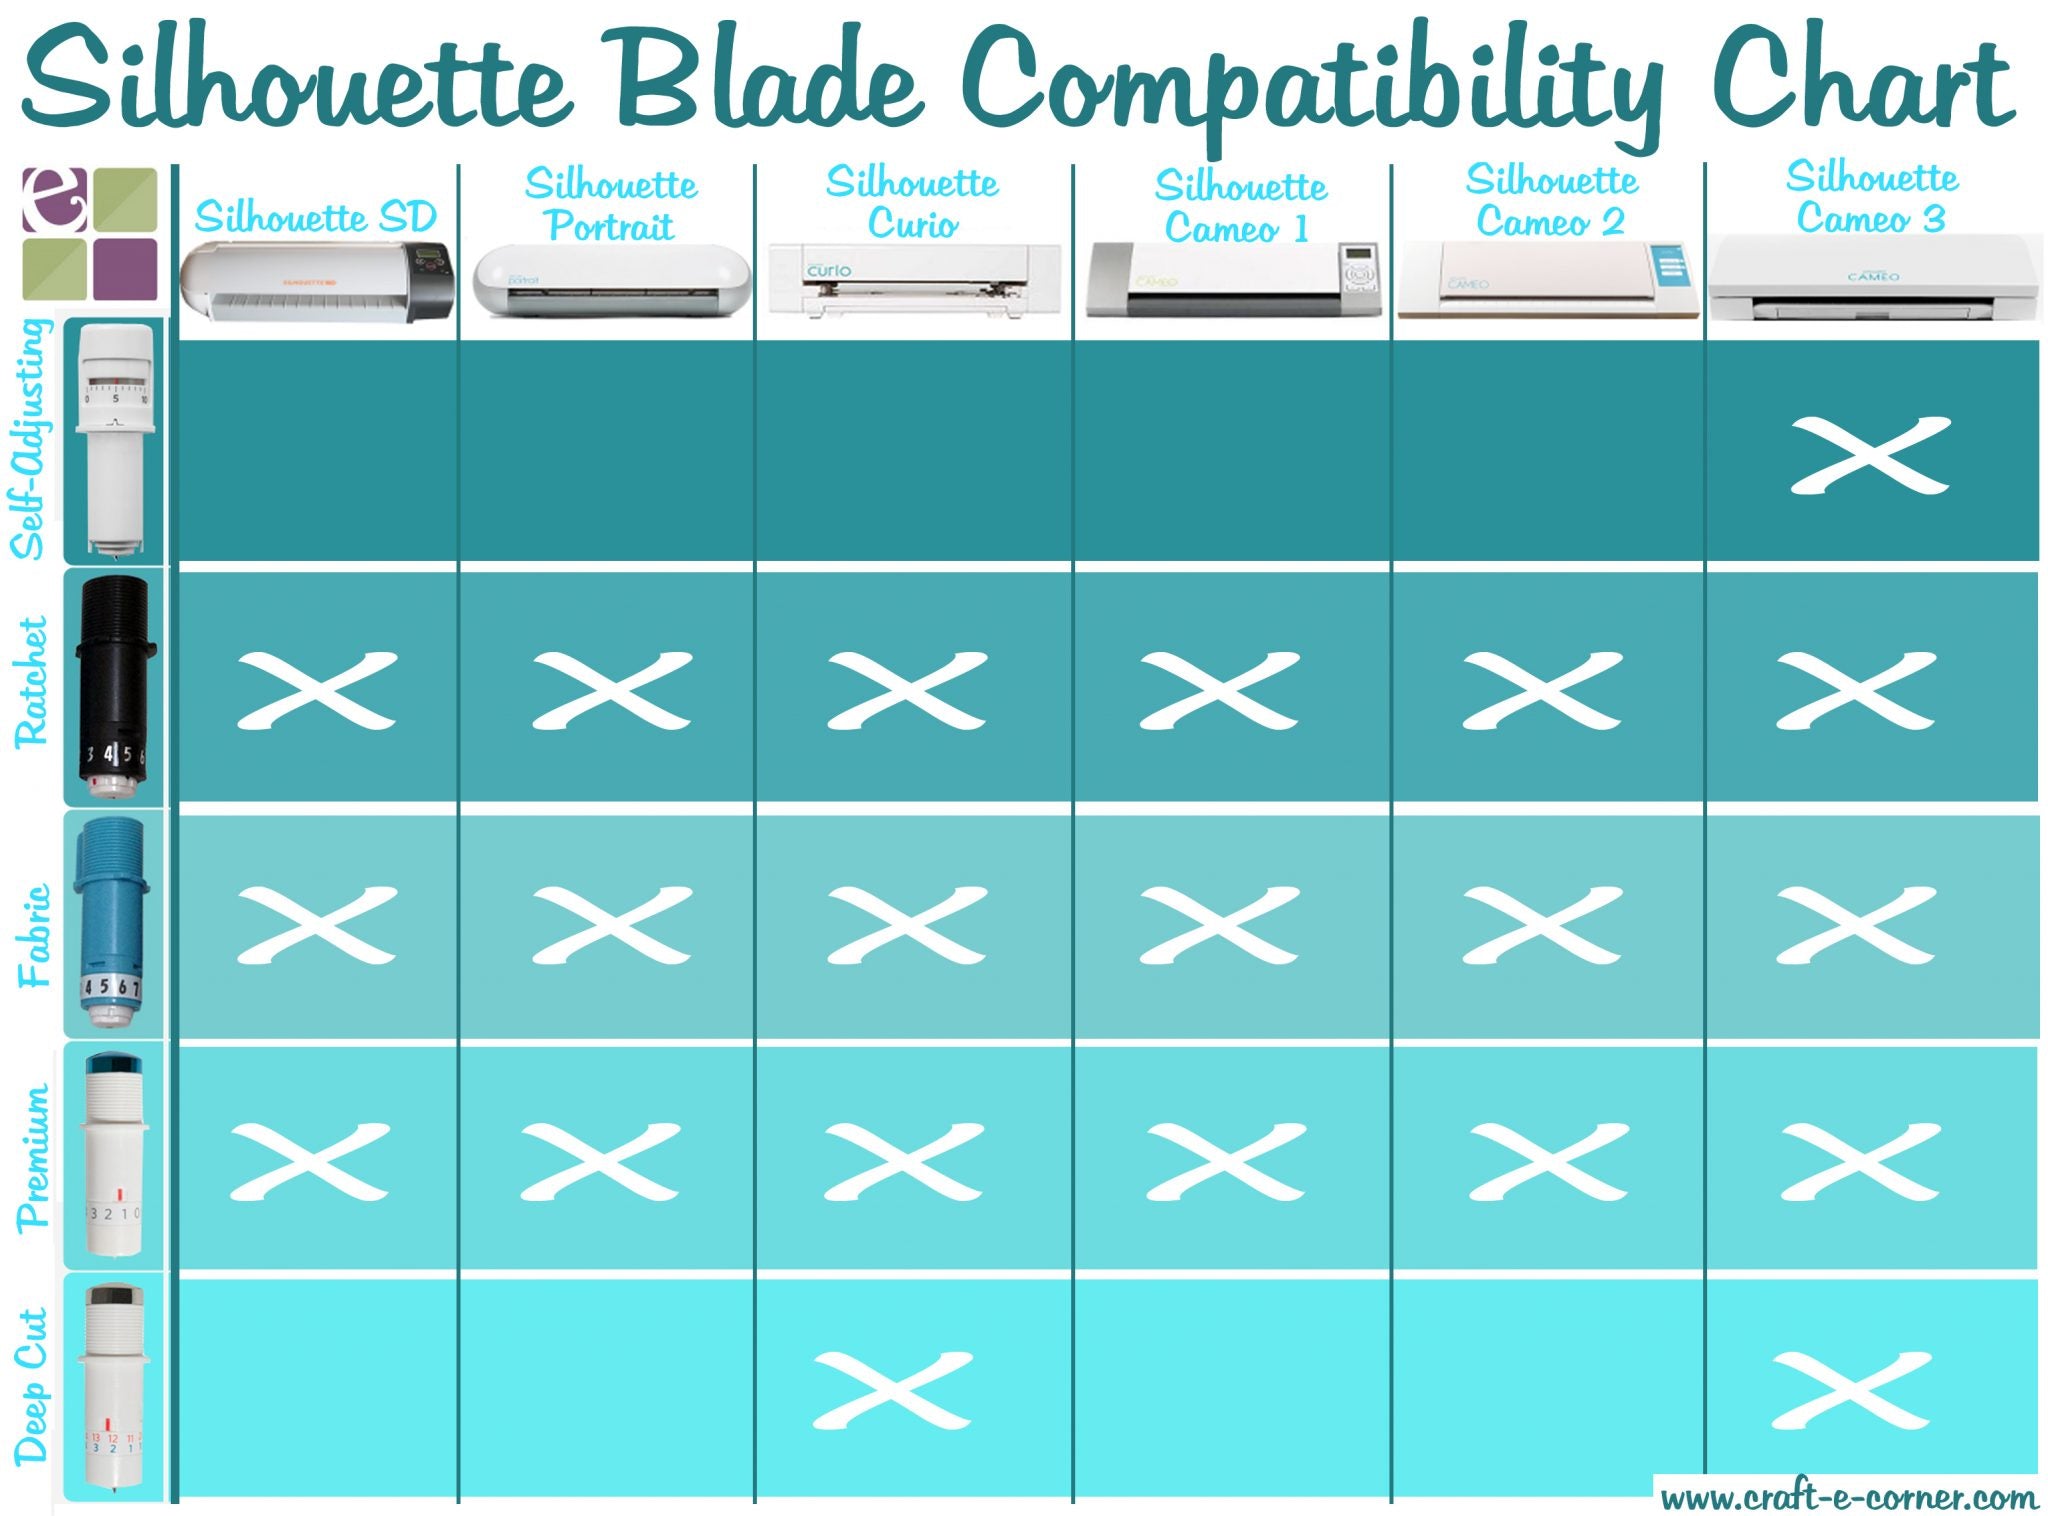
The Auto Adjusting Blade can only be used in the Silhouette Cameo 3 machine.

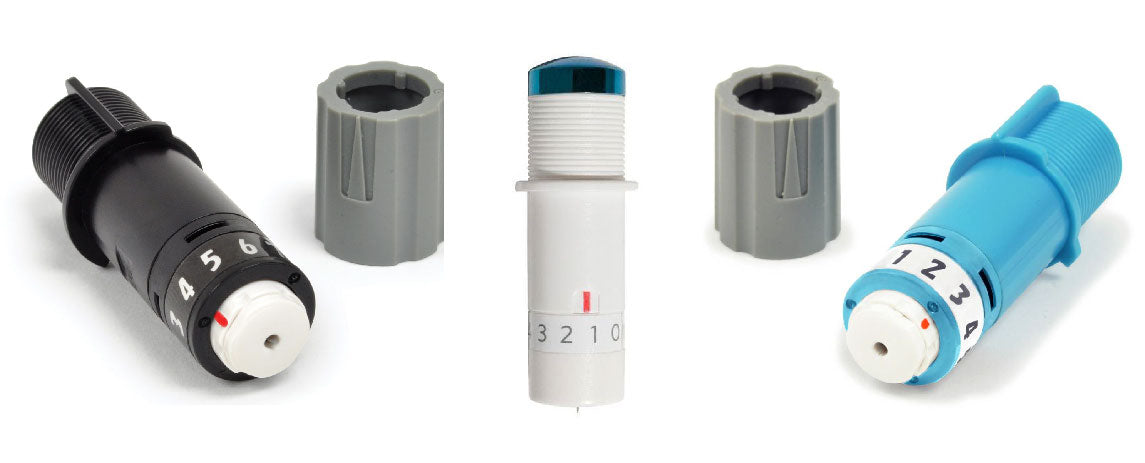
The Black Ratchet Blade is also known as the black blade, the replacement blade or the standard blade. This blade comes stock with the Cameo 1 and 2 machines, the Curio, Portrait and the Silhouette SD (Note: It is not included with the Cameo 3 machine). It can be used to cut a variety of materials such as paper, cardstock, vellum, felt and more. This is a jack of all trades blade.

The Black Ratchet Blade can be adjusted between 1 and 10 (10 being the longest blade length for thicker materials). To adjust the blade length, you can either use the blade adjuster built into the deck of the machine, the gray ratchet adjusting cap or the Blade Chuck that is included with the Cameo 3 machine. To make an adjustment, line up the red line on the blade with the arrow on your adjuster and twist until the red line points at the number you want your blade set to.
When loading the Black Ratchet Blade into the machine, ensure that the little “fin” at the top of the blade is facing you, then lock the blade into place.
If you need to clean out your Ratchet Blade, it is super easy! Just screw off the top and clean it out.

The Black Ratchet Blade can be used in the Silhouette SD, Silhouette Portrait, Silhouette Curio, and Silhouette Cameo 1, 2 and 3 machines.

The Silhouette Fabric Blade is exactly the same as the Black Ratchet Blade, the only difference is that it is BLUE! Just like good sewing scissors, you don’t want to cut fabric and paper with the same blade. Paper is much harder on a blade than fabric, so keeping one blade dedicated to cutting fabric will help ensure that you will get clean cuts with fabric and will also prolong the life of your blade. This fabric blade is great for cutting fabric for custom quilts for babies and gifts. To cut fabric with your machine, you’ll want to iron on some stabilizer onto your fabric and then place the piece, fabric side up, onto your cutting mat.
The Fabric Ratchet Blade can also be adjusted between 1 and 10 (10 being the longest blade length to thicker materials). Adjusting and cleaning out the Fabric Blade is identical to the Black Ratchet Blade (see above).
When loading the Fabric Blade into the machine, ensure that the little “fin” at the top of the blade is facing you, then lock the blade into place.
The Fabric Blade can be used with the SD, Portrait, Curio, Cameo 1, 2 and 3 machines.

The Silhouette Premium Blade can cut materials similar to the Black Ratchet Blade, but it lasts up to three times as long under normal cutting conditions.
The Premium Blade can be adjusted between 1-10 (10 being the longest blade length for thicker materials). To adjust this blade, hold the top of the blade in one hand and twist the bottom with the other. Twist the blade until the red line lines up with the blade length you want.
There is no fin on the premium blade, so you do not have to worry which way it is facing when loading it into your machine (other than blade side down
If you need to clean out the Premium Blade, you can screw the top off, just like the Black Ratchet Blade. The top of the Premium Blade is a shiny metallic blue, which will help you distinguish it from the Deep Cut Blade.
The Premium Blade can be used with the SD, Portrait, Curio, Cameo 1, 2 and 3 machines.

The Silhouette Deep Cut Blade looks similar to the Premium Blade, but it is able to be adjusted to longer lengths than any other blade that Silhouette makes. The Deep Cut Blade can be adjusted between 1-20 (20 being the longest blade length for thicker materials) and can cut select materials up to 2mm thick. Silhouette warns that some dense or loose materials may not cut as intended and attempting to cut overly dense materials may result in damage to the blade. What does this mean? You may not be able to cut just any 2mm thick or less materials without problems, and if you’re not using Silhouette brand materials, you may have to test and retest until you achieve the right cut settings for your material.
To adjust this blade, hold the top of the blade in one hand and twist the bottom with the other. If you want to adjust the blade between 1-10, you should see BLUE at the bottom of the blade. All these numbers will be with one rotation.
If you want to adjust the blade between 11-20, you will have to go past 10 and then you should start to see RED at the bottom. Numbers 11-20 will be all on the second rotation.
The BLUE numbers (1-10) should show the BLUE bottom, the RED numbers (11-20) should show RED at the bottom. If you see blue at the bottom at all, you are on the blue numbers:

There is no fin on the Deep Cut Blade, so you do not have to worry which way it is facing when loading it into your machine (other than blade side down
If you need to clean out the Deep Cut Blade, you can screw the red top off. The top of the Deep Cut Blade is a shiny metallic silver, which will help you distinguish it from the Premium Blade (as will the double set of numbers).
The Deep Cut Blade can be ONLY used with the Silhouette Curio and Silhouette Cameo 3 machines. Using this blade in any of the other machines could result in damage to your machine and can void the machines manufacturer warranty. If you MUST use the blade in a different model machine, do so with caution and at your own risk!
Silhouette Studio has a list of recommended blade settings for various materials. These are what are programmed into your machine and what the blade will be set to if you do not change it (Print this for handy reference!):

If the material you use has a different cut setting than what is preset in the software, or you wish to add a new material, open the cut settings window and click the + button by materials:

You can type in the name of your material (for example, I added in a “Plastic Baggie” in a previous project) and then click the Edit button to adjust the blade settings for your new material.
First, pick your blade from the drop down menu. Once you have your blade selected, you can adjust the blade length by clicking the black arrows to the left and right of the blade image (see the red arrows above). Next, you can adjust the speed of cutting your material. The faster the speed you want to cut, the higher the number. If your blade tears when it cuts, you can try to slow the speed down a little to help. Next, adjust the thickness of the material based off how thick it is. Vinyl is typically only thickness of 9 where chipboard has a thickness of 33, for example. Thicker materials = bigger number.
If you feel like your material might need double cuts, check that box now. Thicker materials like chipboard may require a double cut to cut all the way through the material, clicking the double cut button will have the blade cut it again automatically.
To finish up, test your cut settings and cut your project. When you exit, you will want to save your file in order for Silhouette Studio to save your new material. TIP: Write down your custom material cut settings somewhere. Custom cut settings are tied to the software on your computer and not necessarily to your Silhouette account. If you need to reinstall the software (your computer dies, for example), your custom cut settings may not come back. Upgrading the software should not overwrite custom cut settings, but you don’t want to take the chance of losing the perfect combination!
I know, this was a LOT of information about the blades! I wanted it all together in one handy reference and I hope you found it helpful! If you have any questions or if there was anything I didn’t cover, please let me know and I will add it in! - Kala

Comments
Leave a comment