Christmas Mug Project with Cricut Infusible Ink and Color-Change Vinyl
If you have not made mugs with the Cricut Mug Press yet, let me tell you how much fun it is! I recently completed a project making 15 mugs for our annual Christmas party here at work. They turned out so cute, and I enjoyed the entire process.

Cricut's 15-ounce mugs worked great for this. They are big enough to hold lots of coffee, tea or hot chocolate. I mean, if you're going to have some, you might as well have some, right?

To learn how to use the Mug Press, check out this simple tutorial here.
While most of the mugs were made with the Mug Press using infusible ink, I was asked to make some with heat-activated color-changing vinyl, and I did those first. I used the colors available of pink, purple and blue for those.

Time was limited for this project, so I used designs purchased from Etsy shops instead of creating my own. This made the project much easier and allowed me to finish by the deadline. The hard part was deciding which ones to use because they were all so cute.
I included a list of the designs and sellers at the end of this post, if you want to find any of them on Etsy.
Heat-Activated Color Changing Vinyl Mugs
The first step was to select my designs, download them to my computer, and then upload them into Design Space and add them to my canvas. If you don't know how to do that, you can watch a video that explains it all here.

The bottom design was actually a full wrap, but I weeded it in reverse to remove the background since I was using vinyl and not infusible ink. More on that later.

I prepared to cut the first design with my Cricut. The vinyl is so sensitive to temperature that just touching it with my hands to put it on my cutting mat caused the color to become marbled.

Since I was using adhesive vinyl, there was no need to mirror the image before cutting. I just ran it through the Cricut to cut it out and was ready for weeding.

Again, the vinyl changed color during weeding, due to the heat of my hands and from my Cricut floor lamp that was shining on it, which also gives off some heat.
I adhered transfer tape to the design to apply it to the mug.

When applying vinyl to a mug, I always use a piece of parchment paper between the design and the mug to adhere it a little bit at a time.

Here is a vinyl design fully adhered to a mug. I always try to center it so the edges are equally distant from the handle on either side.

For the last design with the full mug wrap, I weeded it in reverse, meaning I removed the background and left the small pieces of vinyl on the backing, which is opposite of the intended way.

Then I applied it to the mug, again using parchment paper. I left about a half inch of transfer tape free to stick to the mug, but I could still move it around to get proper placement before adhering the entire design.

I pulled out the parchment paper a half-inch at a time and pressed the design onto the mug. This prevented other parts of it from sticking to the mug too soon in the wrong position and also prevented bubbles from forming. It worked like a charm.
![]()
All that was left to do was remove the transfer tape. I started with a corner and pulled it down on an angle, while keeping the transfer tape close to the design.
This mug with the reverse weeded design turned out pretty well.
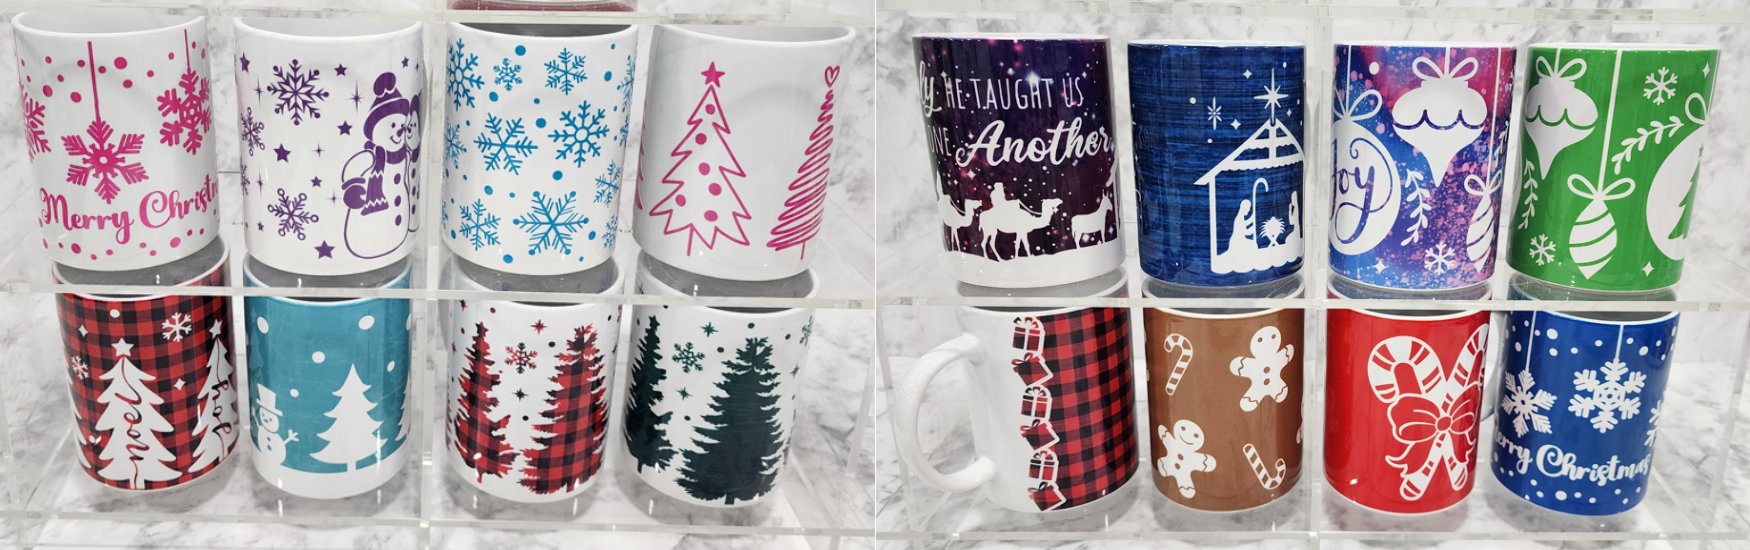
Here are the four color-change vinyl mugs done. I used the same process for each one.

The purple one on the left was a bit tricky to weed since there were so many intricate parts in the design. I was concerned that some of the smallest stars may not stay on during use, but I hoped for the best. It's probably better to stick to simpler designs for adhesive vinyl.
Here they are with hot liquid in, changing color. Notice that with heat-activated vinyl, the color gets lighter, not darker. However, the purple vinyl actually changed to a greenish-blue color instead of just getting lighter. That was interesting.

Infusible Ink Mugs
Next I started on the infusible ink mugs using the Mug Press, which is my favorite way to create mugs. I love the pop of color once the design is adhered to the mug with heat. The ink color looks so dull before application.

The process for these is quite similar; however, it is necessary to mirror your design before cutting. Since I used purchased designs, I first uploaded them onto my Canvas. Here are some of the ones I used.

To cut out these mug designs, I placed the infusible ink transfer sheets on my cutting mat with the ink side up.

After cutting, I weeded the designs mainly with my fingers, trying to avoid touching the ink side as much as possible. Sometimes it helps to curl the transfer sheet a bit to loosen the edges of the design elements.

Infusible ink is more like cardstock, so it is weeded differently. It is not recommended to use a weeding tool because it would be too easy to puncture the ink with it and ruin the design.
Now I just needed to wrap the design around the mug, so I started preheating my Mug Press. I plugged it in and pressed the power button. There was no need to figure out temperature or heating time, as the Mug Press does that on its own.

Once the design was weeded, I wrapped it around the mug, making it as even as possible from top to bottom. I also tried to make each end an equal distance from the handle, same as with the vinyl mugs I made. The design should end at least a half-inch from either side of the handle, as the Mug Press will not cover that part when heating.

I used Heat Resistant Tape to keep the wrap adhered well to the mug, with the ink side close up against the mug surface.

I placed the wrapped and taped mug into the preheated Mug Press. I knew it was ready because it beeped to let me know. I shut the cover and let it do its thing.

When the mug was done heating, the Mug Press beeped again, and all five lights were lit up.

I opened the lid, removed the mug, and placed it on an Easy Press mat to let it cool.

It was so hard to wait for it to cool to remove the wrap and see how it turned out! That is the most fun, seeing the vibrant colors after application.
Once the mug was cool to the touch, I removed the tape and the design wrap from the mug. I followed this same exact procedure for all of the mugs. Here is the gingerbread man mug and several others all done.

And then the rest of the mugs done.

Wow, that was a big project, but I enjoyed it so much! I loved the variety of designs and colors that made each mug unique.
There is an even easier way to make mugs with the Mug Press. You just use a busy pattern of infusible ink and wrap it around the mug without cutting a design out of it. The only cut you make is for the outer edges of the wrap. You can see that done here.
The completed mugs were filled with goodies for all the employees here, and everyone got to choose one at the party. They were a hit!


Have I inspired you to make a collection of mugs, whether for Christmas or with another theme? Or, even to make just one or several? A set of four would be a great gift. Who knows, you might get hooked on making mugs, like I did. The Mug Press makes it so easy and fun.
---------------
Designs Used and Etsy Sellers
Candy Cane Bows Wrap – JoyartanddesignUS
Christmas Ornament Joy Wrap – Dkpaperstudio
Christmas Trees with Words Inside Wrap – Dkpaperstudio
Christmas Snowflakes (in blue color-change vinyl) – VeczDigitalsShop
Christmas Trees with White Background (in Buffalo Plaid & Green) –
VeczDigitalsShop
Nativity Christmas Wrap (in Midnight Sky Pattern) – KennieDesignsCA
Christmas Borders Wrap – Gifts (includes several wraps)– KennieDesignsCA
Christmas Tree Bundle – (5 trees in pink color-change vinyl) – StudioHelloYello
Merry and Bright with Tree Wrap – CattyMaker
Snowman Trees Wrap, Forest Scene – CattyMaker
Oh Holy Night Wrap – CattyMaker
Merry Christmas with Snowflakes – 293CreatorStudio
Joy Hope Peace Believe Let It Snow Tree with Snowmen – LadyNightSVG
Gingerbread Man Wrap – StacieMakesThings
---------------
If there is love in your heart and your mind, you will feel like Christmas all the time. Faith Hill
Leslie
FEATURED SALES