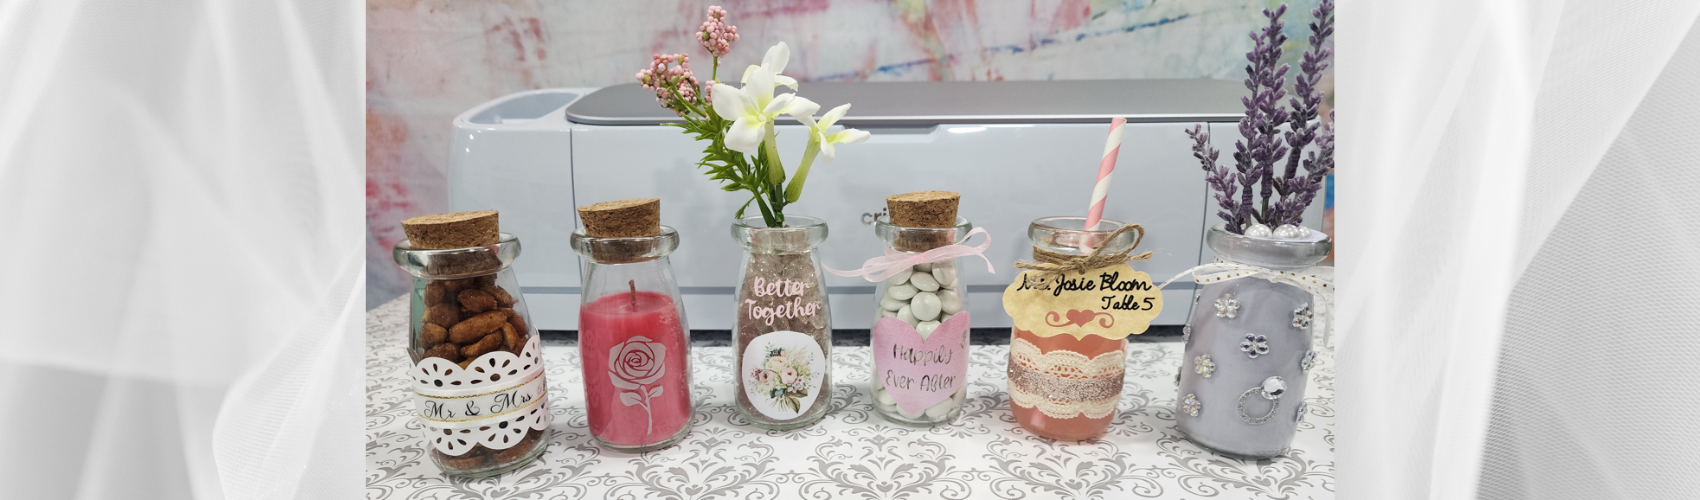
DIY Mini Milk Bottle Wedding Favors with a Cricut
Handmade favors and décor for weddings are always so lovely and are often quite simple to make. Using a Cricut machine is the perfect way to create your own unique wedding items.

When I came across some ideas for decorating mini glass milk bottles, I was inspired to try making some. I created six different styles as a small sampling of what can be done with them. There are so many style options and ways to fill them.

Since the bottles were so small, I used my Cricut Joy for all the projects except one, which was a Print Then Cut design. That feature is not available on the Joy, but the Joy Xtra does have that capability. Yay!
Materials:
Mini milk bottles with caps Flat lace
Cricut Joy machine Thin twine
Cricut Maker 3 machine Ribbon
Inkjet printer Printable Sticker Paper
Easy Press Mini Contact paper
Permanent vinyl / Smart Vinyl Armour Etch Cream
Cutting mat Rub'n Buff Paint
Cricut Tools Self-adhesive gems
Cricut pen(s) Artificial flower sprays
Cardstock Fancy paper straws
Other desired fillings for jars
My first step was to measure the circumference of the bottle and the height of the flat area to know what size to make my designs.

Design #1
The first idea was to wrap some lace around a bottle and embellish it with ribbon. I created a lace design and cut it from white cardstock, wrapped it around a bottle and taped it together on the back. This could be glued on for a more secure wrap.

Once the bottle was wrapped, I cut a piece of ribbon to fit on the paper lace and cut out the words Mr & Mrs and 6.15.24 from Cricut Iron-on. I used my Easy Press Mini to apply the text to the ribbon and wrapped it around the bottle on top of the paper lace.

A recent post on applying iron-on vinyl to ribbon can be viewed here, if you would like to see how it's done.
Design #2
Next up was a bottle with a candle inside it. I loved this idea but wanted it to dress it up a bit, so I etched a rose onto the glass bottle first, using Armour Etch and a vinyl stencil. To see how to etch a design onto glass, check out this post.

The etching turned out great but was hard to see. I hoped putting candle wax inside the jar would help with that. My lovely niece, who makes candles, was kind enough to handle that part for me. Here is the bottle made into a candle.

It's so cute! Unfortunately, the etching still seemed too faint, so I went a step further and used Rub'n Buff paint to make it stand out more. I did a more involved colored etching project a few months ago, which you can view here, if you'd like to try it for yourself.

I love how this turned out, and it only took moments to paint it! All you do is rub a tiny bit of paint over the etching and wipe it off with a paper towel. Can't you just see a bunch of these placed on tables at a wedding? You could do them all the same color or in various colors.
For a lit candle, you would probably want the wax to come farther up the jar, so the inside wouldn't turn black with soot while it's burning. I was going more for the look of this and probably would not burn it. You could also do this same project on a different jar with straight sides, if you wanted lit candles.
Design #3
This one was simpler but still turned out cute. I found a heart image I liked in Design Space and added text and a small flower to slice out of the heart. Then I applied the vinyl with transfer tape, and it was done. It will look more impressive once it's filled with candy and has a ribbon around the top (I hope).

If I did this again, I would probably make the heart image smaller. Since it wrapped around the jar and was not a straight design, I had some trouble with creases and bubbles when applying it. You can still see some of the problem areas near the top edge. This was removable vinyl, too, so that didn't help.
Design #4
My next idea was to create tags to tie to bottles and use them for seating assignments. These could be put right onto the tables or placed near the reception entrance for guests to find when they arrive.
I used two functions in Cricut for this, drawing and cutting. The Cricut draws the text first and then cuts out the tag. Brown Kraft paper is often used for this purpose, but I used some marbled cardstock I had on hand.

I created two tags, each in a different color and orientation. I tied a tag onto a bottle with thin twine and added flat lace and some pretty ribbon to dress it up. I found some cute straws and would fill the bottle with pink lemonade. I couldn't decide which straw I Iiked better.

This is one of my favorite mini milk bottle designs. It's simple and pretty.
If you'd like to see how to draw and cut out tags with your Cricut, check out this post, which has a video tutorial.
Design #5
For this next one, I used Cricut's Print Then Cut function with my Maker 3 machine. If you would like directions on making your own stickers, take a look at this post.
I found a cute flower bouquet image and uploaded it into Design Space. I printed it onto my sticker paper and tried to create an offset around it to cut out. However, I could not get that to work, so I ended up cutting around the design with a scissors.*

I also applied text directly to the bottle with adhesive vinyl and applied it above the bouquet image. I filled the jar with some glass deco stones and stuck a small spray of artificial flowers in it. So cute.

*The problem with the offset was that I did not remove the background from the image after uploading it. I tried doing that, but it removed some color from the middle of a flower and didn't look right, so I went to plan B. I did not want to choose a different image at that point.
I found out later that I could have used the Contour function in Design Space to fill in that open area, but it was too late by then. Oops. It probably would have looked better with an offset around it.
Design #6
My final bottle was painted using a unique process that created a waterproof paint inside the bottle, leaving the outside glass unchanged and ready for designs to be applied. Here is my bottle painted and dried but not yet baked in the oven.

I liked the idea of adding embellishments to the jar without being concerned about how well they would stick to the paint. I found this painting method on Pinterest at kenarry.com. The post was named "How to Create Beautiful Waterproof Painted Glass," if you want to check it out.
After the bottle was painted, I added some self-adhesive gemstones to it in a random pattern. I filled the jar with some faux pearls, stuck another small spray of artificial flowers inside and tied on a narrow ribbon. The pearls were to hold the flowers up, even though they can only be seen from the top. This design did not require a Cricut machine, but a vinyl design could very easily be added to the jar.

This is just a small sampling of ways you can adorn mini milk bottles for wedding décor. There are endless options for creating and using them, with whatever colors or designs fit your wedding theme. I almost wish I had a wedding to make a collection of these for. I wonder which design/method I would choose. Has this sparked any creative ideas for you? Which would you choose?
I love being married. It's so great to find one special person you want to annoy for the rest of your life. Rita Rudner
Leslie
FEATURED SALES