
Free Shipping
On Orders $49+
On Orders $49+

Crafting projects for holidays is always fun, and this glass centerpiece with colored etching will be perfect for my Thanksgiving table. I have done glass etching before, but adding color was new for me. The process was easy, and the results were impressive.

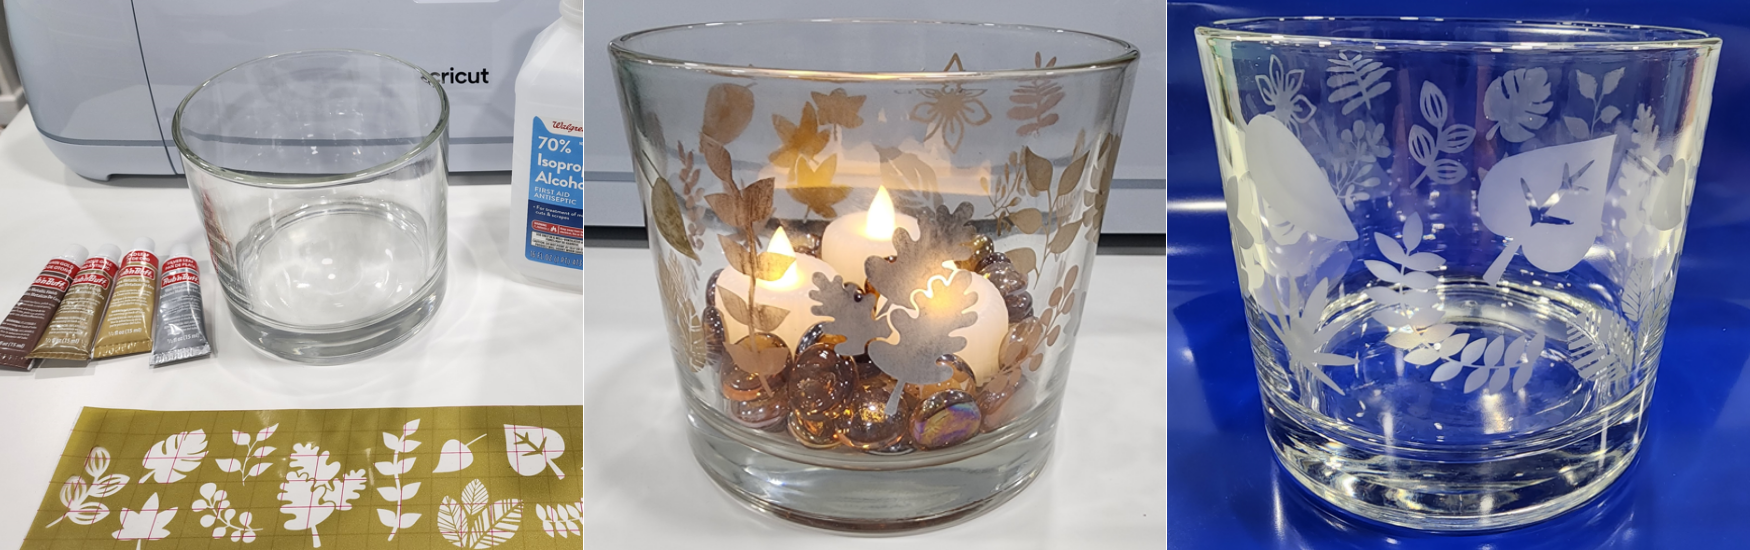
I started with a glass "vase" I found at a thrift store. I wanted to etch a Harvest design on it and place a candle inside it when it was done. I decided to go one step further and try colored etching. I researched how to do it, and it did not seem hard. There are different types of paint you can use for this process. The one I chose to use is called Rub 'n' Buff.

Materials:
Glass vase or candle jar
Cricut Removable Vinyl
Cricut machine
Standard Grip Cutting Mat
Transfer tape
Weeder Tool
Armour Etch Glass Etching Cream
Rub 'n' Buff paint
Rubbing Alcohol
Lint free cloth
For my design, I first created a rectangle to use as a template to fit the design in, making it long enough to wrap completely around the glass, so the ends would meet.

Then I selected various leaves from Design Space Images. I brought them onto my Canvas and sized them as desired.

Once all the leaf designs were on my Canvas, I started placing them on the template where I wanted them.

I ended up not using all of the leaves I had chosen.

I used removable vinyl as a stencil, attached it to my 12-in x 24-in Standard Grip cutting mat and loaded it into my Cricut Maker 3 for cutting.

After it was cut, I removed it from the mat and began weeding.

Some of the leaf designs were rather intricate, so I took my time and weeded carefully. I did not want to have to recut my stencil.
Once all the weeding was done, I wrapped the stencil around the glass vase. It did not come together perfectly because the glass was slightly narrower at the bottom than it was near the top.

I did not adjust for this ahead of time because I knew I could make it work. The ends didn't need to meet up perfectly because of the random placement of the leaves. I simply cut off small pieces of the vinyl and transfer tape where they met, so none of the leaves would overlap.

I removed the transfer tape and was almost ready to apply etching cream over my stencil. First I put some painter's tape on the upper and lower edges of the glass and over any cracks where the edges of the vinyl didn't quite meet.

Tip #1: Use painter's tape to cover areas around your stencil to to avoid etching unwanted areas. I learned this the hard way during a previous etching project.
I began applying etching cream, using a generous amount on my paint brush and being sure to brush back and forth in different directions to cover all the areas.

Tip #2: Be sure to brush in all different directions to get good coverage with the etching cream.
After the etching cream was applied, I let the glass sit for a few minutes and then rinsed it off with water. I wore gloves during this entire process to avoid getting any of the etching cream on my hands.

Tip #3: Always wear gloves when using etching cream to protect your hands.
Removing the vinyl stencil was a time-consuming task, as it did not come off that easily. I did it bit by bit, being careful not to scratch the glass with my fingernails in the process.
Tip #4: Avoid using anything sharp to remove the vinyl stencil so as not to scratch the glass in or around the design.
Here are the different sides of the glass vase with the etching completed. I took the photos with some dark vinyl behind and beneath the glass to see the etching better.

I was very pleased with the etching and how well it stood out. I believe using more etching cream and letting it sit on the glass longer made a big difference.
Tip #5: Use a good amount of etching cream to get good results.
Tip #6: Let the etching cream sit on the glass a bit longer than suggested to get a deeper etching.
The etching looked very nice and would have been fine as is, but I continued on to the next step - the color painting. I was anxious to try it and see the results.

I gathered my supplies for this part. I would need my etched glass vase, the Rub 'n' Buff, some gloves and paper towels.
Applying the paint was quite simple. I just put a dab of paint on the tip of my gloved finger to blot it onto the etched designs. Just a small amount was needed.

Tip #7: Use a small amount of Rub 'n' Buff for application. You don't need much.
Once the paint was blotted on, I rubbed it over the leaves with the tip of my finger to work it in well.

Then I immediately used a paper towel to rub the paint off the leaf designs on the glass. Here are the leaves painted silver. I chose to apply the paint to all the leaves that I wanted silver at one time before wiping it off.

I thought the leaves stood out really well with the paint and couldn't wait to add the other colors.
Although it worked okay to apply the paint to multiple leaves at once, this was somewhat problematic, as the paint dried very quickly and was harder to rub off to get an even look. As I went along, I started adding paint to only one or two leaves at a time and rubbing it off right away.
Tip #8: Only apply paint to a small area before rubbing it off, or it may be hard to remove evenly.
Here is the glass with the second color added and rubbed off on some leaves.

You can see how some of the leaves were not filled in as well as they could be. I applied more paint to some of them after rubbing the first batch off to get a deeper color. They were still imperfect, but I kind of liked that effect.
I continued adding color to the etched leaves using this same process, blotting the paint on.....

....rubbing it in....

.....then wiping it off with a paper towel.

I did use several gloves during this process. The ones I had were a little too big, which made it slightly more difficult.
Tip #9: Wear tighter fitting gloves to make the painting process easier.
Here are the different sides of my glass vase with all the colors applied.

You can easily see some of the imperfections, but leaves do sometimes look thin in some places, so I figured it gave them a more natural look. I certainly would have preferred a more "perfect" result, but I still think the color etching is pretty amazing, and I am pleased with my new centerpiece.
To fill the vase, I placed some colored glass gems in the bottom and put a few battery-operated tea lights on top of them. I chose not to use a real candle to avoid the inside of the glass getting black with soot.

The tea lights I bought have a flickering effect that makes them look more like real candles. Such ambience. I love it.
Here is my new centerpiece on the table, all set up for Thanksgiving. I may place a few glass gems on the table around the centerpiece to add a little something more. 
What do you think? Do you want to try your hand at colored glass etching now? I totally think you should.
The difference between ordinary and extraordinary is that little extra.
Jimmy Johnson
Leslie
DIY Casserole Dish Etching for beginners
Comments
Leave a comment