
Free Shipping
On Orders $49+
On Orders $49+


I just love the look of these glitter “dipped” mugs and glasses. They are actually quite simple and give such a fun look to whatever you may be drinking.

Materials:
Mug
Wine Glass
Painters tape
Glitter
Mod Podge
Paint brush
Hairband
Clear gloss sealant spray
Cricut
Cricut tools
Premium Vinyl

I started with my wine glass. To get the line straight on the wine glass I have a fun trick. I add some water to the glass to where I want the glitter to be. I then put the hairband on the glass and make sure that it is completely on the water line all the way around.

I dump out the water and then using painter’s tape I tape off right where the hairband is. Make sure that the tape is down really well and that nothing can get underneath it in any spots.

Then I taped off the mug. The water trick doesn’t quite work on this. Darn! But I just eyeball it and it is usually pretty accurate. I wanted to go up the handle so I taped the handle off as well.

Using the paint brush, paint on the Mod Podge. Make sure the entire area is covered well but don’t leave any puddles or big globs.


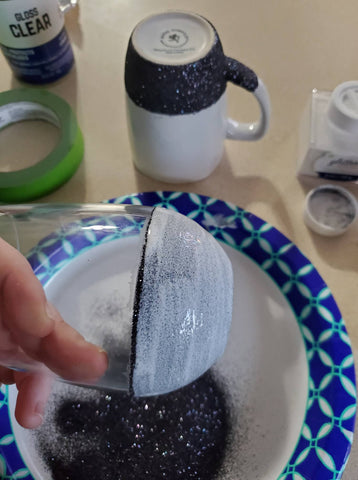
Immediately sprinkle the glitter over the Mod Podge. I do this over a paper plate because after I am done I can funnel it back into my glitter container. After the whole Mod Podge surface is covered with glitter, I use a finger to kind of bang the glass/mug so that any glitter that is not stuck falls off. I immediately and carefully take the tape off while it is still wet. If you wait till it dries you risk the Mod Podge curing to the tape and not leaving a clean line. Then set it upside down somewhere safe to dry.
After a couple hours it should be dry enough to do the next layer. You could try retaping the line to be sure but I just very carefully add another layer of Mod Podge right over the glitter. Then just sprinkle more glitter over this layer of Mod Podge. Again, I bang it off with my finger to make sure all the glitter is stuck on. Allow to dry.

When it is completely dry I use a spray sealant. I have tried different methods to make sure that I only spray the glitter and not the rest of the cup. The best one I have so far is I just hold a piece of paper towel right up against the line of the glitter while I spray. Make sure this is in a very ventilated area or outside. Allow the sealant to dry and set.

I then went into Design Space. I inserted the text and picked my font. I arranged it how I liked and sized it to my glass and mug. Then I attached the words together. I cut this out of Premium Vinyl, weeded it, and used transfer tape to put them on the cups.

You could use any color glitter with any saying for this project. I thought this mug and wine glass set was pretty funny! You could make for yourself or gift them away with coffee and a bottle of wine.
What saying would you put on your coffee mug or wine glass?
*To live a creative life, we must lose our few of being wrong
~Beth
How to Make a Full Wrap Starbucks Cup with a Cricut — Part Three

Leave a comment