
Free Shipping
On Orders $49+
On Orders $49+

Grandparents day is coming up and I wanted my kids to make something fun and crafty for their grandparents. I had this idea to let them color with infusible ink markers and then transfer it to something. As soon as my mom mentioned she could use more coasters I knew right away that was what they were going to do. I love how these turned out and are really neat, and bonus, useful!
Materials:
Cricut
Cricut tools
Light Grip Mat
Infusible Ink Markers/Pens
Cricut Coaster Blanks
Easy Press 2
White Cardstock
White Copy Paper
Parchment Paper
Heat Resistant Tape
In Design Space, I made a circle that was 3.6. Then I searched for designs with in Design Space that were drawing as the operation. I found a bunch of options and pulled them onto my Canvas.

I placed them each on their own circle to see what they would look like on the coaster size. When I had them each how I liked them I attached them to their circle. I made sure that the pattern was set to draw and the circle was set to basic cut.

I put the black infusible ink pen in Clamp A of my Cricut Maker 3. I placed a piece of blank white laser copy paper on my light grip cutting mat.

My Cricut drew the designs first with the infusible ink pen. It then cut each circle out with the fine point blade.

I made a bunch of different patterned circles even though I only had 4 coasters because I wanted my kids to choose which ones they wanted to color.

I then laid the circles out for my kids and they picked which ones they wanted to color and I showed them the markers they were to use.

Then they were off coloring! My daughter asked me to color the butterfly one. I couldn’t say no.

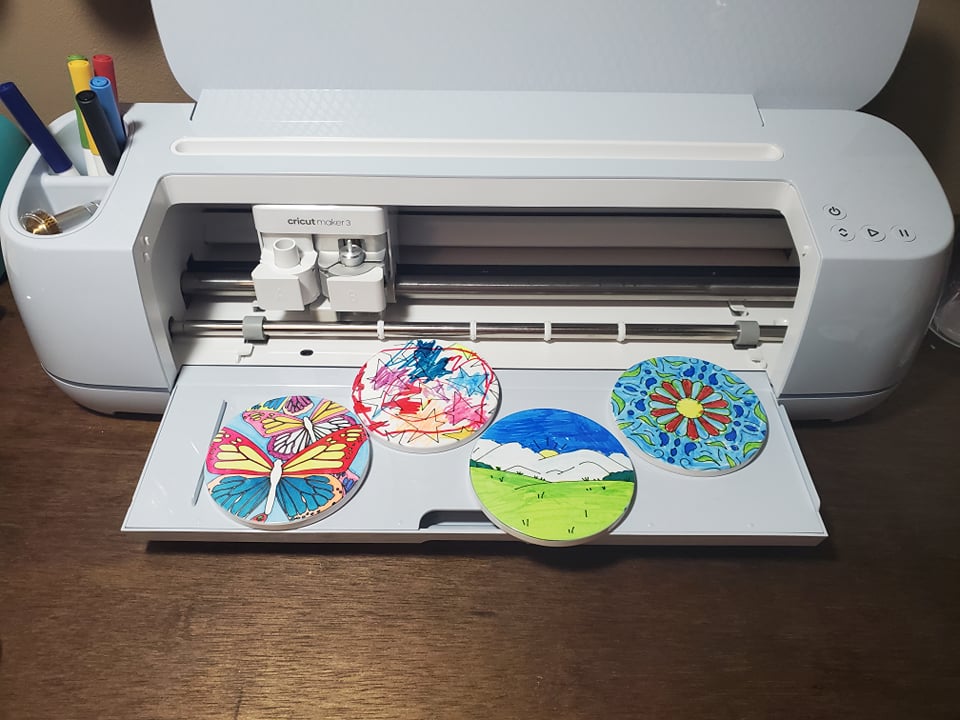
Here they are all done coloring.

I then took a coaster and made sure it was clean. I took one of the colored circles and placed it face down on the coaster.

Using heat resistant tape secure it in place.

I did this with all four coasters.

I placed a piece of white cardstock on top of my Easy Press Mat. Then the coasters FACE DOWN. The colored copy paper will be towards the cardstock. On top will be a piece of parchment paper or Teflon sheet. I used the sheet that came with an infusible ink transfer sheet for on top.

Then following Cricut’s Heat Guide, I used my Easy Press 2 to heat press it. It was 400 degrees for 240 seconds. It didn't need any pressure. In fact you may not want to touch it at all as you could possible move the paper around and ruin the design.

After it was done I let it cool completely right on the cardstock.

When it was cool I started to remove the tape.

It is such a fun surprise taking off the tape. The images get so much more vibrant after it is heated.

I just love them and can not wait for my parents to see them!

*Life isn't about finding yourself. Life is about creating yourself.
~Beth
How to Make Infusible Ink Coasters

Leave a comment