
Free Shipping
On Orders $49+
On Orders $49+

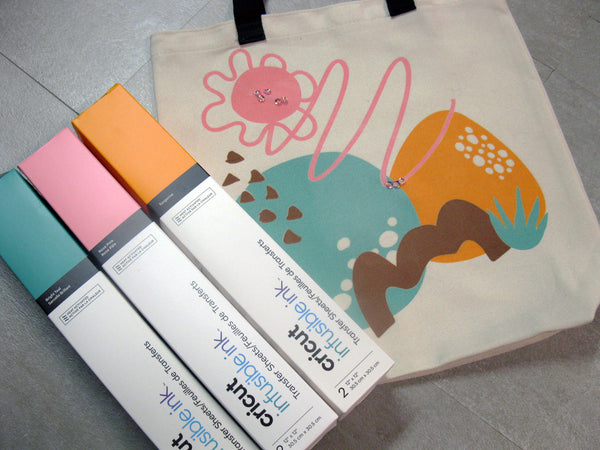
Mother's Day is around the corner, and if you're looking for a fun DIY project to make a gift, why not try crafting a colorful custom tote bag using Cricut Infusible Ink? In this blog post, we'll walk you through the process of creating a unique abstract art tote bag using multiple colors of Infusible Ink transfer sheets in one press. While you can choose any design that your mom will love, we'll guide you through the process of prepping the design, cutting the project, and pressing the tote using the Cricut EasyPress machine.
The beauty of Infusible Ink is that it requires consistent and high temperatures to bond with your substrate, and the Cricut EasyPress machine delivers just that. Plus, the EasyPress makes iron-on application a breeze, making it an essential tool for this project. So, gather the materials needed, and let's get crafting!
Find this project in Design Space.
You may be wondering - do I really need an EasyPress machine? The answer is '"yes!" A heat press is a must for Infusible Ink. The ink requires consistent and high temperatures to bond with your substrate. Your household iron, even if it can hit the temperature mark, is plagued by those pesky holes on the bottom base plate that will interfere with heat application. Cricut EasyPress is smooth and flat on the bottom – and it delivers the consistent, high temperature required. Plus it makes iron-on application a breeze. Get one. You won't be sorry!
If you'd like more information about these products, our team has written a great article that describes - What Tools Do I Need for Infusible Ink?
Add your designs to the canvas in Cricut Desgn Space. I'm combining a variety of abstract designs inspired by #M296204D6 and #M296204D4.

Move your design elements into position. When you are happy with the arrangement, use the Slice or Subtract functions in Design Space to remove any part of the design that is hidden behind another part.
This is key to this whole project. When you apply infusible ink to your project, you do not want to layer different colors of infusible ink one on top of the other. For one thing, the ink is not opaque. Plus Cricut advises against multiple reheatings of the project surface, like you might do when applying multiple layers of iron-on.
Instead, what you're going to do is prep the cut design in Design Space so that there will be only one layer of infusible ink transfer sheet applied to any part of the project surface.
For example, in this image below, part of the orange circle is hidden behind the blue one. If this were an iron-on project, we might opt to cut out both shapes - then apply the orange circle to the project in the first (bottom) layer and iron on the blue circle in a second (top) layer.

But with infusible ink, we do not want to use a bottom and top layer - only a single layer of transfer sheet. So we'll select both shapes and Slice. This will cut the shapes into new pieces where they overlap.
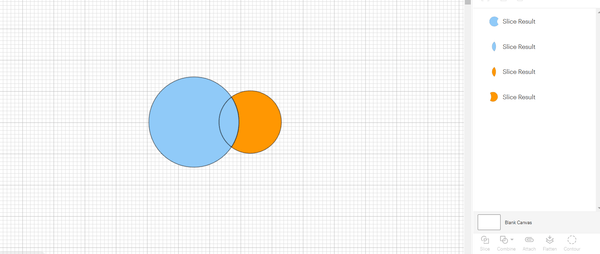
Then we can delete the piece of the orange shape that we don't want.

And Weld the blue shape back together.


Or you could duplicate the shape in front (blue) and then Subtract the remaining blue shape from the orange shape to yield the same result.

It can be a bit of a putzy process, especially if your design is complicated like this one. Keep in mind that Slice will only work on 2 selections at one time. But it will be worth the effort - I promise!
Get more information about using the Slice function in this post - How to Slice in Cricut Design Space.
When you've finished prepping your design, it's time to make the project. Mirror your design before cutting. Typically, I would set the materials setting on my machine to cut the same material I am using - in this case, infusible ink transfer sheets. This would cause the machine to cut only the papery ink layer, leaving the clear carrier sheet uncut. Then I would have to weed the cut to remove any extra ink from the carrier sheet not part of my design.
However, because I want to transfer my now single layer in one pressing, I am going to tell my machine that I am cutting heavy paper so it will cut completely through the carrier sheet. No weeding required! The only parts that I might cut to remain with an intact carrier sheet are the tiniest parts of my design like the group of triangles.
But mostly, I end up with a whole bunch of cut pieces that I will reassemble into a whole. Fit the cut pieces together like a puzzle and secure them in place using heat resistant tape.

Now the hard part is done! Next, follow Cricut's detailed instructions for heating and using an EasyPress machine to apply the ink to your project surface. Their heat guide will walk you through all the pressing steps and let you know the proper temperature and press time to use for your particular surface. As I'm making a tote bag, I preheated the tote at 385 degrees for 15 seconds and then used more heat resistant tape to secure my assembled design to the bag.

I layered my butcher paper on top and applied my EasyPress to the surface with firm pressure for 40 seconds. My design was larger than the plate on my Easypress, so I did have to press in several different areas of my design to heat it all. Lift and replace the press as you work, taking care not to move the design. Fortunately, it's pretty secure on the tote with all that heat resistant tape!

When you're done pressing, let things cool and then discard the remnants of the transfer sheets in the trash.
I did a pretty good job of pressing my design, but you can see a few spots near the edges where the ink didn't transfer completely. Those spots are right up against the straps and bag bottom, where the fabric was thicker. I should have used more pressure when pressing in those places, or sized my design better so it remained within the flat center of the bag.

But overall not a bad job. I was able to adjust and use increased pressure when pressing the other side of the bag. Again, the results were not perfect, but still a cleaner application.

One of the things I love about infusible ink is that - unlike iron-on - the ink does not change the hand or the feel of the fabric. So if you're into embroidery or beading, the inked designs are a perfect surface for adding any stitched embellishment. I added a couple of sequins to disguise my mistakes. I still think Mom will love it:)


This is clearly not the only technique for addressing the question of how to apply multiple colors of infusible ink transfer sheets in one press. You can watch one of our design team members demonstrate an another technique that works well for less complex designs in a tutorial using Cricut Mug Press - How to Layer Infusible Ink - Cricut Mug Press Tutorial.

Happy making! And Happy Mother's Day to all the moms out there.

Leave a comment