
Free Shipping
On Orders $49+
On Orders $49+


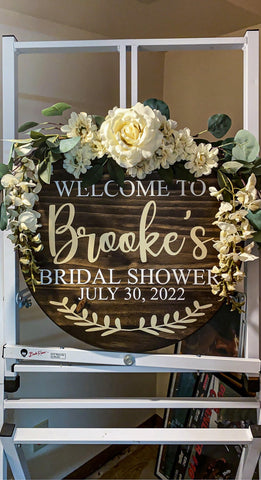
There are many beautiful Bridal Shower Welcome sign ideas, so why not create your own? Create a customized Bridal Shower Round Wood Sign with Cricut Permanent Vinyl. Perfect for your pre-wedding event, this wood sign idea is lovely to greet your party guests. I wanted to incorporate a round sign rather than a rectangle with my design. The wood round is pine and purchased from a local home improvement store.
Materials:
Sign Prep:
To prep the sign before use, it’s essential to sand the wood and use a tack cloth to remove any excess wood shavings. Use Minwax Walnut Stain and apply it with a rag. You can use a sponge brush too, but the rag is easier to spread the stain on the flat surface of the sign. Use the sponge brush on the edges of the round in the creases.
For best results, let the sign sit for 2-3 days before applying the sealant and vinyl. This way, the sign will be completely dry, and the sign will have absorbed the stain, so the vinyl properly adheres to the wood. After the stain has settled, apply Acrylic Satin sealant with a sponge brush and let the sign sit for 24 hours. This process secures the vinyl a little more when applied.
Step 1:
Go to the Shapes tab in Design Space and select the Circle. Changing the color of the Circle, similar to the stain of the sign, can be beneficial to give you an idea of how the sign will look with the gold and white vinyl is optional. Change the shape size to 18” x 18”, the same as the sign.


Step 2:
The white font is Times New Roman, and the gold font is Annie Leu. The font sizes vary because I adjusted them to my preference on how I wanted them to look. The Laurel Sprig is an image I found on Design Space that I added to my canvas.
Font Sizes:
Welcome To: 51.11
Bridal Shower: 49.35
July 30, 2022: 39.22
Brooke’s: 312.55
Laurel Sprig: 12.713


This part is optional, but the apostrophe on this font is upside down, so either we can move it in Design Space or flip it after cutting the vinyl. I chose the latter option but will explain how to flip certain characters in Design Space. Click on the Text you want to change and then click the Ungroup Tab to the right. Click the apostrophe and select Flip. I chose Flip Horizontal, then Flip Vertical. Super easy! Make sure to group them all again by selecting each character.

Step 3:
Now it’s time to cut and weed! Since there are two different colors, there will be two different cuts. I selected Smart Material, and for the Pressure, I selected more.
![]()
![]()

Step 4:
Placement of the vinyl can be a little tricky and time-consuming. Start from the bottom of the sign and work your way up. You can use a measuring tape to ensure the spacing on each side is even. Be sure to leave space at the top for the floral arrangements.


Next is time for the floral! For this step, you will need a staple gun, wire cutters, and E6000. Laying out the floral first to see how it will roughly look helps with knowing which piece to staple first. The Eucalyptus leaves are first in this case. The flowers on the sides are added next and blended in as much as possible.
When adding the flowers, using the E6000 on the back of the flowers and the stems secures them. You may need to apply more pressure for a minute or two to secure them in place. Try not to move the flowers before the adhesive is dry.
When finished with the gluing and stapling lay the sign down on the backside for it to dry overnight.


Use this time to fluff or add more flowers to your choosing. The flowers at the end were longer, so I cut them a bit and rearranged the leaves to how I wanted them to dry.
After drying, your sign is all set! Place your welcome sign on the stand for your Bridal Shower, and you're all done!


Leave a comment