
Free Shipping
On Orders $49+
On Orders $49+

This colorful acrylic painting requires no drawing thanks to a copyright-free coloring page. Reuse a wooden box to add an instant frame.

Hinged wood box
Canvas boards to fit the interior openings of the box
Gesso and wide brush
Acrylic paint and brushes
Acrylic matte medium
Spray bottle
Permanent black marker, medium tip
Deli paper
White glue
Coloring Page Image
Cut canvas board to fit the interior openings of your box. I’m using canvas board recycled from another project. The canvas board cuts easily using a utility knife and metal ruler. Cut from the front of the canvas board so the sharp cut edges are on the side of the board where it matters.
Apply gesso to the board face and edges using a large brush. Allow the gesso to dry completely.
Select a coloring page image and size it to fit your canvas boards. Locate royalty-free coloring pages on-line on websites like The Graphics Fairy or find a link to the same image I used in the list of supplies above.

Use a fluid acrylic paint to create some dripped lines on the painting. I am using phthalo turquoise, an intensely pigmented color of blue green. Thin the paint with a bit of water on your palette to help it flow. Hold the canvas upright and brush the thinned paint along the top edge of the canvas. Continue to hold the canvas upright until you’re satisfied with the dripped lines you’ve created. Using your spray bottle, spritz the bottom 1-2 in. of the painting with water to soften the color. Allow the paint to dry.

Copy your coloring page image to deli paper using a medium-tip black permanent marker. Deli paper is a wonderfully inexpensive paper available from kitchen supply stores. I love it because it takes paint and marker well and remains translucent when glued to a surface. This project takes advantage of that translucence to allow some of the underpainting to show through the woman and kitty images. If you don’t have access to deli paper, you can get a similar effect using white tissue paper. Lay your tissue paper on top of the coloring page image and trace carefully using a pencil. Iron the tissue with the penciled image to a piece of freezer paper to make it sturdy enough to trace over the pencil line using the marker. Or, simply cut your image from a printed copy of the coloring page.
Tear the images from the deli paper and position them on your canvas boards. Work on both boards together to keep sight of how the images will relate to one another in your finished artwork. When you are satisfied with the position of your images, glue them to the canvas board using your favorite acrylic medium. If you don’t have medium, decoupage glue or even thinned white glue would also work. Put the medium both under and on top of the paper, pressing the paper to the canvas gently using your damp finger.

You’ll see the deli paper is most noticeable where it overlies the blue paint on the top third of the painting. Help it recede into the background by painting over it using the same color blue paint. Begin to fill the white space between the blue drips. Here, I’ve started this process using some lavender paint applied with a medium round brush.

Continue working between the drips in this manner using other paint colors. I’m using tangerine, yellow, and hot pink in addition to lavender. Apply the paint using short strokes, distributing the colors in a balanced manner across the 2 canvas boards.
Color between the lines of your coloring page image using paint. I’m using red, white, black, and flesh tones on my lady plus cream and white colors on the cat.
Apply additional layers of paint as needed to intensify the colors.
Paint additional blue over the blue at the top of the painting.


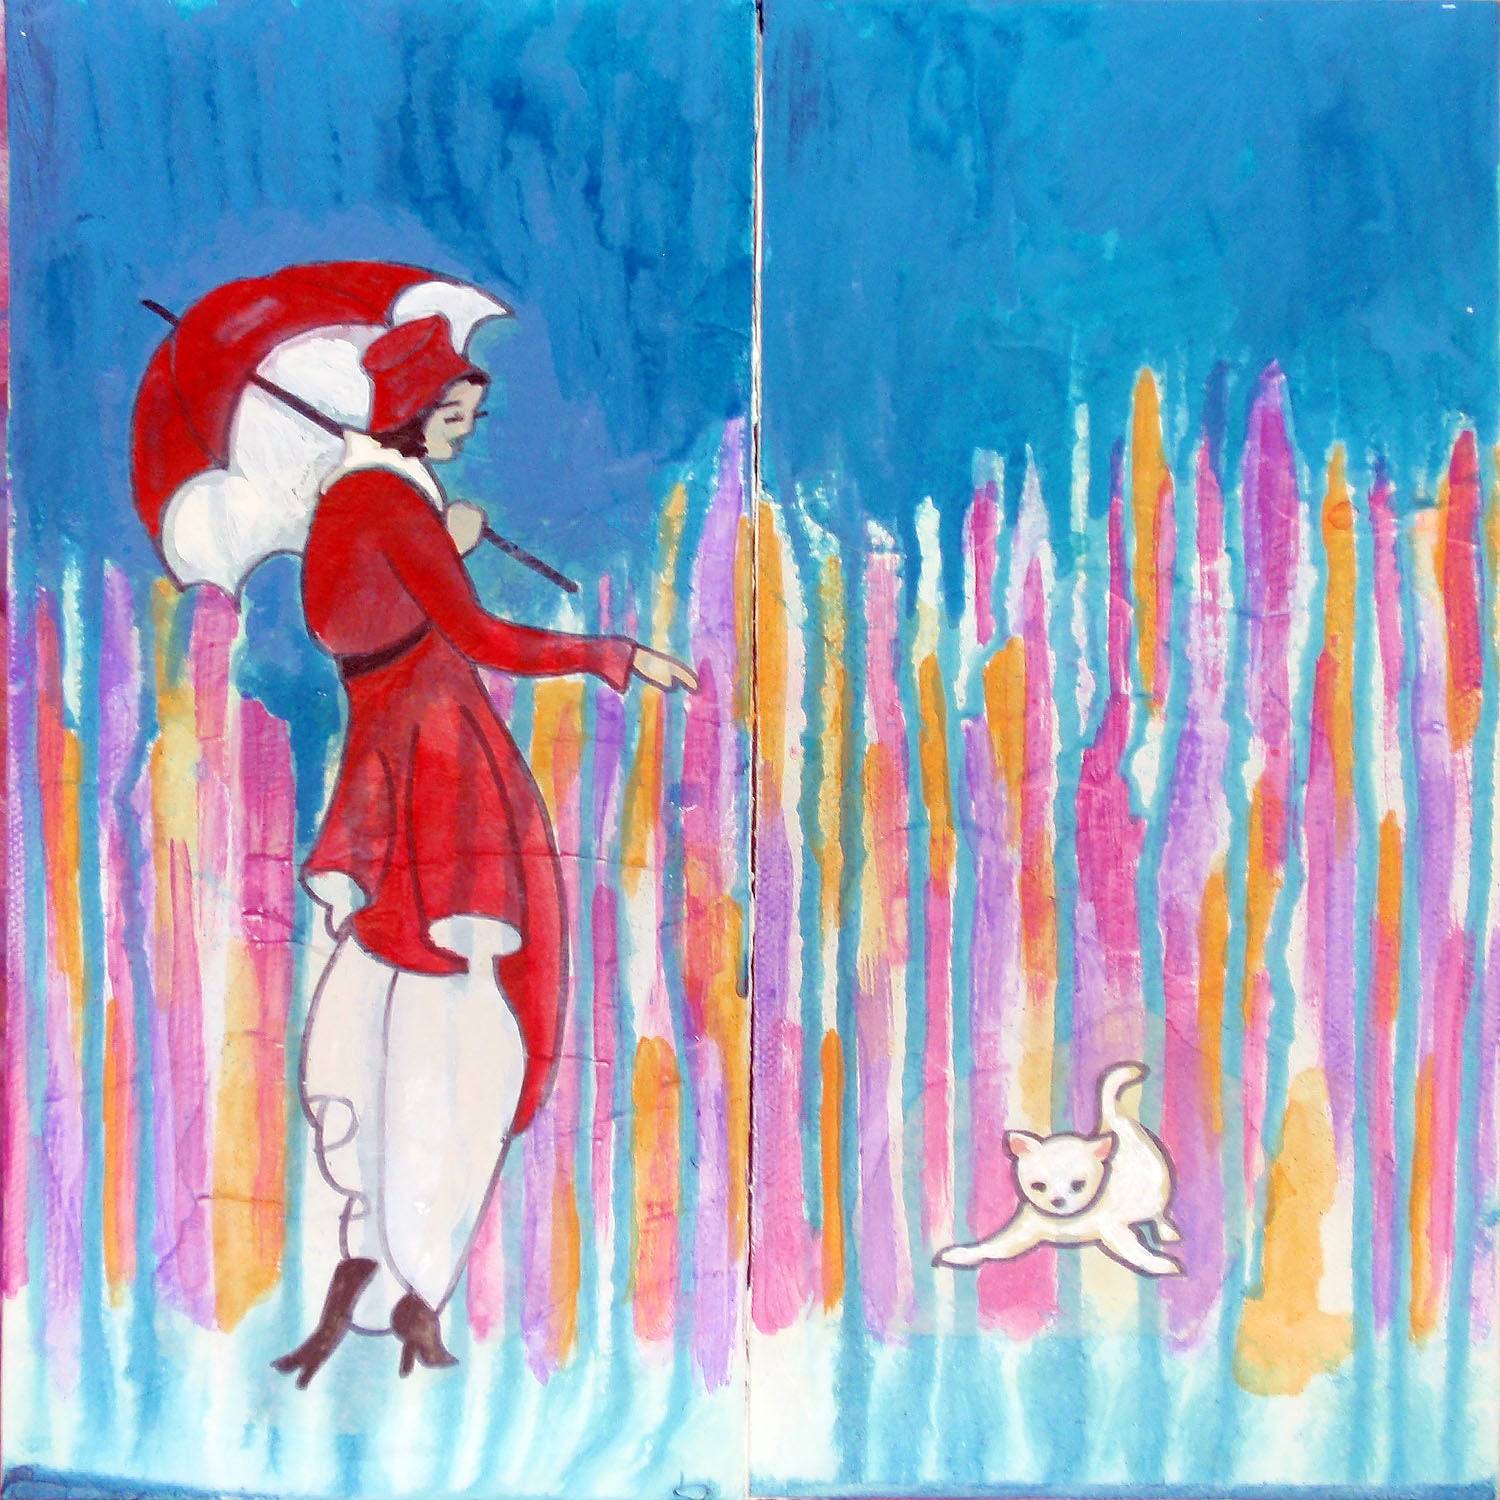
Using a small round brush, darken the outlines on your coloring page image using black paint. Feather or smudge the edges of painted black lines as you work. Add more black to areas that would be in shadow, like the folds of the skirt.

I decided my kitty needed a little red ball to play with.

Ink the edge of the canvases using permanent black ink pad and paint the canvas edges black. If desired, allow some of the black paint to come over edge onto the front of the canvas and smudge using your finger.
Add some paint spatter to the tops of your canvases. Use the same colors of paint that you used to paint between the drips plus some white. Loosen the paint by mixing a small amount of water into the paint on your palette. Load the paint on your brush, hold the brush horizontally over the canvas, and tap the handle to release the spatter.
Allow the paint to dry.

Paint the outer edges plus the recessed inside edges of your box using black paint. Allow to dry.

Glue the canvas panels into the box using white glue. If needed, protect the artwork with a sheet of deli paper and place something heavy on top of each panel while it dries.

Nature Close-Ups: Easy Watercolor Paint Project

Leave a comment