
Free Shipping
On Orders $49+
On Orders $49+

Have you heard about Cricut's new Cutaway Cards for the Joy? As soon as I heard about these new card products, I knew I wanted to try them, as I was already using their insert card sets.
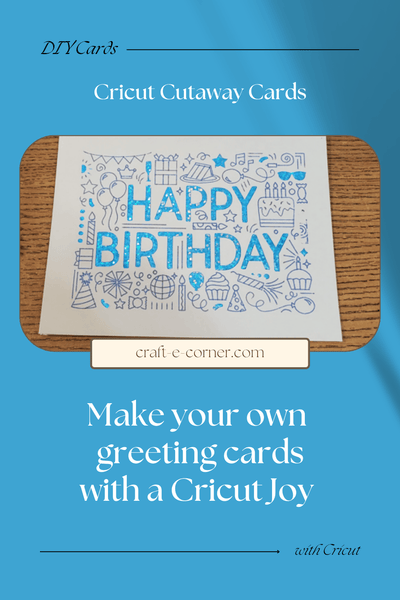
For my Cricut Cutaway Card project, I opted to make a birthday card with a design from Design Space. I thought selecting a project in Design Space with clear step-by-step instructions would help me get familiar with the materials and how they worked.
Materials:
Cricut Joy Machine
Cricut Joy Card Mat
Cricut Cutaway Cards
Cricut Tools
Cricut Pens
I purchased two cutaway card packs, the Marina Sampler and the Corsage Sampler. Each set includes 8 cards in various colors, 8 inserts, and 8 envelopes.

The Marina Sampler:

The Corsage Sampler:

This Cricut Joy Cutaway Card bundle includes these two sets plus the Neutrals Sampler. The beauty of purchasing several card sets is that you can mix and match the cards and inserts to suit your purposes. There is no need to stick to the color combinations as purchased.


For this project, I selected a Khaki color card and a blue holographic insert from the Marina Sampler.

The difference between Cutaway Cards and Insert Cards is you adhere the insert to the inside of the card before you draw on or cut the card with your Cricut Joy, instead of sliding the insert into slots in the card after cutting it.
The card has adhesive right on it for this purpose. Remember to stick the insert with the patterned side down onto the adhesive. Once you cut the card, the pattern will show through the front of the card.
Another great thing about these cards is that they allow you to use a design with small pieces not connected to anything. The adhesive will keep them in place. It gives you freedom when creating or choosing a design.
Here is the birthday card design on my canvas.

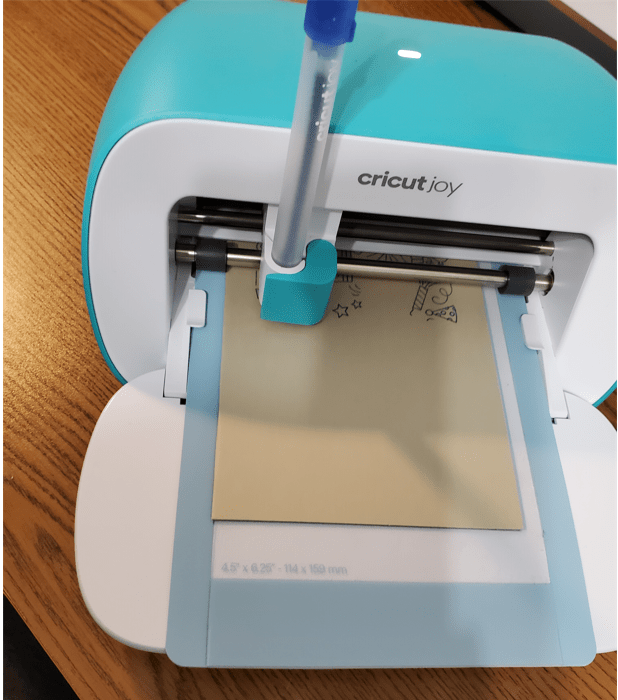
Once on the canvas, I prepared my materials. First, I removed the liner from the adhesive side of the card. Second I adhered the insert patterned side down, then inserted the card into the Cricut Joy Card Mat.


Here is the design ready to cut in Design Space.

The next step was to select Cutaway Card + Backer as an option (under Cardstock) in Design Space.

Design Space will always draw on the card first and then cut the rest of the design. When prompted, I removed the blade and inserted the pen. I placed the card mat with the card inserted into the Joy and hit Go.


When the drawing of the text and imagery was complete, Design Space prompted me to replace the pen with a fine point blade.

Then the machine began cutting out the other parts of the design.

When completed, I carefully removed the card from the card mat to avoid ripping anything. Then I carefully weeded the card to remove the unneeded pieces, making sure not to scratch the insert card beneath the design.
I used a weeder tool to pry up the edge of each piece carefully and pulled the rest off with my fingers or a tweezers.

I love how the completed card turned out. See how the small pieces inside the letters are still in place? The adhesive inside the cutaway card makes that possible.

I can't wait to create a design of my own to put on one of the Cutaway cards. It will be great not to worry about connecting all design elements. What kind of card would you like to make with Cutaway cards?
In crafting, there are no mistakes, just unique creations.
Leslie
Cutaway Card with the Cricut Joy for Mother's Day
How to Upload SVG's to Design Space to Make a Cricut Joy Card

Leave a comment