
Free Shipping
On Orders $49+
On Orders $49+


Cricut has released a new version of the insert cards. They are called Cutaway Cards. They are such and awesome update to the ease and simplicity of making cards with the Cricut Joy.

When making a card with the original insert cards you would need to create a design that did not have any pieces that would stand alone, such as the middle of letters (O, P, R, etc.). With the new Cutaway Cards you do not have to worry about that. The card itself has an adhesive on the inside of the front cover. You would then add the desired backing and the Cricut Joy does the rest. Let’s make a Mother’s Day Card!
Materials:
Cricut Joy
Card Mat
Cutaway Cards (they come with the backing)
Brayer
Inside each pack of cards includes 8 cards of varying colors, 8 backings, and 8 envelopes.

In Design Space I searched in Projects for the Cutaway Cards.

I selected the one that is titled Cutaway Card Design Setup and then clicked Customize.

This gives me the template to size the design correctly.

I then searched in images for Mother’s day. And found one that I liked. I selected it and then I clicked add to canvas.

This image is 3 different layers so I welded the whole image together so that it was one layer.

I then sized it so that it fit inside the template.

The Cricut Joy can also write with a pen on the inside of the Card. So I created text to fit inside this same template

When I was happy with how it looked, I hid the template layer, and then clicked Make It

The first thing I needed to do was to change the size of the material to the card size. Then I clicked on Continue.
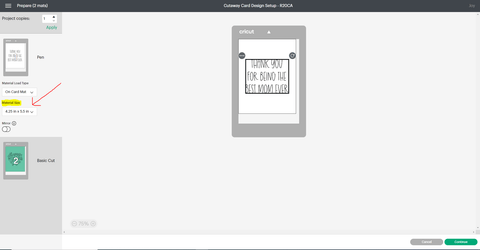
I selected Cutaway Card for the material.

I took one of the Cutaway cards and folded it inside out so that the inside of the card was facing out. I then inserted this into my Card Mat.

I like to use my Brayer to really adhere the card to the mat.

I then took out the fine point blade and replaced it with a black Cricut Joy pen.

I clicked go and the Cricut Joy wrote my message

When it was done writing I unloaded the mat and took the card out. I flipped it the correct way so that the writing was now back on the inside of the card. Next, I peeled off the protective sheet on the adhesive.

I placed my backing onto the adhesive making sure that the color part was facing down onto the adhesive.

Press down firmly so that it sticks well.

Then I inserted it back into my Card Mat.

I used the brayer again to press it down to the mat.

Then I inserted the fine point blade back into the clamp and clicked Go in Design Space. It then Cut out the design. It will only cut the pink card part and not the backing. It is actually very cool how it knows how far down to cut.
When it was done cutting I took the mat and flipped it over and peeled the mat away from the card. This helps it not start to curl as you peel it off.

Then to weed the design I used my fingers and peeled away the image.

Here the card is all weeded

Here it is with a few other cards that I've made.

The Joy has made it so easy to give personalized cards. But the Cutaway cards are a whole step above. I love how easy and simple it is to make. They are also super quick so making a card for that last minute note of gratitude or just to say hi is much more achievable.
* I am a Craftaholic on the road to recovery. Just kidding! I'm on the road to the Craft Store.
~Beth

Leave a comment