On Orders $49+
On Orders $49+


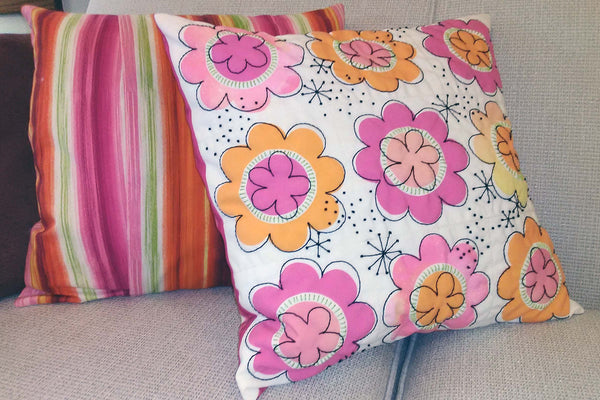
It's late February here in Wisconsin - the time of year when I've had enough of cold and snow and I am wishing for spring! Add some "Flower Power" to your spring decor with colorful pillow covers made with Cricut Infusible Ink Transfer Sheets. Design your own fabric with seamless transfers - perfect for embellishing with hand stitching! The envelope-style pillow cover makes it easy to update your home for each season.
Visit your local fabric store and purchase a polyester-cotton fabric blend for your pillow cover. Select a white or other very light fabric with the highest percent of polyester that you can find while still having minimal or no stretch. Look for a fabric with at least 70% polyester. I found mine in the section for lining fabrics.
Cut the fabric into 7 inch squares. You will need 9 squares for the cover for an 18 inch pillow. Cricut recommends using a cut design no larger than your EasyPress. Therefore, you’ll be heat transferring one design onto each fabric square and then sewing the squares together for the pillow cover.
Create your cut design in Cricut Design Space. I’m using Folk Art Flower (#M80FB929). This cut design is free with Cricut Access.
Size each flower to 5.5x5.5 inches. Make the project using infusible ink transfer sheets. Weed the cut design. After you cut the flowers, separate the center circles from the outer petals using a craft knife. This will allow you to mix and match the centers and petals as shown in the image below.

Follow Cricut’s instructions for infusible ink to transfer the design to your fabric squares. Remove any debris from the fabric surface using a lint roller as instructed and preheat your fabric for 15s. Lay one of the outer petals ink-side-down on the fabric and lay one center in the opening at the petal center as shown below. You’ll be transferring both colors at the same time.
As I am not using an official Cricut blank for this project, I used Cricut’s heat guide to help me select the temperature and time settings for my EasyPress 2. I heated the Easy Press to 365 degrees and applied it with light pressure for 120s. These settings worked well for my fabric. Repeat until you have completed heat transfer for all 9 fabric squares.

Lay the 9 squares out on a table and organize them into an appealing layout. Take the 3 squares from the top row in your layout and pin them together along adjacent sides to make a strip of 3 squares. Sew using a half inch seam. Repeat for the middle and bottom rows of squares from your layout.


Finger press all seams open. Pin the bottom of row 1 to the top of row 2 and pin the bottom of row 3 to the top of row 3. Sew using a half inch seam.

Press all seams open on the back.

At this point, you can choose to use the cover as is and proceed to make the envelope-style pillow back.

Or, you can back the pillow cover with some batting and embellish it with hand stitching like I did.

After you’ve added embroidery details, trim the excess batting from the pillow cover, leaving a pillow front about 18 x18 inches square.
Cut two 18 x 15 inch pieces of fabric for the pillow back. Fold over one inch twice along the long side of each of the back cover pieces. Pin and then machine stitch in place.

Now it’s time to assemble the pillow cover! Put the cover right side up on a table surface. Lay one of the back pieces right side down on the cover, lining up the raw edges with the pillow cover. Place the other back piece right side down, lined up with the opposite raw edge.

Pin through all layers around the whole edge of the cover. Stitch using a narrow 1/4 inch seam allowance. I like to double stitch over the hemmed edges of the pillow back because this is where the cover is most stressed when inserting and removing the pillow form.

Trim close to the stitching across each of the four corners.

Turn the cover right side out and insert an 18x18 inch pillow form.


What Tools Do I Need for Cricut Infusible Ink?
Leave a comment