
Free Shipping
On Orders $49+
On Orders $49+
![]()
Cricut Infusible Ink is AMAZING. I think it is just the coolest. But sometimes buying the Cricut blanks isn’t always that accessible or can be costly. I wanted to see what I could find locally and relatively cheap that would work with this really cool product. I went to a few different stores and found some items that I attempted.
Infusible Ink Tips:
*Infusible Ink Transfer Sheets become more vibrant when heated. If you take it out of the box and notice that it is a dull version of what you wanted, don’t worry. It will look just like the box color after it is heated.
*Oils from your skin can cause the ink to rub off when handled too much. Try to not touch the ink side of the sheet a lot. I use a brayer tool to help press it to the mat instead of using my hands.
*Designs need to be mirrored in Design Space when you are cutting Infusible Ink Transfer Sheets. They are cut, flipped, and then pressed so the image will be backwards if not mirrored.
*Weeding Transfer Sheets is a little different than weeding vinyl. You can move and wave the sheet between your hands and hear it kind of crack. This is good! Then you use your fingers to peel off the negative space.
100 % Polyester Pillow

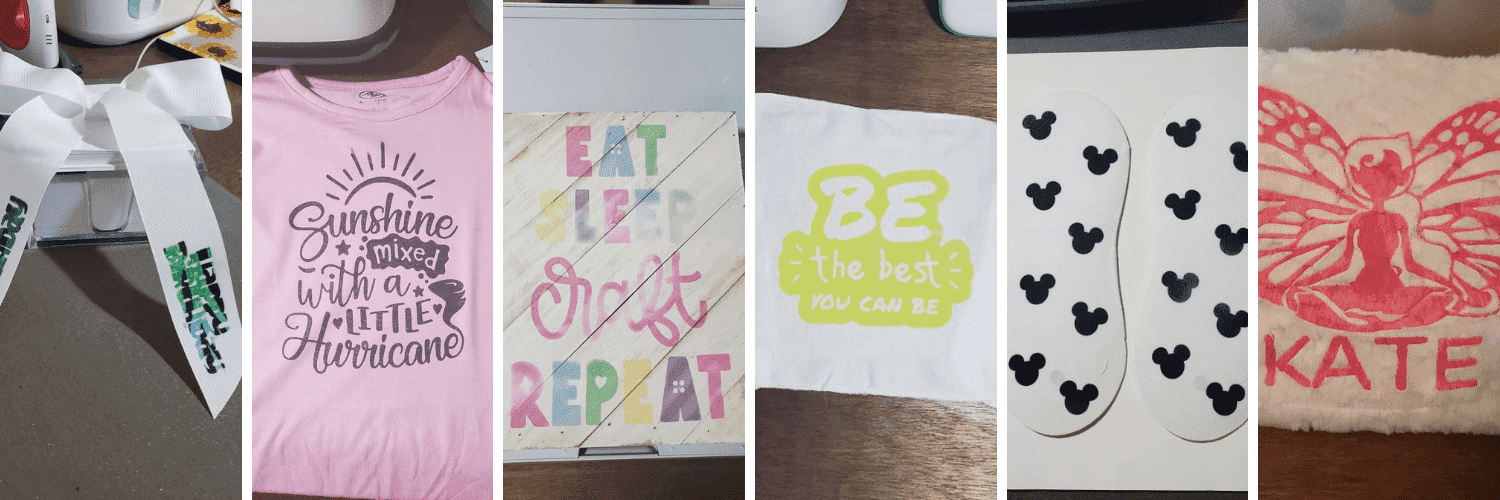
I found this pillow at the Dollar Tree and saw that it was 100% Polyester. My little lightbulb went off and was so excited to see if Infusible Ink would work on it. It worked!
Materials:
Cricut
Standard Grip Mat
Brayer Tool
Infusible Ink Transfer Sheet
Easy Press 2
White Card Stock

I created my design in Design Space and sized it correctly for the pillow. I clicked make it and placed the Infusible Ink Transfer Sheet on my standard grip mat.

Then it was ready to cut.

After it was done cutting I weeded it using my fingers.

I placed the weeded sheet right onto the pillow. The transfer sheet is sticky so it stuck right where I wanted it. I always put a piece of white cardstock on top of my Easy Press Mat so that I do not accidentally get the ink onto the mat. Then I place the protector sheet that comes with the transfer sheet on top of the Infusible Ink.

Using the Heat Guide I determined the temp and time. I then used my Easy Press 2 to heat the ink into the pillow.

After it was cool I removed the transfer sheet.

I am so excited that it worked. My niece is going to love this personalized pillow!
Socks

I needed no show socks and went to pick some up and happened to look at the materials. These socks are 70% Polyester, 27% Repreve Polyester, and 3% Spandex. Of course as soon as I saw that they were a high polyester count I figured I could put infusible ink on it!
Materials:
Cricut
Standard Grip Mat
Infusible Ink transfer Sheets
Easy Press and Mat
White Cardstock

I uploaded a Mickey Mouse head SVG into Design Space. I decided how big I wanted each one on the sock and sized it accordingly. I cut it out of black Infusible Ink Transfer Sheet.

After I weeded the sheet, I ended up cutting each Mickey individually so that I could place them where I wanted them.

I started to place each Mickey. I did the front and the back. I left the paper insert inside the sock.

Using my Easy Press I pressed the ink into the socks.

I noticed that when I pressed one side it did not do both sides like I thought it would. So I ended up flipping the socks over and pressing the other side as well.

After it was cool, I peeled off all the little Mickeys.

My socks were done!
Washcloths

I was looking for some new washcloths and stumbled upon these paperless towels. They are an all purpose towel (not necessarily washcloths but I do what I want! lol). They are only 50% Polyester so I wasn’t sure if It would work with the infusible ink but I thought I would try anyways.
Materials:
Cricut
Infusible Ink Transfer Sheets
Standard Grip Mat
Brayer
Easy Press
White Cardstock

I started by measuring the space that I wanted for the design on the towel. I found some fun saying inside Design Space and sized them accordingly.

I used a brayer to push the sheet onto my mat so that I wasn’t using my hands.

Then I cut it out of each sheet.

Then I weeded it using my fingers.

I placed a piece of white cardstock on top of my Easy Press Mat. I then put the towel on top of that and placed my design on the towel. I used the white parchment paper that came with the transfer sheet on top of the design.

Using my Easy press I heat pressed that design to the towel. I did 385 degrees for 40 seconds.

After it was cool I peeled off the design.

And it worked! Even though it was only 50% polyester, the image was super bright and it turned out great!
Pink Shirt

I was always told that with Infusible Ink it has to be a white surface. I saw this pink shirt that was 62% polyester and wanted to see what would happen if I used a pink shirt instead of white.
Materials:
Cricut
Infusible Ink Transfer Sheet
Standard Grip Mat
White Cardstock
Easy Press

I uploaded my design into Design Space and sized it. I cut it out of a black transfer sheet.

After it was cut I weeded the design with my fingers

I placed a piece of white cardstock inside my shirt and then place the cut transfer sheet on the shirt. I then put the parchment paper on top of the design and heat pressed it.

After it was cool I peeled off the design. I actually really like it! I wish it was a little more vibrant but it still turned out really nice.
Wood Sign

I saw somewhere that you could put infusible ink on wood. I just had to see if it was true. And it worked! Well, kind of.
Materials:
Cricut
Standard Grip Mat
Infusible Ink Transfer Sheets
Easy Press

I started by finding the design I liked in Design Space and sizing it according to my wood.

I attached each color together and cut them out of each individual colored Transfer Sheets.

After it was cut, I weeded each color.

I then peel off the backing of the transfer sheet and place it in the correct spot on the main piece. I picked the pink as the main because it had the most part of the design.

Then, I flipped it over and placed it where I want on the wood.

I placed a piece of the parchment paper that comes with the Transfer Sheet on top.

Using my Easy Press I heated the sheet to the wood. I had to do it in two different sections since my easy press didn’t cover the whole design.

I let it sit to cool for just a bit.

I was surprised on well it worked! There are parts that I wish were a little darker but I think that is either because I didn’t have enough pressure or the wood not being flat. I still like it and will be putting it up in my new craft room!
Ribbon

When I was trying to pick out some new ribbon for a birthday present I noticed that this type of ribbon is 100% polyester. Another light bulb went off! I just had to see what infusible ink would look like on this ribbon.
Materials:
Cricut
Standard Grip Mat
Infusible Ink Transfer Sheet
Easy Press

I placed the transfer sheet onto the mat with my brayer.

I cut out two designs and weeded them with my fingers.

I placed them onto the ribbon and used my Easy Press to heat transfer.

And it worked! Think of all the possibilities. Personalized wrapped presents. Matching theme gifts. Even personalized or themed bows. This just opened up a whole new ball game for me!

I was so surprised with how well these all turned out! Infusible Ink is one of the coolest parts of owning a Cricut. I was so scared to try it at first because I was so intimidated by it and I wasn’t sure how it worked. I am not kicking myself for not trying it sooner. I love it so much. The final result always blows my mind.
*If you are searching for that one person that will change your life, take a look in the mirror.
~Beth
What Tools Do I Need for Cricut Infusible Ink?

Comments
Leave a comment