On Orders $49+
On Orders $49+


I absolutely love making these. They are just so fun and pretty simple to make. They make great gifts as you can really make them with any image and color you want!
Supplies:
Premium Permanent Vinyl
Cricut (any would work for this project)
Cricut tools
Standard Grip Mat
Transfer Tape
Painters tape
Glitter
Mod Podge
Spray Sealant
Paint Brush

I first start with the image I want to ‘peek-a-boo’. I either find an image in Design Space or upload one of my own. I make the image about .5 for the either the width or the height depending on which is bigger. I usually do anywhere between 15-20, it really depends on how you want it to look. You could also make them bigger and do less of them. It really is up to you.

Then I cut the images out of permanent vinyl with my Cricut. I like selecting more pressure when working with vinyl. It tends to cute just a little bit better (or maybe I just need a new blade). After it is cut out I weed the excess vinyl away.
Next, I start placing the peek-a-boo images. If it is a full image I just use my tweezers to take off the backing and place where I want them to be. If It is an image with multiple parts I use transfer tape to place it on the wine glass.

After the images are placed I create the line for the glitter. To do this I fill the glass with water up until the point of where I want that line to be. I then use a hair tie and place it around the glass exactly over the top of the water line. This helps keep that line perfectly level.

Then I empty the water out and use painters tape to tape off that line. Following the hair tie exactly. Be careful because the hair tie can move around on you if it is too loose.

Now comes the fun (messy) part! GLITTER! Be sure your glass is dry by just patting some paper towel. Start painting a layer of Mod Podge on the entire bottom of the glass under your tape line and right over the top of your vinyl images. Be sure to use enough that you are covering well but not too much that it is gloopy (is that a word?)
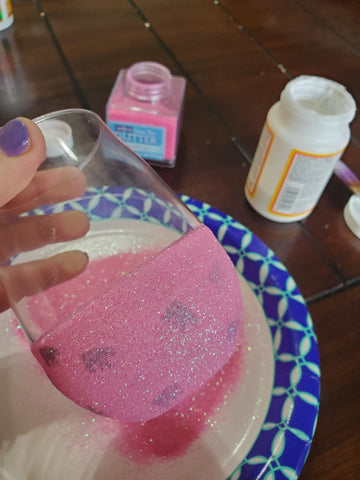
Then sprinkle your glitter on! I do this over a clean plate so that I can put the glitter that falls and doesn’t stick back in the container to use again. I stick my hand in the inside of the cup and hold it that way. I start from the bottom and work my way up. I shake it slightly as I go so I know how much I have put on or if I missed a spot. I use my other hand to bang off the excess glitter.


I take the tape off at this point. I do plan on doing one or two more coats but if you let the tape sit there and the Mod Podge dries it can be hard to take the tape off and still have a clean crisp line.
Set it upside down and let it dry. I don’t know exactly how long it has to dry for. I usually let it sit and go do something else and then come back but I’d say at least and hour or two. You can usually tell it’s dry when you can not see the Mod Podge any more.

Then do a second coat. Paint the Mod Podge right over the dried glitter. Be super careful near the line of the glitter. I don’t go all the way up until that line. Then sprinkle your glitter again the same way that was done before.


Bang the excess off again and set upside down to let dry.


If you are happy with the two coats then all you have left is the sealant. I have a spray sealant but I’m sure you could use a liquid one as well. Be sure to let the whole glass dry before using or gifting. This is not dishwasher safe. I have seen people use the dishwasher safe Mod Podge but from my experience it is still not totally dishwasher safe.
You could leave it just the way it is or add a word or saying to the top part. You would not need to seal it if it is permanent vinyl.

Here are a few others I've made. These are totally awesome gifts for the wine drinker in your life! What’s your peek-a-boo image?
*I told my husband, “See, I can fit all my craft supplies into one box.” He said, “Stop calling our house a box.”
~Beth
Glitter Dipped Coffee Mug and Wine Glass with Cricut Vinyl
Leave a comment