
Free Shipping
On Orders $49+
On Orders $49+


I think that one of the coolest features of the Cricut Maker is it’s ability to cut deeper materials, like wood! Did you even know that it could cut wood?! It’s pretty awesome. I recently tried cutting wood for two different projects and learned a lot along the way. I thought it might be helpful to compile some tips for you so that have a good idea of what to expect when you cut wood!
Tip #1: Make sure you have all the correct tools and materials
1. Cricut Maker
You are only able to cut wood with the Cricut Maker. If you have an Explore Air, I’m so sorry but it won’t work for your machine! The Cricut Maker has new technology that allows you to switch out different blades. This fancy technology is called the Drive Housing. It allows you to change out the blades and can apply up to 4kg of force. Currently, as of 6/24/19, the blades that are available in the Drive Housing are: the Knife Blade, the Rotary Blade and the Scoring Wheel.
We sell a bunch of different bundles featuring the Cricut Maker. Check them out on our website here! You can bundle and save money.

If you’re wanting to cut Bass Wood, you are going to need a few specific tools for this. First, you will need to use a StrongGrip cutting mat (the purple one). The Standard Grip mat is just not strong enough, so you will need the Strong Grip mat to cut wood.
3. Knife Blade
When you are cutting thick materials on your Cricut Maker, the knife blade is a must. You won’t be able to cut wood without this. You will also be able to cut leather, chipboard and other thicker materials with the Knife Blade. It’s definitely a blade you’ll want to keep on hand! We also sell the Knife Blade on our website for an awesome price, so check it out if you don’t have one yet!
Some other fun information about the Knife Blade – it has Intelligent Variable Pressure technology. If you are cutting a thick material, the knife blade will take multiple passes- it starts with a lighter scoring pass, another heavier pass will get into middle and then, towards the end of the cutting, it will cut lightly again. This helps you get the cleanest cut possible and mimics how you would cut if you were doing it by hand. This variable pressure helps to optimize the life of the blade as well.
4. Packing Tape or Masking Tape
We will go further this in a second, but you will need to put tape on the signs of the wood to help secure it down to the mat.
5. Wood Itself
And lastly, you’ll need wood. Cricut has a great brand of wood, but I’ve seen other wood at home improvement stores like Menards at Home Depot too. You’re basically looking for craft wood because the wood that you are cutting cannot be thicker than 1.6mm. And if you’re wondering, that’s pretty thin! This isn’t the kind of wood you’re going to be building furniture out of, it’s more for smaller crafts. The max thickness that it can cut is 1.6mm. For these projects, I am cutting Bass Wood from Cricut.

Tip #2: Use a Brayer Tool or Scraper Tool

It’s so important to make sure that your wood doesn’t move while it’s cutting. I like to use a Brayer Tool or Scraper Tool to really push the wood down on the mat.
Tip #3: Work with a CLEAN mat!
If your StrongGrip mat is full of old scraps of materials, the wood is not going to stick well to the mat. And really, overall it’s super important to keep your mats clean to improve the length of their life. I like to use a baby wipe to gently clean my mat.
Tip #4: Apply tape to the sides of the mat
When your Cricut cuts the wood, it will cut it in multiple passes. Depending on what you’re cutting, this could take up to an hour or more. You will want to apply masking tape/packing tape to the sides of the wood on the mat to help secure it down as it’s being cut. If your machine cuts through the tape, it’s not a huge deal. You just don’t want your wood to move on the mat, so the tape is necessary. I applied it on both sides of the mat.

Tip #5: Keep an eye on your Maker while it’s cutting
Like I mentioned above, it can take a LONG time to cut your wood on the Maker. It will be fine on it’s own for the most part, but I would recommend keeping an eye on it. If you have another project to work on while it’s cutting, then you can multi-task. I’ve cut chipboard before and had it get clogged up a little bit (and then needed to clean it out for the Cricut to finish cutting), so it’s just important to keep an eye on it.
Tip #6: Stick to larger, broader cuts + not intricate ones
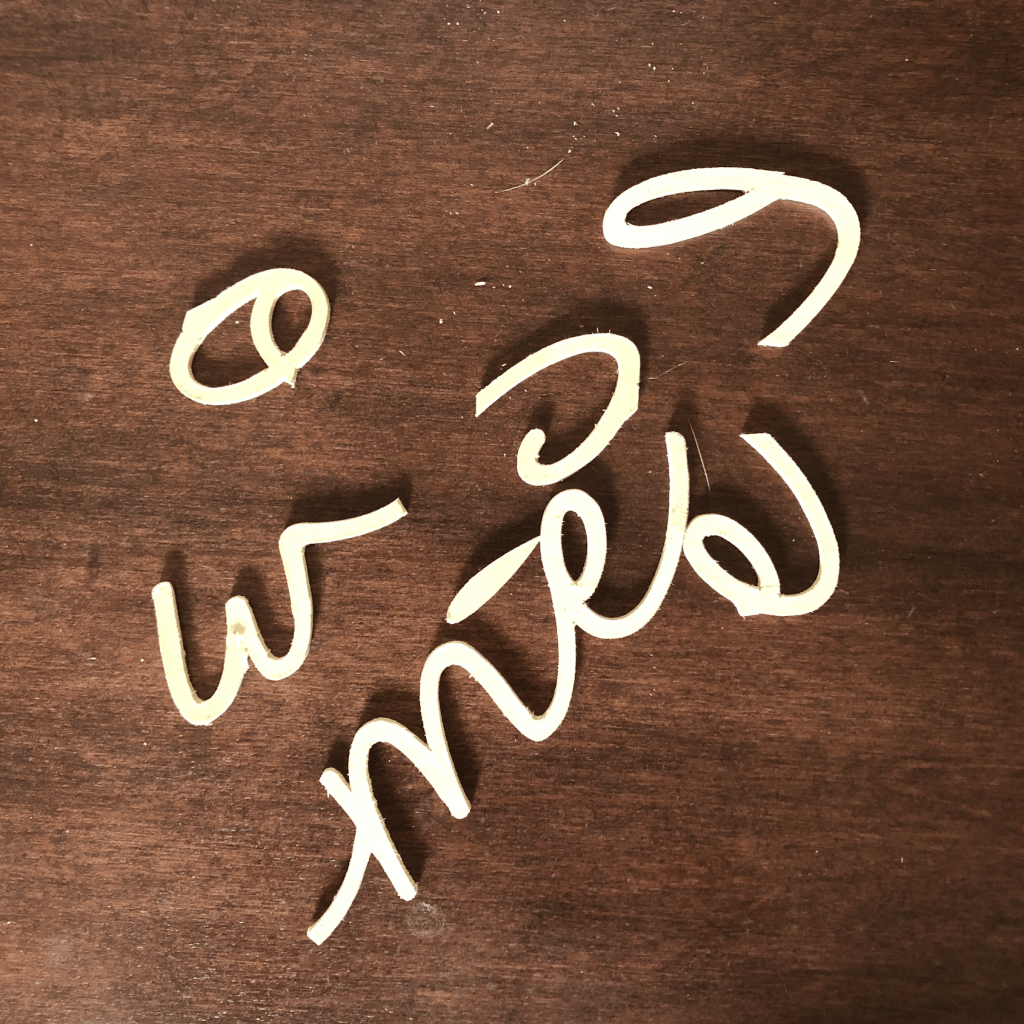
Since this wood is so thin, it doesn’t work well for intricate cuts. As you can see below, I cut out two words, “Hi” and “Welcome”. The “Hi” is about 6 inches tall and 10.5 wide. It cut perfectly! The “Welcome” is 1.75″ tall and 10.5 inches wide and broke apart as I was taking it off the mat. I definitely think this is the most important tip to know. Since the wood is so thin, it’s going to be stronger (and break less) when you have larger cuts. It’s not as strong when you have intricate cuts. All this to say, your best bet is just cut larger designs.

Tip #7: Move your star wheels (the white wheels) all the way to the right
These will need to be out of the way when you start your project, so make sure you move them all the way to the side!
Tip #8: Start with a small cut
I always recommend this to people when they are trying to cut new materials, but I think it’s especially true for wood. If you’ve never done it before, do a small sample cut so you can get the gist of it.
Tip #9: When removing the wood from the mat, peel the mat back slowly instead of bending the wood
When removing any kind of material from my cutting mats, I always let the mat do the bending instead of the material. But especially with wood, you don’t want to bend the wood and risk it breaking. You can also use a weeder to help pull the wood straight up off the mat, but whatever you do, don’t bend the wood – you’ll risk breaking it!

Tip #10: Watch the wood to make sure you don’t over cut.
Like I mentioned above, your Cricut will cut the wood in multiple passes. Right before your Cricut cuts the last pass, it will ask you you to check the material to see if it is finished or if it needs to do another pass. If you can easily remove the wood with a weeder tool, or if you see the wood starting to move up/away, then it’s finished.
However, sometimes your material will be done cutting several passes before you get to this point. Just keep an eye on the cut. If you can pull up the wood, then it is finished. You’ll just need to cancel the cut on your computer.

Cutting wood is one of my favorite things to do on my Maker. Learning these tips along the way has really helped me to be able to cut successfully from now on. I actually took this “Hi” and turned it into a project. You can read all about that here.
Tip #11: Make Sure Your Knife Blade Isn't Dull
Unfortunately, when you're working with thicker materials with the knife blade -- it can dull out super fast. I've had unsuccessful projects when I used an old blade. I would recommend replacing your blade before a basswood cut if you've used it on multiple projects beforehand.
What do you think? Have you cut wood on your Maker before? If so, let us know in the comments below!
-Courteney

Comments
Leave a comment