
Free Shipping
On Orders $49+
On Orders $49+

Do you have lots of vinyl scraps to use up? Here is a Cricut project that will allow you to do just that. You simply place strips of different colored vinyl onto your cutting mat and cut out your design.

I saw a project similar to this and loved the way it looked, so I decided to make one of my own. It was applied to a wooden frame with a clear surface and no backing, and I found a bigger one that my design would fit on.

The original project was only one word, but I wanted to do a larger design with an entire quote. I planned to hang this sign in my craft room at our new home.
For another project using vinyl scraps, see this post: First Day of School Sign with Cricut Vinyl.
Materials:
Picture frame with no backing
Cricut Explore or Maker Machine
Permanent vinyl strips in various colors
StandardGrip Cutting mat
Transfer tape
Weeder tool
Scraper
White paint (I used acrylic)
Paint brush
Rubbing alcohol
First step is to choose a design. Whenever I see a quote I like on Pinterest, I save it, so I have quite a collection. I chose one that was inspiring to me and recreated it in Design Space, choosing a font and spacing it like the original one.

Once I was satisfied with it, I grouped and attached the design to prepare for cutting. Then I started applying my vinyl strips to my cutting mat. I used the green StandardGrip mat. I placed the strips very close together, so there would be no gaps. I used my Cricut Portable Trimmer to make sure each one was straight for this purpose.

While the idea is to use up scraps of vinyl, I did have to cut a few skinny strips, some for colors I did not have scraps of and some because my scraps were not long enough. If I had done a single word, I may not have had to do that.
I will note here that I mirrored my design before cutting it, as I would adhere it to the back side of the frame surface. I would paint over the design on the surface of the frame, and I wanted the paint on the back, so it would look smooth in the front.
See this post for another project that adheres vinyl to the back of a surface and mirrors the image: Design #11: Kitchen Utensils! Personalized Glass Cutting Board.
Next, I loaded the mat into my Cricut and started cutting out my design. I was a bit concerned about the blade cutting over the seams where the strips met, but there was no issue with that at all.

I started weeding the design next. It is important to note that I left the design on the cutting mat while weeding. If I took off each strip and weeded them separately, I would then have had to tried to match them back up to line up the letters. There would be no point in doing that.

Here is the design all weeded on the mat. I would again leave the strips on the mat to apply the transfer tape.
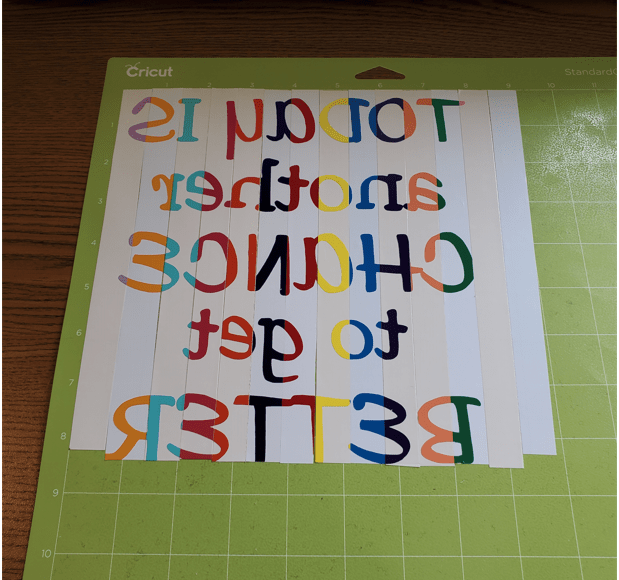
You can see at the bottom of the design that the vinyl strips were just barely long enough for the design to fit on. I guess my measuring left something to be desired. Luckily, it did work. I would not have wanted to start over.
Now it was time to apply the transfer tape. I cut a piece the same size as the vinyl backing. Then I carefully applied the transfer tape, smoothing it out across the design as I went.
![]()
Here is the design all weeded and applied to the transfer tape. I put the piece of backing underneath it for better viewing. From this view, the tops of the letters were sticky, as they would be applied to the back of the frame surface.
![]()
Before adhering my design to the frame surface, I removed it from the wooden frame and cleaned it off with rubbing alcohol. I wanted to be sure the vinyl would stick well.
 The clear insert of my frame was acrylic, not glass. Whichever you use will not make any difference. I just found that this frame was more lightweight with the acrylic, and it was bendable, making it easy to insert back into the wooden frame. Maybe they don't even make these types of frames with glass. I've never used one before.
I applied my design to the back of the acrylic frame surface, using an extra large Scraper to smooth it out. Notice how the design is backwards from this side.

Then I removed the transfer tape backing.
![]()
Here is the frame surface with the design applied. The next step is to paint over the vinyl letters from the back.

I covered my work area with newspaper and placed the completed design on it upside down to prepare for painting.

I used a small paintbrush with white acrylic paint and brushed right over the top of the vinyl letters. I made the painted area look like an offset with rounded edges instead of the just making a square of paint, which was easier, too. Here is how it looked from the back.

Notice the brush strokes in the paint. I did not want those showing on the front of my picture, which is why I applied the design to the back. I did a couple layers of paint to get good coverage.
And here is my completed picture frame, all reassembled. I love how it turned out and cannot wait to hang it in my new craft room!

What type of design and which colors of vinyl would you use for a project like this? You could match colors to a room or just use your favorites. You could even use an image instead of a quote or a combination of words and images, like my coworker, Beth, did for her project, Hot Glue Gun Plate with Strips of Cricut Vinyl.
My goal is not to be better than anyone else, but to be better than I used to be. (Wayne Dyer)
Leslie

Comments
Leave a comment