On Orders $49+
On Orders $49+


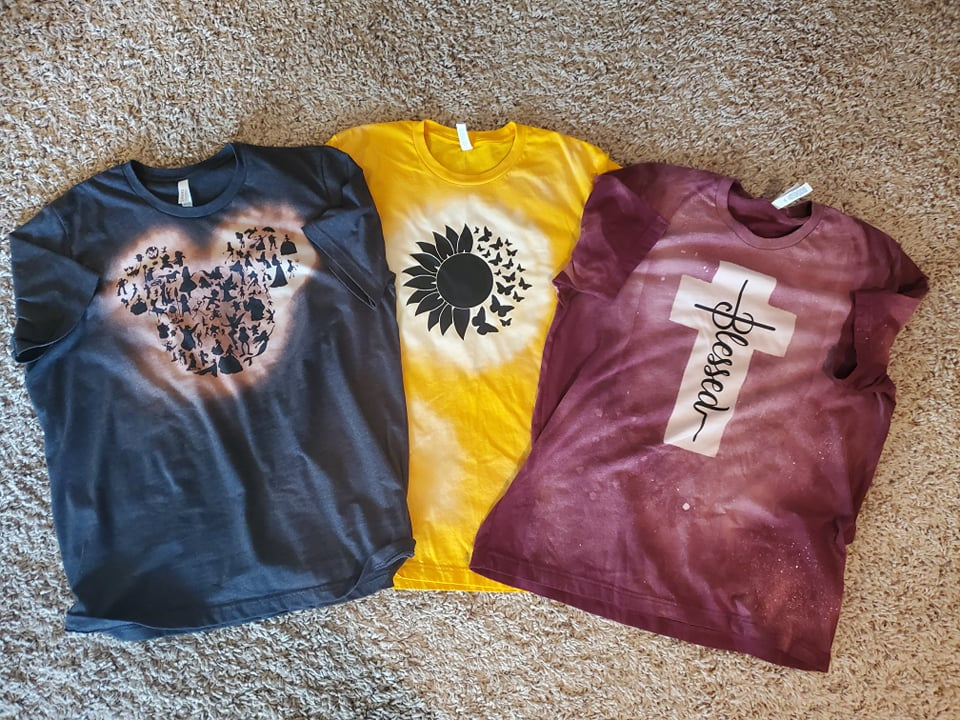
I have seen a lot of people bleaching shirts to make a really cool effect. I wanted to see how I could use my Cricut to make the shirts even better. I used the Cricut 3 different ways to make these very different looking shirts. I love how they turned out and was even told that they look store bought! How cool is that!
Materials:
Cricut
Cricut Tools
Easy Press
Permanent Vinyl
Transfer Tape
Iron-On Vinyl
Spray bottle
Paper Towel
Household Bleach
Cardboard
For Each Shirt:
Bleach can really damage shirts. I found that if I use a half water and half bleach mixture it isn’t as harsh on the shirts and I still get the same results. I use a small little spray bottle. You really don’t need much of this bleach solution to get some really cool shirts.
1. Negative Space Image Stencil

I bought this SVG from a shop on Etsy. I uploaded it into Design Space and sized it to the right size for my shirt.

I had my Cricut cut out the design out of Permanent Vinyl (NOT IRON ON). We are using the image as a stencil and we will be removing the vinyl later so we do not want to iron on the vinyl.

After it was done cutting, I weeded the design. I then used transfer tape to place the vinyl image onto my shirt. I placed the transfer tape onto the image while it was still on the mat. I used a scraper to burnish the vinyl to the transfer tape. I then flipped it all over and peeled off the mat and then the vinyl backing. I used my brayer to really push the vinyl image onto my shirt. Taking off the transfer tape can be a little struggle so I just took my time and pressed each image down really well as I went along.

Then I took my shirt outside and placed cardboard in the middle. I started to spray the bleach mixture over the vinyl. I started in the middle and slowly worked outward. It takes a minute or two for the color to change. But I just did a little spray and waited to see where I still need to go. I did this over and over till I got the result I was looking for. It actually got lighter the longer it sat on the shirt.

When I was happy with the look, I took a piece of paper towel and dabbed off the bleach liquid from the vinyl. The bleach pools on the vinyl and can make a mess if you don’t dab it off.

I let the shirt dry for a little bit. Then, I removed the vinyl.

Note: You do not need to over saturate the shirt. If you do the bleach can go underneath the vinyl. Here is one of the characters that didn’t show up because there was too much bleach in that area.

When the shirt was completely dry I washed it in cold water and it was ready to go!
2. Stencil for Shape
For this shirt I used Cricut Vinyl to create the stencil for the Cross. If I were to do this process again I would make sure that the stencil covered more of the shirt so that the overspray didn’t effect the shirt right away. You can also see the outline of the stencil.

In Design Space I created a cross with two rectangles. I made sure that my ‘blessed’ design would fit inside.

When I went to cut the design out I made sure to place it in the middle of the mat. I cut it out of permanent vinyl and weeded the cross out.

I used Transfer Tape to help hold the shape of the cross together as I put it onto the shirt.

I took the shirt outside and again put cardboard inside the shirt.

I started by spraying on a paper towel and dabbing it on the shirt inside the cross shape. I wasn’t seeing enough change at first so I started to spray directly onto the shirt. What I didn’t notice was that the wind was making some of the spray go farther outside the stencil.


When I pulled off the vinyl cross you could tell the outside lines of the vinyl. I tried to spray around those lines to try to get it to go away but you can still see it. Oh well.

After it was completely dry I washed the shirt in cold water and then added my ‘Blessed’ iron-on vinyl with my Easy Press.

3. Iron-on Image

This shirt I started with just bleaching a plain shirt.

I made a circle towards the top. I would spray a small circle and then wait for the color to change to see how big the circle is.

When the circle was good I sprayed a little bit on the rest of the shirt in areas to give it a fun distressed look.

I turned it over and sprayed the back as well in areas.


When it was completely dry, I washed it in cold water. I then added my sunflower image with Iron-On vinyl and my Easy Press.

I love how these three shirts turned out. I can't wait to make more for my friends and family!

*Everyone starts at the beginning; getting good at something starts with trying.
~Beth
How to Make a T-Shirt with a Cricut
Comments
Leave a comment