
Free Shipping
On Orders $49+
On Orders $49+

Have you asked: Can the Cricut Maker cut Felt?
Do you need decorations for an upcoming graduation party? I made this felt banner with Iron-On Vinyl for my grandson's party with my Cricut Maker, and I was really happy with how it turned out. It was my first time using my rotary blade and cutting felt on my Cricut, and I was impressed with how well it worked. I chose to use Glitter Iron-On for the letters plus two images.

Materials:
Wool felt, royal blue
Wool felt, black
Glitter Iron-On, Tuxedo Sampler
Cricut Maker
Cricut Rotary Blade
Cricut Fabric Mat
Cricut Standard Grip Mat
Contact Paper
Cricut Easy Press
Cricut Brayer
Cricut Weeder Tool
Sewing Pins
Sewing Ruler
Scissors
I purchased bulk felt from a roll because I needed a lot. I went a little overboard with this project, which is not surprising; I don't do anything small. I ended up cutting out 30 letters, including punctuation, plus 2 images, which was for two different banners. I began to question the wisdom in this when I started measuring the placement of the letters on the banner pieces. What was I thinking?
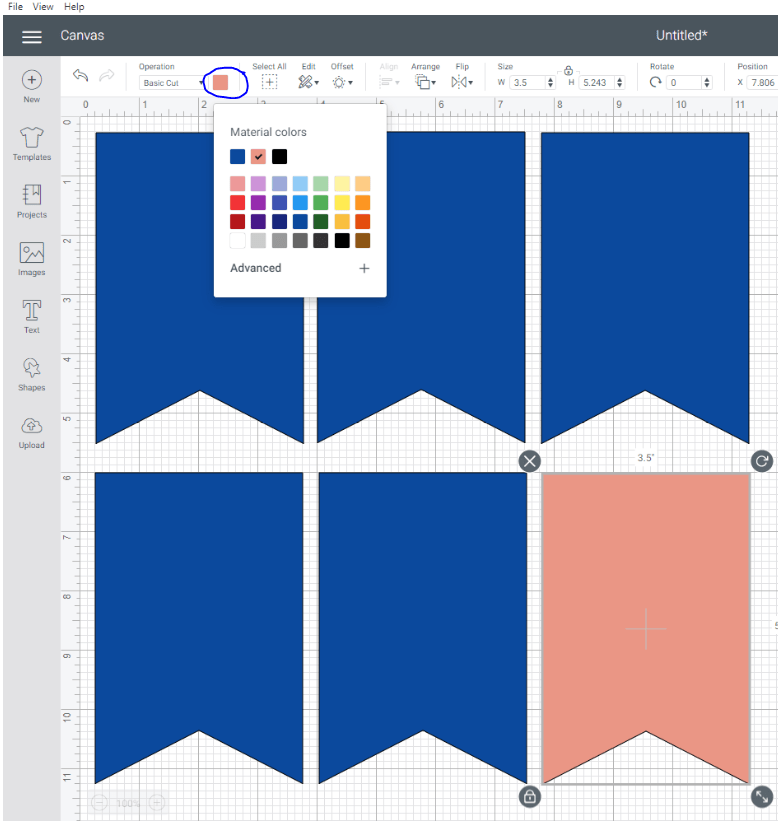
In Cricut Design Space, I first selected a banner image I liked and inserted it into my Canvas. Then I sized it and duplicated it to cut 6 banners at a time on my mat. That is how many would fit on a 12" x12" piece. For some reason, I never thought of using my 12" x 24" mat and cutting even more pieces at once. Oh well, I will remember that for next time.

Then I changed the color of the banner pieces to match my felt. I would be cutting two different colors, so I wanted to be prepared for that. Besides, the blue was much prettier.
Once I had the banner pieces ready to cut in Design Space, I cut out 12" x 12" pieces of blue felt to put on my mat. I measured and cut one first and used that one as a pattern for the rest. It would take 5 pieces of felt to cut out all the blue banner pieces. I would also need a small piece to cut out two black banner pieces.

Before putting the felt on my Fabric Mat, I made use of a hack I learned from another project I saw online. I stuck a 12" x 12" piece of contact paper on top of my mat, sticky side up, so the felt would not leave residue on my actual mat.
The contact paper I had purchased previously was about 18" wide, and I wanted it to be 12" wide. I knew I would only use it for this purpose, so I used a utility knife to cut through the entire roll to make it that width. It would have been easier to purchase a shorter roll, but it worked out okay.

Once the contact paper was applied to my mat, I placed my first blue felt piece onto the mat and smoothed it out with my brayer.
Now I was ready to cut out my banner pieces. I clicked on "Make It" in Design Space and chose my fabric. I was using wool felt fabric, so I selected that.

Then I changed the blade in my Cricut Maker to the Rotary Blade to cut the felt.

Then I proceeded to cut out the blue felt pieces. I loved watching how the rotary blade would lift up, rotate and go back down every time a change in direction was needed. I was impressed with my Cricut Maker all over again.

Once I had cut one sheet of felt, I weeded the felt banner pieces and removed them from the mat. It was so easy!. The felt just peeled right off with my fingers.


I also placed some black felt onto my Fabric Mat to cut out two banner pieces that I would put images on to go between the words in the second part of the banner.

Here is how my mat with the contact paper looked after I cut banner pieces out of several pieces of felt.

It seemed as though the contact paper was still quite sticky, so I went ahead and cut out all of the banner pieces using the same piece of contact paper. To cut multiple pages of the same design, I was able to just continue to load the mat and hit 'Go' as many times as needed.

Once all the banner pieces were cut out and removed from the mat, I was ready for the next step. Here is how the contact paper on the mat looked after all the pieces were cut out.

I did discover one problem when removing the contact paper from my Fabric Mat. Because I had to unload the mat from the machine each time to weed before cutting the next set of banner pieces, the Maker did not cut along the same exact lines as previous cuts.
In addition, the blade actually ended up cutting through the contact paper, so removing it was a bit difficult. I had to use my scraper and spatula to remove all of it, as there were some very skinny strips that had to come off. I ended up cleaning my mat with a baby wipe after all. Maybe next time, I would remove the contact paper after each cut when doing multiples or skip it altogether. This hack might work better for projects requiring only a singe cut.
Now I was ready to create the letters and images in Design Space. I simply used the Text box over and over to create each individual letter. I wanted the letters separate in order to space them on my Canvas for cutting.

Then I sized each letter so they were all about the same size. Because the shape of the letters varied, this did not happen automatically, even though I used the same font for all of them. I chose what size I wanted based on the size of my banner pieces and unlocked the dimensions to make it possible to get that size.

After I was done sizing each letter, I locked the dimensions, so they would stay how I had set them.

The words I was using were, "Congratulations!" and "Great Job Jacob!" I counted out how many of each letter I needed. Once I created and sized each letter, I duplicated it to have the correct amount of a particular letter. I arranged all the letters as close together as possible, so I could cut them all out of one sheet of Glitter Iron-On. I had purchased a sampler pack, and only one sheet of each color was included. I did not realize this until I started the project.

Once all the letters were sized and arranged on my Canvas for cutting, I selected 'Make It' in Design Space and followed the prompts to choose my material and to put the fine point blade back in my Maker to cut the Iron-On. I made sure to mirror my image, so the letters would be right side up when I ironed them onto my banner pieces.

After the letters were all cut out, I began to weed them.


Then I cut them all out separately with the carrier sheet backing attached.

Now it was time to select a couple images to place between the words, "Great", "Job", and "Jacob". I chose a graduation cap image first from 'Images' in Design Space. The one outlined in green is the one I chose. I inserted this into my Canvas.

Then I found an image of a diploma I liked. Since it was rather small, I created text of '2021' to go with it. After adding these images to my Canvas, I changed the color to cut them separately on the Maker. Then I grouped them and clicked on 'Attach' so they would cut exactly how I had them on my Canvas.

Now the images were ready to be cut and weeded.


Before adhering the letters and images to my banner pieces, I wanted to cut slits along the top of the them for the cord to go through. I chose not to use a banner image that had holes at the top for that purpose.
I just folded over the top edge of each piece, held it down with one hand, and used a scissors to cut a small slit on either side.

You can see that the slits are not the exact same size, but they won't really be seen. It's actually quite surprising that this didn't bother me.

Now I wanted to figure out how to center the letters and images on the banner pieces. I tried just eyeballing them, but I had a hard time getting them even. I could not handle having them crooked, so I decided to actually measure and put pins in the banner pieces to make them even.

Probably not many of you would spend time doing that, but my perfectionist tendencies made it necessary.
After measuring all of the felt pieces, I had one left over and discovered that I only cut one letter 'C'. This was a problem because I already used my one sheet of black Glitter Iron-On. I am including the process I used to solve this problem at the end of this post, if you are interested.
When I was ready to iron on all the letters and images, I used the Cricut Heat Guide to preheat my Easy Press to 285 degrees to apply the images. I originally cut those out of holographic iron on, which required that temperature. However, once they were ironed on, they did not look blue the way I pictured them. I then recut them out of white Glitter Iron-On. Here is how they looked after being applied, only they are much brighter in person.

When I was ready to iron all the letters onto the felt, I was able to put three banner pieces on my Cricut Easy Press Mat at a time to make it quicker.

Near the end of the project, I realized I could iron on four pieces at a time. I guess if I ever make another banner, I will have some new guidelines to follow. I seem to have learned a lot while doing this.
Here are several letters and an image ironed onto the felt. I just chose a few letters to include. They were part of the word 'great'. You might think food was on my mind at that time, but it wasn't.

I chose to use some black cord to string the banner pieces. I taped the end of the cord for easier threading.

I inserted the cord so most of it was behind each banner piece.


Here are the banners up on the wall. I did first one and then the other one. I hung them up at work to get the photos. It was nice to see what it would look like ahead of time and to figure out how far apart to space the banner pieces. I am so proud of myself. I did not measure anything and just eyeballed it. I left the cords long at the ends to allow more options when hanging them.


I was somewhat disappointed because the black letters on the blue felt pieces did not show up that well, especially if I stood back a bit. I thought maybe I could outline the letters with white fabric paint to make them stand out more, but I don't really have time for that before the party. This will just have to do. Of course, it's hard to get that idea out of my head. Hmmm.
Even though this project took me a while because I chose to do two banners and did all the measuring, I love the idea of having homemade decorations. Also, with the felt pieces not permanently attached to the cord, some of the letters could potentially be used again for a different event. What upcoming event do you have that you could make a banner for?
"I'm a craftaholic on the road to recovery. JUST KIDDING! I'm on the road to the craft store." (Unknown source)
Leslie
Please see below if you are interested in how I solved my problem of the one missing letter.
Problem Solving
I mentioned earlier that I was short one letter but did not have any leftover black Glitter Iron-On that was not used. I took the piece of Iron-On I had weeded off the carrier sheet. There was a strip at the bottom wide enough and long enough to cut several letters out of. I cut a piece and stuck it back onto a piece of the carrier sheet, but it did not stick that well. I tried to cut it several times, and the third time, my Cricut managed to cut about halfway around the letter before the Iron-On shifted on the mat.
I decided to use this one and finish cutting it by hand. I cut a 'C' out of cardstock with my Cricut to use as a pattern. Then I held the partially cut 'C' of Iron-On against the pattern and cut the rest by hand. It was not completely perfect, but it worked. I was able to get it ironed onto the last felt piece without too much trouble. Crisis averted. Yay! I was not going to give up.
This taught me two things. One - always double-check your design before cutting it. Two - always cut your material to size before placing it on the mat, if possible, to leave a bit of extra in case you make a mistake.
I hope this helps somebody. Sometimes it seems like my simplest projects are the ones I make the most mistakes with. Go figure.

Leave a comment