
Free Shipping
On Orders $49+
On Orders $49+


We are moving into a new house and my daughter wants a princess bedroom. I have been wanting to make a 3D mandala for awhile and thought this could be the perfect fit. I bought the cut files off of Etsy. The Cricut makes quick work of the intricate designs.
Materials:
Cricut
Cricut Tools
Light Grip Mat
Shadow Box
Cardstock
3d Foam Adhesives


I started by taking the back off of the shadow box that I bought and measured the inside of the glass. This is different than the original size of the shadow box so be sure to know how much space you have for your design.

Using that measurement, I sized each princess accordingly after uploading the cut files into Design Space.

There were four layers for each princess. I collected the colors of cardstock that I wanted for each layer.

Then, layer by layer the Cricut cut out the princess mandalas.

When removing each layer from the mat, I flip over the mat and peel back the mat away from the paper. Instead of the paper away from the mat. This leaves the paper straight and not curled.

Most of the cardstock pieces will be left on your mat. I use a scraper tool to scrap off the little pieces.

Sometimes there are pieces that are still hanging on to the main design. I use a weeder tool to poke it through to remove it.

Here are all four layers cut and ready to attach.

These are the foam adhesive squares that I used. These were still too big, unfortunately, so I had to cut them even small her to fit.

I started with the 2nd layer and flipped it over and attached the adhesive foam. Always place the foam underneath the layer you are working with so that it does not show on top. (Don't mind the price tag still on Cinderella's head)

Line it up with the bottom layer and attach.

Repeat with all the layers.
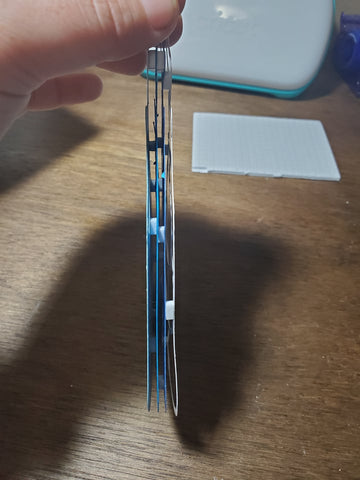
Here is a side view of all the layers attached.

I used my Circuit to cut out a white square as well to attach to the back of the shadow box. I used double sided tape to attach the princess to the white square.

I replaced the back and closed the little tabs.

And one princess was done.

Here are all 6 that I did. They are so pretty and I can not wait for them to be put up in my daughters room in the new house.
*Those who don't believe in magic will never find it.
~Beth
How to Use Cricut Machine with Shrinky Dinks

Comments
Leave a comment