
Free Shipping
On Orders $49+
On Orders $49+
Here are some inbox trays I personalized with Cricut vinyl for our office after our company moved to a new location. We needed an inbox and an outbox, and I thought it would be fun to create some trays with our company colors. Our logo includes purple and green, so I used these colors, and the trays I found were white.

Materials Needed
2 inbox trays
Cricut Maker, Explore or Joy
Cricut Standard Grip Mat
Cricut Tools
Cricut Premium Vinyl Permanent in desired colors
Transfer Tape
Painter's tape (optional)
Ruler (Optional)
First I created the text. I chose to label the trays as Incoming and Outgoing. I used a Text box and typed "Incoming" first and then chose the font. I went with "AR CENA."

Then I opened another Text box and typed "Outgoing". Whenever I type new text, it always shows up in the upper left corner of the Canvas and ends up right on top of my previous text. I just move it off when I'm done typing. If it really bothered me, I could move the first group of text off to the side or down lower on the Canvas.

Since I already had set the font for the previous text, the new text automatically used the same font. Now I had the text for both of my labels done.

I wanted to add some type of image and settled on arrows. I would put one arrow facing the back of the tray for incoming and one facing the front of the tray for outgoing. I found an image I liked in Design Space by clicking on the 'Images' icon, selected the one I wanted and inserted it into my Canvas.
![]()

Next, I sized my text to fit on the side of the trays.

Then I sized the arrow image to fit with that size.
![]()
I duplicated the arrow image by right-clicking on the image and selecting 'Duplicate'. I would put an arrow on each tray next to the text.
![]()
I reversed the direction of one of the arrows by using the little circle icon at one corner of the image and moving it around. I always try to line up the top of the image with a grid line on the Canvas to make sure it is straight, although it may not matter once it is cut out. That probably depends on the design itself.

Each arrow image had two layers, so I duplicated each one to create two of each, so I could separate the layers.

Then I proceeded to hide one layer on each image to prepare for cutting. I clicked on each image, one at a time, which highlighted a section in the right panel of my Canvas. I then clicked on the little eye symbol in the highlighted section to hide whichever layer I needed to in that section.
![]()
I would need one solid rectangle and one arrow cutout for each direction. I noticed that in each highlighted section, there was a black rectangle that was already hidden, so I did nothing with that.

The two layers for each arrow image were different colors, and I changed them to purple and green. Then I changed the text colors to purple and green.

I layered the arrow images again, then separated them and moved them into position with the text, so I could see how it would look at the end.

Then I separated them to prepare for cutting, switching them up a bit to show the colors how I wanted them in the arrows. Now I was ready to cut my design with my Maker. When I hit 'Make It', Design Space put the green parts on one mat and the purple parts on another mat.

When everything was ready, I stuck the green vinyl to my Standard Grip Mat, loaded the mat into my Cricut and pressed 'Go' to cut out the design. Then I removed the green vinyl from the mat and completed the same steps to cut the design out of the purple vinyl.

Here are both pieces of vinyl with the cut designs.

Next step was to weed both of them to prepare for application onto my trays. Notice my cute little vinyl scrap holder I found on Amazon. It works great.

Once the vinyl was all weeded, I cut the pieces apart for placing on the trays.


I applied transfer tape to each piece, using my scraper to rub the transfer tape onto both sides of each design piece. I had to layer the cut-out arrow pieces onto the solid rectangle pieces. It wasn't too hard to get them lined up evenly. After that, I could apply the two layered pieces onto the trays as one piece.
![]() For proper spacing on my trays, I decided to measure with a ruler and place a piece of painter's tape across the tray to line up the edge of the vinyl pieces where I wanted them. I tried to center the entire image along the edge of each tray.
For proper spacing on my trays, I decided to measure with a ruler and place a piece of painter's tape across the tray to line up the edge of the vinyl pieces where I wanted them. I tried to center the entire image along the edge of each tray.


One tray done!

I also measured the distance between the text and the image where I placed it on the first tray, so I could duplicate that spacing on the second tray.

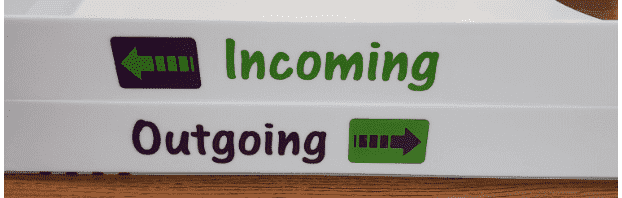
Here are both trays done and ready for use.

A few weeks after I had these trays done, I learned that we needed a few more for other purposes. Luckily, I was able to get more of the same trays to make them similar to these. This is why I always save my projects for future use. Then I can use the same font, colors and design for similar projects.
It's kind of nice to see things I've made being used in the office. It also shows that crafting isn't always just for fun. Sometimes it serves a useful purpose. Just in case we need to convince anyone that crafting is not a waste of time. But who would think that anyway?
I only buy craft supplies when I need them for a project - or because they're on sale - or I have a coupon I need to use - or because they're pretty - or because I want them.
Leslie
Small Business Bags using Cricut Smart Sticker Cardstock

Leave a comment