
Free Shipping
On Orders $49+
On Orders $49+

Here is a quick project you can put together for a Mother's Day gift. If you struggle each year to come up with gift ideas for your mother(s) like I do, you might like this craft idea. I am excited to make homemade gifts this year since I have a Cricut now, and this one is pretty quick to do. If you're pressed for time, this project might fit into your schedule.
Materials
Photo frames
Textured cardstock
Patterned cardstock
Washi tape
Cricut Maker or Explore Air 2
Standard Grip Mat
Cricut Fine Point Blade
Glue Arts GlueGlider Pro
I chose to go with 8 x 8-inch frames, and they were half price at my local Hobby Lobby. Score! I got one in black, one in white, and one in gold because I didn't want them to all be the same. I even knew which mother would get which color.
Although I had some cardstock and packs of designer paper at home, I bought a package of 8 x 8-inch patterned cardstock and some textured cardstock in soft colors to fit the look I had in mind.

My idea was to have the textured cardstock on top with a cutout image and a patterned paper underneath to show through. Then I wanted to include a Bible verse and an embellishment of some kind. I recently discovered washi tape and wanted to try using it. This stuff is awesome! Where has it been all my life?

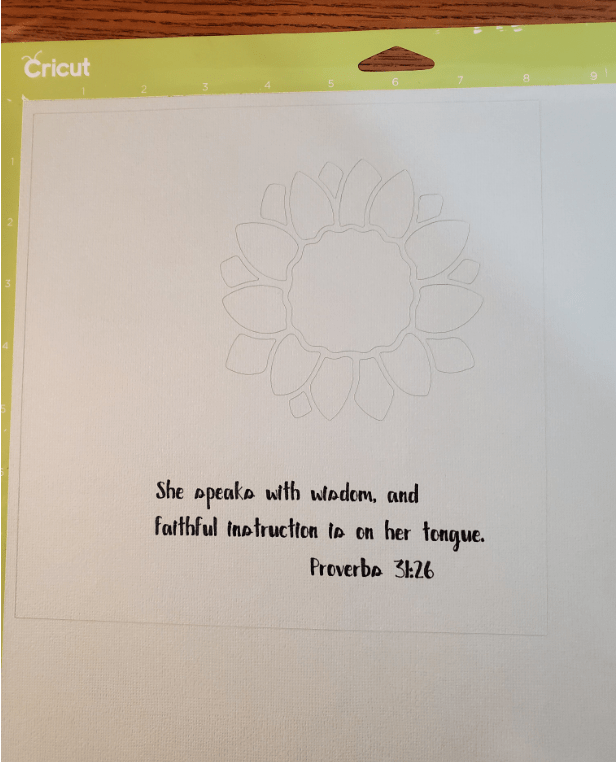
Next, I chose a Bible verse to print on the textured cardstock. I wanted to do something with Proverbs 31 because it lists the qualities of a virtuous woman, and that seemed perfect for Mother's Day. I chose a portion of the text for each mother that seemed to fit them.
I made a sample project first to try out using both the Cut and Draw functions in the same design. I found out it works great. However, I was not able to get the cutout and the text onto my cardstock square in the position I wanted them.
Since Design Space always cuts/draws things at the left, the text printed way to the left instead of over to the right where I wanted it. I had intended to put the washi tape vertically along the left side and then horizontally below the flower cutout and above the text. With the sample, I ended up putting the washi tape on the right side, which would have been fine, but the text was right up against the frame on the left side. It didn't look right, and I was not happy with it.

I got some help from Beth here at the office since she's been using a Cricut longer than I have. I was now ready to make my actual gift projects. Instead of redoing the sample one, I started a new one to document my process and because it sounded like more fun. I will redo the other one later. Procrastination is alive and well, apparently.
First I chose the colors and patterns of cardstock and the washi tape I intended to use for my first frame.

Then I was ready to create my design on the Design Space canvas. I started out with the Bible verse I had chosen for my mother, as this first project would be for her. I opened a Text box and started typing. However, the text was so large, it was distracting.

I could have typed the entire text and then resized it, but I didn't want to do that, so I reduced the font size right away. It was set at 72, and I reduced it to about 20, which made it much more manageable.


I finished typing my text and spaced over for the the Bible verse reference because I wanted it farther to the right.
Please note that you must hit 'Enter' when you want to continue the text on the next line in the Text Box. Sometimes, it takes a few tries to get all the words where you want them.
Next I selected a font I liked. In order to use the draw feature, I chose a Writing font in Design Space. I clicked on 'Filter' up by the Search Fonts field and selected Writing from the drop-down before looking for the font. I chose the 'Karley Sketch' font for this project.

I also went ahead and selected 'Pen' from the Operation drop-down above the canvas while I was in the text box. This tells the Cricut to draw the text instead of cutting it.

Now I was ready to size the text to fit inside an 8 x 8-inch square along with the flower. It's better to do this after choosing the font because some fonts are larger than others.
I moved the text farther down on the canvas to make room for the cutout image. I now had to choose a design for the cutout. A flower seemed like a good choice, and I thought a silhouette image would be the easiest to cut out of the cardstock.
![]()
I clicked on 'Images' to the left of the canvas, which pulled up Cricut Access. I typed 'flower silhouette' in the search box and scrolled through the images until I found a flower I liked that wasn't too simple. I selected it and inserted it into my canvas.


Notice that the flower image had two colors. Those were two layers, and the Cricut would want to cut them out separately on different mats. I could not slice the image out of the background square like that because you can only slice with two layers. There would have been three counting the background square. I selected the entire flower and clicked on 'Weld' at the bottom right of the canvas. This changed the image to one color and therefore one layer.

Now it was time to position everything where I wanted it. I created an 8 x 8-inch square in Design Space as the background. I started the square at the top left corner of the canvas. As I sized it to 8 x 8 inches, it covered up the flower, so I could no longer see it. The square became a new layer right over the top of the flower.

To view the flower again, I right-clicked inside the square and selected 'Send to Back'. This moved the square behind the flower, so I could position it. Thanks, Beth.

I moved the flower to the position I wanted and then moved the text into the box. However, it went behind the box, so I had to send the box to the back again to view the text. Then I was able to position it where I wanted it.


Now I needed to set the flower image to be cut out of the square, and this required the Slice function. I usually do a Google search to refresh my memory on how to do this.
I held down the Shift key and clicked on the square background and then on the flower. This enabled the Slice function, so I clicked on that next (It was previously grayed out). This is located on the bottom right of the screen in the Layers panel.
Slicing actually creates two layers to be removed. Think about how the yellow flower was on top of the black square. Each one is a separate layer. I moved these over to the right of my canvas and removed them by clicking on the 'X' at the top corner of each, as they were not needed for this project.

Here is what it looked like in the Layers panel to the right of the canvas.

Do you see the little eye symbols next to each layer? I clicked on those to hide them in the Layers panel. I left only the Basic Cut of the black square with the white flower along with the text in the Layers panel.
Here is what the canvas looked like with just the square and the flower cutout, along with the text.

The last step before drawing and cutting was to attach everything so it would draw and cut exactly how I had it positioned. I held down the shift key and clicked inside the 8 x 8-inch box, on the flower and on the text. Then I clicked 'Attach'. This would also cut the textured cardstock into the 8 x 8-inch square with the Cricut, so I didn't have to do that by hand.
I loaded my cardstock onto the cutting mat (Standard Grip), making sure it was even against the lines on the mat, so the square would be cut straight. Then I loaded the mat into the machine.
I selected 'Make It' in Design Space and chose my material. I browsed all materials to find cardstock. Then I needed to choose light, medium or heavy cardstock. Oh, dear. I didn't think of that. What kind did I have?
I looked at the cardstock package, but it did not specify the weight. It didn't feel extra heavy or light, so I just chose medium cardstock, and it worked fine. Very scientific, right?

When I was ready to cut and draw, I inserted the Cricut pen into the machine in the left slot. It went in easily and clicked into place. I used the black 0.4 fine point pen that came with my machine.

I pressed the arrow button on the Cricut to pull the mat in and then pressed the Cricut symbol button to cut and draw my design. Then I sat back and watched the machine do its thing. It was so interesting to see how it wrote the text. It did not form each letter completely at once; it did portions of the letters in one pass and then other portions with another pass. Way cool.

Once the text was written on the cardstock, the Cricut was ready to start cutting. It appears that the machine will always write the text first and then make the cuts.

It cut out the flower first and then the outer square.
After my design was cut and drawn on the cardstock, I removed the cardstock around the outside of the square and then removed the square with the cutout and text from the mat. I did this very carefully to avoid ripping any of the thin pieces inside the flower or putting creases in the cardstock.

The cutout pieces of the flower were left on the mat. I found it easiest to remove these with a spatula. I had to be gentle with this, so I didn't scratch the mat. I had already done that enough before.

You can see that my cutting mat is not in good shape. I think I ruined it by trying to weed iron-on vinyl for previous projects with the carrier sheet still attached to the mat. Maybe I pressed too hard with my weeding tool. I won't be doing that again. It's time to get a new mat, I guess, but this one should have lasted longer. My bad.
Now I was ready to place the completed cardstock square over the patterned paper that would go behind it to see how it would look.

I had chosen some patterned paper from a package I already had, but when I tried it out, I didn't care for it. It looked nice, but the color was too similar to the cardstock, and it just didn't give me the look I wanted.
I decided to try one of the patterned papers I had purchased, and I liked that better for this project. The colors seemed to fit in with Spring a bit more.

Now that I had changed the background paper, the washi tape I had chosen did not match, so I changed that, too. The new one was narrower, so I decided to put several pieces along the side instead of just one. I placed it on the cardstock, reapplying it several times to get it straight. It's so great that you can do that, and it doesn't lose its stickiness!

I attached the cardstock to the patterned paper using Glue Arts' GlueGlider Pro Plus, but I did not apply tape too close to the flower cutout. I liked the look of the cardstock coming up off the patterned paper underneath it a bit.

Then I put it all in the frame, and it was done.

I was really pleased with the end result. The flower cutout seemed like it could have been positioned a little higher and to the left, but maybe it's better a little off-center. Everything doesn't always have to be even. At least that's what I'm telling myself.
After completing the first project, I had the process down, so it didn't take me long to do the other two for my "bonus" mothers. I think they turned out just as nice.

When I redid my first sample project (above), I added another shorter piece of washi tape to it because I didn't like the blank space between the flower and the other piece of tape. I liked it much better this way. I used the 'Kickball' font for this project and found the flower image in Cricut Access.

My favorite is this one with the tulips in the black frame. I got the idea to position the washi tape differently, and I loved the look of it. I did have to do a bit of measuring to make sure each corner was the same. The font for this one is called 'Pajamas', and again, the flower image was in Cricut Access.
Now I just have to wait to give them to my mothers. I have never been prepared for Mother's Day this far ahead of time. It feels great, but I'm anxious to see how they like them.

These almost didn't seem like enough for gifts, probably because they were so quick and easy to make. But I did purchase the frames and cardstock, spent time on the designs to get them just right, and put thought into what Bible verse I would include for each of the moms. With all that considered, these really are special gifts, and I think they will appreciate my efforts on their behalf.
Can you see how easy it is to create something quickly with your Cricut and still end up with something special to give as a gift on Mother's Day?

Leave a comment