
Free Shipping
On Orders $49+
On Orders $49+


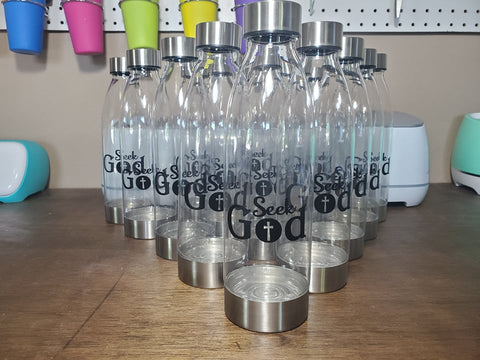
I was asked to do a project where there would be 15 of the same water bottles. Using the Smart Vinyl made it super quick work. Not having to put the vinyl on the mat and being able to just cut right away was so convenient. These 15 bottles didn’t take up a lot of vinyl but I could imagine having to do a ton of bottles for a sports group or family reunion and it would be nice not having to switch mats all the time.
Supplies:
Cricut Maker 3 or Explore 3
Cricut Smart Vinyl
Transfer Tape
Cricut Tools
Water Bottles

I started by creating the design in Design Space. I just used text and picked a font that I wanted for each word. I then ungrouped the word God and selected just the o. I clicked on contour and I unselected the middle of the o. I found a cross and placed it in the middle of the circle that was the o. I selected both the circle and the cross and sliced. I deleted all the parts I didn’t need. I then selected the entire thing and welded it all together.

Then it was time to size, duplicate, and cut. I measured the space I had to work with on the water bottle. I sized the design accordingly. I duplicated the design 15 times. And clicked Make it.

It will then ask ‘How will you load all of your materials for this project?’ Without Mat (for Cricut Smart materials only) and On Mat (for any material).

Next, it will show how the images will look on the vinyl. Here is where the images can be moved around or mirrored if necessary.
The next screen is to select the material. I selected Smart Vinyl-Permanent.

Now it is ready to go. I held the end of the vinyl roll up against the rollers and clicked the load button. It grabbed the material and checked to make sure I had enough vinyl for the cut. Then the cut button started flashing and I pressed that. It began cutting.

Wow is it fast!
After it was done the load button flashed and I clicked that and the material unloaded. I cut a straight line underneath my design so that it was ready for the next cut.

I weeded the entire thing at one time. I could have cut each one individually and weeded them separately.

I cut a piece of transfer tape to the size of one of the decals. I peeled the back off the transfer tape and placed that on one of the images.

I used a scraper to burnish the front and back side so that the vinyl would really stick to the transfer tape.

Then I flipped it over and carefully peeled off the backing.

I lined it up on the bottle and gently set it down.

Using my fingers, I firmly pressed down on the vinyl to get it to stick to the bottle.

At a sharp angle I pulled off the transfer tape leaving the vinyl decal on the bottle.

I continued this until all 15 of the bottles were done. I actually used the same piece of transfer tape for all 15 bottles!
Not having to put the vinyl on a mat made this project go super quick! Think about all those big group projects you could do so much quicker with Smart Vinyl.
* I was being so good at the Craft Store. I really was. But then I got out of the car and went in.
~Beth
How to Make A Custom Coffee Mug with Cricut Joy

Leave a comment