
Free Shipping
On Orders $49+
On Orders $49+
Why not create a Thanksgiving table runner with your Cricut machine this year? I made one for my table using Everyday Iron-On applied to burlap, with fabric as the base. My fabric had a pattern of leaves in fall colors. The table runner turned out very well, and I am anxious to use it for the first time. This project does include some sewing for those of you who enjoy that, but you could make a version without sewing.
I already had a roll of burlap I had picked up to use for an undetermined future project. This was something I had not worked with before. All I needed was some fabric for the backing and some Everyday Iron-On Vinyl. And, of course, my Cricut Maker and my sewing machine. Okay, maybe a few more things, too.

Materials:
A length of burlap (mine was 5 1/2 inches wide)
Cricut Everyday Iron-On in fall colors
Cricut Maker, Explore or Joy
Standard Grip Mat
Cricut EasyPress 2
Cricut EasyPress Mat
Cricut Tools (brayer, weeder, tweezers)
Parchment paper
Ruler
Pins
Optional Materials:
Fabric in harvest colors (I used 3 yards for my 4' x 7' table)
Sewing machine
Thread
This project includes some instructions for the sewing portion; however, I put those at the bottom for anyone who is interested. If you are not a sewer, you can start right at the top with the Cricut instructions. You could make a table runner with just the burlap or a different material or perhaps attach the burlap to a piece of fabric or felt without finishing the edges. Use your imagination and make it your own!
CRICUT INSTRUCTIONS
To create some designs to put on my table runner, I went into Design Space and started selecting images. They were easily accessible through the 'Images' icon on the left panel.
![]()
I first chose a turkey image I liked and inserted it into my Canvas. Then I selected some other images, such as a cornucopia, a leaf, a pumpkin and several more. I chose images that were only one layer, more like silhouettes, so they would be easier to iron onto the burlap.

Since my table runner was so long, I decided to use each image twice but make them in different colors for each side. I folded the table runner in half and measured the center, marking it with pins. This helped me determine how many images I would need. I ended up with 9 images spaced evenly on each side. These would all be visible on top of the table.

In Design Space, I made a copy of each image by right-clicking on it and selecting 'Duplicate'. Then I chose 9 different colors to correspond with the colors of Iron-On I had and applied each color to two different images. I would place the images on the table runner in a different order on each side.

I also decided to place an image on the bottom edges of the table runner that would hang down from the edge of the table. I chose the words, "Grateful, Thankful, Blessed," centered them like a list, and made them all the same color.

With all the different colors I was using, I ended up loading my Cricut mat and cutting out designs 10 times, one mat for each color. I left the words for the bottom edges of the table runner black, even though I would cut them both out of dark green. I wanted to cut them separately from the other dark green designs.

For each color, I had to make sure I mirrored my image, so it would be facing the right direction once I ironed it on. These were mostly images and not words, but I always mirror my images when using Iron-On to create a habit, so I never forget to do that.

Now I proceeded to cut out my designs from each color of Everyday Iron-On. I placed each color onto my mat and smoothed it out with my brayer to make sure there were no bubbles underneath. (The Iron-On always goes on the mat with the shiny side down). Next, I loaded the mat into my Cricut and pressed 'Go'.

I weeded each design with the Iron-On still adhered to the mat, then removed them from the mat and cut the designs apart.

A trick I always use when removing Iron-On or Vinyl from a mat is to turn the mat upside down and pull the mat off the vinyl while holding the vinyl down onto the table. This helps keep the vinyl from curling up.

Once I had all my designs cut and weeded, I was ready to adhere them to the burlap on my table runner. I folded the entire table runner in half and put some pins along the fold line to easily see where each section ended. Then I began to lay my designs on the burlap to see how far apart to space them so they would look even.

I stuck a pin into the edge of the fabric in line with where the bottom of each design would be applied for proper placement. I would remove the designs in order to preheat the burlap with my EasyPress.

Using the Cricut Heat Guide to determine the proper temperature, I set my EasyPress to 305 degrees to preheat it. This temperature was determined by the Heat Transfer material I was using and the base material it would be adhered to, in this case Everyday Iron-On and Burlap.

After preheating the burlap, I placed two designs on it for heating, as that is how many would fit under my 9 x 9-inch EasyPress at one time. Each set of designs required heating for 30 seconds on the top of the Iron-On and 15 seconds on the back side.

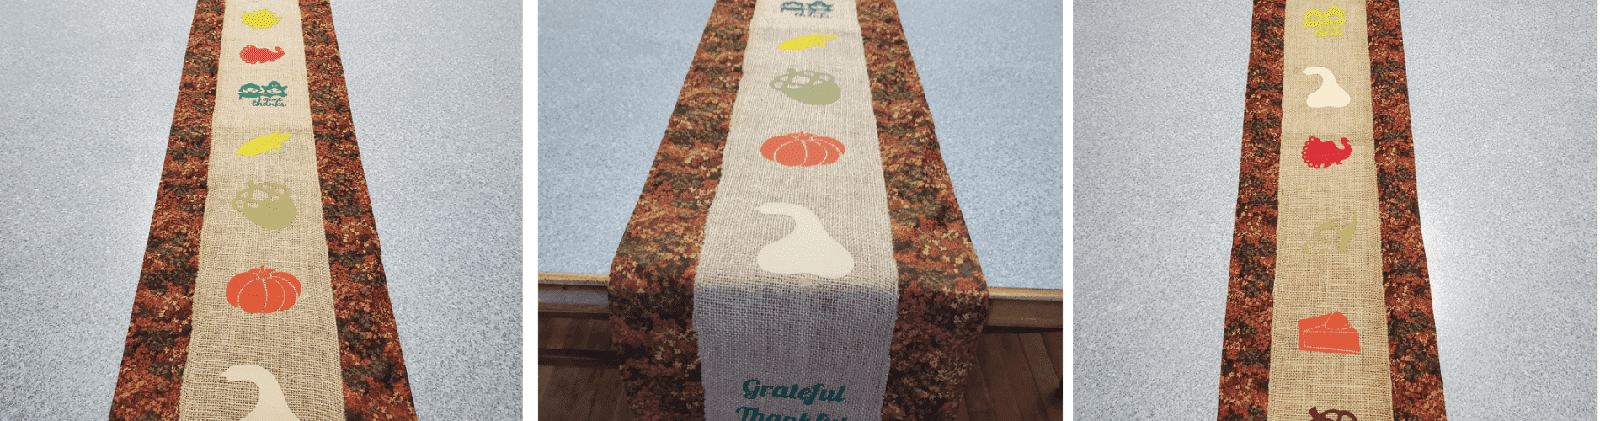
I continued applying two designs each time until one side of my table runner was completed. I made sure my EasyPress Mat was under each set of designs before I ironed them on. Here is a picture of a few designs applied.

After applying the cornucopia design, I noticed that it did not show up well at all because it was almost the same color as the burlap.

I was not happy with this, so I knew I would have to do something about it. I had never removed Iron-On that was already applied, but I knew that it could be done. I thought it might be more challenging to do since it was applied to burlap.
I learned that this would require heating the Iron-On from the bottom and then pulling the burlap off from the top. I would use my EasyPress Mini to make sure I only heated the one design I needed to remove. I started by preheating the Mini Press to medium.

Once it was ready, I placed it underneath the table runner directly behind the tan cornucopia I wanted to remove and wrapped the rest of the fabric around it, pulling it as tight as possible.

I held the Mini Press against the fabric behind the design for a minute or so to heat the vinyl and then started to pull it off with a weeder.

I continued doing this, pulling off more vinyl as I went. It actually worked pretty well, and the vinyl (Iron-on) came off quite easily.

I took my time doing this so as not to pull too hard and ruin the burlap. Here it is with almost all of the vinyl off.

Once I had all the vinyl removed, it looked pretty good. I couldn't even tell that there was ever anything in that spot.

Now that I was successful in removing the design from my table runner, I needed to replace it with the same design in another color that would show up better. I had a roll of Everyday Iron-On in Olive, which I thought would work. It was not too dark, but it fit in with the other colors I was using.

I also had to go into Design Space to recut the cornucopia out of the Olive Iron-On. The acorn image I was using I had also cut out of the tan colored Iron-On, but that one was for the other side, so I had not ironed that one on yet. Since I needed to recut that one as well, I cut those two designs on my Cricut together on one mat, just like I had done previously.
Here are the two new designs cut out, along with the tan acorn I had been planning to use.

I placed the new cornucopia on my table runner where the tan one used to be, so I could iron this one on.

I had to be a bit more careful this time, as the designs on either side of it were already applied, and I did not want to overheat those. I planned to use my larger EasyPress again, so I placed some pieces of parchment paper over the top of those other designs to protect them.

Then I went ahead and ironed on the new design. I was not concerned about the other designs when I turned the fabric over and heated the other side.
Here is the new cornucopia applied. It does show up better than the other one, although it's not very dark. But I was okay with that because I was trying to vary the colors between light and dark along the burlap.

Here are some images of the other designs I applied.


I finished ironing on all the designs on the second side of the table runner, using the same procedure. I took a close-up of two designs to show how the weave of the burlap shows through the vinyl a bit, which is a good way to tell that the Iron-On Vinyl is applied well enough. Unfortunately, this does not show up well in the photos.


Here are the words I applied on either end of the table runner, the parts that will hang down from the edge of my table.

And here is one half of the entire table runner. I hung it up to allow a view of one entire side put together. After taking this picture, I decided the door really needs to be painted. How did I not notice before how bad it looks? Too funny.

And here is most of the table runner on my table. It's hard to get a good picture of the whole thing because it's so long. I am ready for Thanksgiving now.

I am excited to be able to use this table runner when the time comes. Thanksgiving seems a bit far away now, but I know it will come fast.
#############################################################
SEWING INSTRUCTIONS
I used the entire 3-yard length of fabric purchased to fit my table but only half the width. I cut it in half along the fold line and sewed the entire length of one half together into a tube with right sides together. Then I pressed the seam open and turned the tube right side out.

I centered the seam using a ruler to keep it even. This seam would be on the bottom of the table runner.

Next, I turned under the raw edges of the fabric on each end and pressed them under about 3/8 of an inch.

I pinned the edges together in preparation for stitching.

To finish the fabric portion of the project, I topstitched around all the edges of the table runner, removing the pins as I sewed the two ends.

Now I was ready to measure the burlap roll to fit on the fabric. At this point, I discovered that the roll of burlap was adhesive on one side. I did not realize that when I bought it, and I had not opened it yet.

Instead of applying the images to the burlap and then sewing it onto the fabric as I had originally intended, I would first attach the burlap to the fabric and then apply the Iron-On images.
I wanted to sew the burlap onto the fabric, but this could be a problem with the adhesive backing. Sewing over adhesive usually does not work. The adhesive sticks to the needle and sometimes causes it to break. I would have to figure out a way to make it work, unless I wanted to remove the burlap from the fabric before washing the table runner. I would deal with that later.
Next, I unrolled the end of the burlap and laid it over the fabric, using a ruler to make it even on either side. I measured and inserted pins to use as a guide for placement of the burlap.


When all the pins were in place, I pulled the backing off the burlap at one end and began adhering it to the fabric, placing one edge of burlap along the pins.

I continued pulling off the backing and adhering the burlap, making sure the burlap was smooth as I went, cutting off the excess backing when it became too cumbersome.

I finally had the burlap adhered to the entire length of the fabric, and I cut the end off the roll, which still had some remaining burlap on it.

Now I was able to remove the guiding pins I had placed in the fabric.

There seemed to be a lot of extra threads of burlap sticking out. I didn't like how that looked, so I trimmed off the excess with a scissors.

Now I tried to sew the burlap to the fabric table runner despite the adhesive on the back of the burlap, which did not work, of course. I did some research and ordered some special sewing machine needles, some covered with titanium and some anti-glue needles, both made by Organ.

I also ordered a lubricant called "Sewer's Aid" in case that was needed. I was determined to make this work one way or another.

I had success with the anti-glue needles and got the burlap sewn to the fabric with no problem. At first, I used the lubricant along with the needles but then tried to sew the burlap on without it, and it worked just as well. Those sewing machine needles are fantastic. I am so glad they worked for me.
Here is how the table runner looked on the back after stitching on the burlap. You can't really see the stitching from the front because I matched the thread to the color of the burlap.

And there you have it, a completed table runner.
Thank you for hanging out for this very long post. I hope you learned something today or were inspired to create something new.
Leslie
Easy Thanksgiving Cards With Watercolor and Cricut Pens

Leave a comment