
Free Shipping
On Orders $49+
On Orders $49+


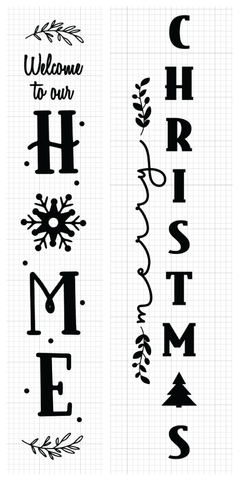
A front porch sign can add so much to an otherwise bare space. These are a bit time consuming, but fairly simple to make. I don't have many outdoor decorations for Christmas/winter, so this is the theme I decided to go with.
Materials Needed:
• wood board
• mod podge
• acrylic paint
• ribbon & glue (optional)
• Cricut vinyl
• Cricut transfer tape
• Cricut die cutting machine
• Cricut tools
Directions:
1. Prepare the board
Sand the board and wipe off the dust before painting. I wanted it to have a rustic feel, so I first painted mine in black. Then I did two coats of white and lightly sanded it to get the desired look.
2. Put together your designs
I decided to go with a Christmas theme for one side and a general winter theme for the other. I usually work in Adobe Illustrator to make my designs, but you can also put together or buy designs in Design Space. There are also a lot of free SVG files out there. For the winter "Home" side, I did buy this SVG and added some additional text to it.
Size your designs accordingly to the size board that you have.
3. Cut Vinyl
Since the designs are so large for these, I cut my design in several pieces and then took my time measuring where they go. However, if you have a Maker 3 or Explore 3, you can use Smart Vinyl to cut the whole thing.

3. Transfer
Use transfer tape and apply the vinyl. Again, if you had to cut in separate pieces like me, take your time measuring to make sure your design is right where you want it. Use a scraper or brayer tool to smooth your vinyl down.

4. Mod Podge
Apply Mod Podge over your stencil. This will help prevent the paint from bleeding. Let it dry all the way before painting.

5. Paint
Apply paint after the Mod Podge has dried. I did a couple coats of paint to get my desired look. Then let the paint completely dry before removing the vinyl.

6. Touch Up
When removing the vinyl, it peeled up some of my white paint so I repainted some areas. I also needed to touch up a couple areas on my letters. I also did a coat of Mod Podge over the whole board to help seal it.
7. Embellish
I added a ribbon to my Christmas side using tacky glue.

Winter Pillow Cover DIY Using Cricut Iron On
Leave a comment