
Free Shipping
On Orders $49+
On Orders $49+

Have you heard about the new Cricut 2x2 Card Mat? This is a game-changer; we can now make multiple insert cards with Cricut Explore and Maker series machines. When I needed thank you cards, I knew this was the perfect opportunity to try the 2x2 Card Mat.
Materials:
Cricut Maker or Explore
Cricut Card Mat 2x2
Cricut Cutaway Cards or Insert Cards
Cricut Tools
Cricut Pens
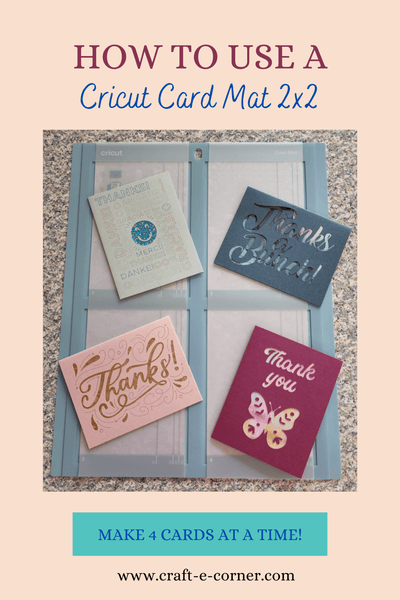
The 2x2 Card Mat is similar to the Joy Card Mat, only bigger. The great thing about the mat is you can create up to four cards in one project in Design Space. Here is what the mat looks like.

The card mat has two liners on each side that must be removed before inserting your cards.

Along with the 2x2 card mat, Cricut created more card sets in different sizes, larger rectangular cards, and square cards. These sizes are available in both insert and cutaway cards, providing many options.

The cards are numbered differently now to be more universal. R10, R20, R30, and R40 for the rectangular cards and S40 for the square cards.

The larger can only be used in the 2x2 card mat now, as they are too big for the Joy card mat.
For my thank you cards, I used some previous A2-sized Cutaway Cards in the Marina and Corsage Samplers, but regular Insert Cards would work, too. I switched out two inserts for some glitter cardstock and glitter paper I had on hand for my cards. I used the Cricut inserts as a pattern to cut them out.
I wanted two predesigned cards and two with my own designs. I first searched in Images and Project Type and chose "Cards." Then I scrolled through to find two I liked and inserted them onto my Canvas.

Then I looked under Projects, and Cutaway Cards to find a customizable template, selected the correct size for the cards I was using, and inserted that onto my Canvas to create my other two designs.

Once my designs were picked out and created on my Canvas, I got my cards and the 2x2 card mat ready.

I grouped and attached the designs to cut them all on the mat in one project.

Tip: Design Space will want to cut different colored designs on different mats. If you don't want that, change all the designs to one color.
One way to do this is using Color Sync under the Layers Panel on the right. It will show the different colors of your designs, and you can just drag them all into one color.

You can still use whatever color cards you want on your mat for each one, and your machine will never know!
Since I was using cutaway cards, I removed the adhesive liners from the insides of the cards.

Then I stuck the inserts onto the cards over the adhesive with the patterned sides down, so they would show through the front of the cards once my designs were cut out.

I placed the cards into the card mat and used a weeder tool to pry up the plastic for the card to slide under, as it was pretty tight to the mat.

Unfortunately, my glitter inserts were not sticking well to the adhesive on the card or the mat. I knew if I ran them through the machine like that, the cards would shift, and the designs would not cut properly. I removed those two cards from the mat to replace the inserts.

The inserts came out of the cards easily, but getting them off the card mat was challenging, as it is quite sticky. I had to use my Cricut spatula to get some of it off. The glitter paper stuck to the mat more than the glitter cardstock did.
Tip: Glitter cardstock and glitter paper may not work well as inserts in Cutaway Cards.
I still wanted to use different inserts, so I cut new ones out of some patterned cardstock I had on hand. I stuck those inside the two cards and was ready to go.

I placed the four cards into the card mat again and used my brayer to adhere them well. I had no problems this time.

I inserted the card mat into my Cricut Maker 3 and hit "Make It." I selected Cutaway Card + Backer as my base material.

Design Space also instructed me to move all the star wheels on my Cricut to the middle of the mat, so I did that. This will prevent any markings on the cards.

Notice how Design Space shows both processes, Pen and Basic Cut.

Design Space will always draw first.
 As prompted, I inserted the first pen, and the Cricut began drawing on the cards.

Design Space prompted me to change out the pen for each color.

Once all the drawing was done, my Maker 3 began cutting the card designs.

When the cards were done, I unloaded the mat from the Cricut and removed each card, turning the mat upside down and pulling it off the cards to try not to bend them.
This may not work well since the card mat is so thick. You can also use a scraper or spatula tool to carefully loosen the cards from the mat and pull them up slowly.

It was time to weed out parts of the design to show the insert cards underneath. I did this carefully, using a weeder tool to start each piece and finished with my fingers.

Here are all four cards completed.

You can see the designs I created myself are simpler and only include cutting. I prefer to use pre-existing designs to save time for more complex designs.
It was so great to make four cards at a time! It would be even quicker when making invitations or other identical cards. You could create one design and duplicate it to fill the 2x2 mat.
My next plan is to create birthday cards for my family in advance. What kind of cards would you make with the Cricut Card Mat 2x2?
While doing this project, I watched videos and read blog posts to make sure I knew how to use the new card mat correctly. I came up with 22 tips I wanted to share, but it was too much to include here, so I created another post with a free reference guide: 22 Tips for the Cricut 2x2 Card Mat with a Free Downloadable Guide.
If you prefer, you can access the guide right from here. I hope you try out the new Cricut Card Mat 2x2 soon. I know you'll love it!
We must find time to stop and thank the people who make a difference in our lives. (John F. Kennedy)
Leslie
How to Upload SVG's to Design Space to Make a Cricut Joy Card

Leave a comment