
Free Shipping
On Orders $49+
On Orders $49+

Display your favorite crafting quotes by creating your own photo cube with your Cricut. This was my creative solution for all the quotes I loved but didn't have room for in my craft room. I thought of using a square box of some sort and putting each quote on a side, which would allow me to display six quotes. I started searching online and found some photo cubes. I had never used one of these, but they seemed like the perfect solution for my needs.

If you don't know what a photo cube is, it is simply a clear acrylic cube with a cardboard box inside to apply photos to. The cube itself comes apart into two pieces for insertion of your photos, or in my case, quotes.
The most popular size I saw was about 3.5 inches, but I wanted mine a little bigger. I was able to find one on Amazon that measured 4 inches on each side, so I ordered that one. Now I wish I had ordered more, but I can always do that later, like maybe tonight, as soon as I get home, before I make supper. Hee-hee.
Okay, on to the project.
Materials
Acrylic photo cube
Cricut Maker, Explore or Joy
Standard Grip Mat
Scrapbook paper
Cardstock
Cricut Pen
Tape or glue
Cricut Paper Trimmer
OR
Ruler and Scissors
First, I selected the scrapbook paper to stick to the sides of the photo cube as the background. I just happened to have some glitter cardstock on hand with a tie-dye design in pastel colors, and I decided to use that on all sides of the photo cube. I varied the colors of cardstock for each quote. You could use any type of paper with any design you like, or even just a solid color for the background.
I measured one side of the cardboard cube insert to create a pattern for cutting out the glitter cardstock. Then I cut a square piece for each side and adhered it to the cardboard cube with some two-sided tape. Glue would also work. Here is a picture of the acrylic cube taken apart with the inner cardboard cube decorated.

And then a picture of the decorated cardboard cube inside the photo cube.

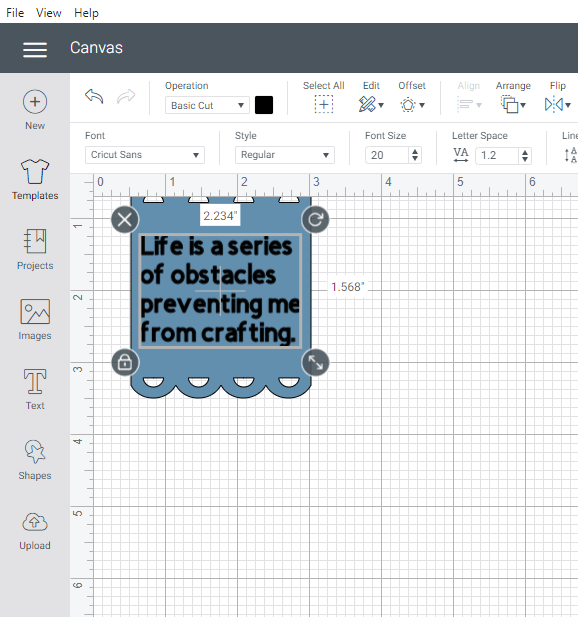
The next step was to create a shape to write the quotes on to apply to the cube. I chose a banner image from Design Space with scallops on the top and bottom. I inserted it onto my Canvas and sized it to fit on the side of the photo cube.

Then I duplicated the banner to create a total of six banners, one for each quote I wanted to include. I just right-clicked on a banner and selected 'Duplicate' as many times as needed.

I wanted to have a different color for each banner, so I changed the colors of all of them in Design Space, so the Cricut would know to cut them out separately.

Now I opened a 'Text' box on my Canvas to write out each quote. I started typing my text and then decreased the font size, so I could see how to fit them on the banners.

I clicked back on the text box to continue. I also chose a different font for each quote, just because I could, and to give me the variety that I crave. Because the Cricut would draw the text instead of cutting it, I had to choose Writing fonts in Design Space. When you search fonts in Design Space, you can filter the fonts to find Writing fonts.

It took me a bit of time to decide how many words to have on each line, so the quotes would look good centered on the banners.

I placed the whole box of text over the top of the banner to see how it would look. Sometimes you have to right-click on the banners and send them to the back in order to see the words on the front of the banners.
I like how Design Space kept the box around the text. It made it easier to center it on the banner. I made the necessary dimension adjustments to fit the text in evenly. I proceeded to type and format each quote until I had all six ready to draw and cut with my Cricut.

I measured the solid colored cardstock to cut the size I needed for the machine to cut. I could have used my Cricut Paper Trimmer for this, but I just did it by hand because I didn't need very big pieces cut.

After I cut the first one out, I used it as a pattern to draw around and cut out the rest of the colors instead of measuring each one.

Now I was ready to start cutting out the banners and drawing the quotes on them with my Cricut. Here is what Design Space showed after I clicked on 'Make It'.

Notice how each mat template showed 'Pen' and 'Basic Cut'. Those are the operations chosen for the text and for the banners. This means that two functions would take place on the Cricut for each mat/color.
I stuck the first piece of cardstock onto my mat and inserted it into my Cricut. Then I inserted a black Cricut pen, making sure it clicked into place.

With these draw and cut projects, I find that the Cricut always draws first and then cuts. I took a picture of the process of drawing as seen in Design Space.

I also took a picture of the cutting in progress. You can easily see which function is taking place on the Cricut at any given time.

Here is the first banner drawn and cut.

To remove the banner from the mat, I turned the mat upside down and pulled it away from the banner instead of pulling the banner off the mat. This helps keep the cardstock flat, so it doesn't curl up.
Here is another banner removed from the mat. The little pieces of cardstock inside the scalloped edges were easy to remove from the mat using a Spatula. Just be careful not to scratch your mat. I've done that before.

When I tried drawing on one piece of cardstock, it did not work properly. The Cricut will draw parts of letters in sections, but it doesn't usually draw complete letters and leave some undrawn. I knew that, so I canceled the cut before it was done.

I discovered that I had not chosen a Writing font for that particular banner, so I had to change the font and redo it. Try not to make that mistake, especially if you are in a hurry.
Once I had all the banners cut out with the quotes drawn on them, I was ready to attach them to the cardboard insert for the photo cube.

I took the photo cube apart and removed the cardboard insert. Again, I used two-sided tape to attach the banners to the sides of the photo cube instead of using glue, but either would work fine. I don't really like using glue because it tends to be messy, and I am concerned that it won't hold well.
I centered each banner on the cube mainly be eyeballing it. I wasn't quite as particular as usual, since this project was just for me, and there wasn't a lot of extra space on the sides of the photo cube to deal with.
And here is a picture of each side of the photo cube with all the banners inserted. I think the whole thing turned out really cute, and it was not a hard project. Sometimes it's nice to do something a bit simpler for a change.

To make it even simpler, you could have your Cricut draw the quotes right on the square background pieces before gluing them onto the cardboard insert. Of course, you would not want to use glitter cardstock for your background then. I don't think the Cricut would draw very well on that.
I like my little photo cube with quotes so much that now I want to make more. I enjoy sewing, too, and I have seen lots of cute sewing quotes. I also like motivational or inspirational quotes, so I could end up making a lot of these cubes. What about you? What types of things would you like to put in a photo cube - besides photos? It's fun to think outside the 'box'.
I'm off now to choose more of my favorite quotes and to buy some more photo cubes. See you next time!
Leslie
Pet Bowl Memorial with Cricut Vinyl

Leave a comment